Asus NCCH-DL Disk Array & Driver Installation Guide English Version - Page 8
Array Type > RAID 0 Stripe
 |
View all Asus NCCH-DL manuals
Add to My Manuals
Save this manual to your list of manuals |
Page 8 highlights
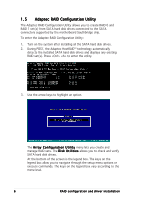
4. When all the drives required for a RAID 0 set appear in the S e l e c t e d D r i v e s field, press . 5. A message appears on screen, warning users that initialization will erase all array information on the drives. Press to proceed or press to abort creating the RAID 0 set. 6. After disk initialization, the utility displays the A r r a y P r o p e r t i e s menu. Select A r r a y T y p e > R A I D 0 ( S t r i p e ), then press . 8 RAID configuration and driver installation
-
 1
1 -
2
-
 3
3 -
 4
4 -
 5
5 -
 6
6 -
 7
7 -
 8
8 -
 9
9 -
 10
10 -
 11
11 -
 12
12 -
 13
13 -
14
-
15
-
16
-
17
-
18
-
19
-
20
-
21
-
22
-
23
-
24
-
25
-
26
-
27
-
28
-
29
-
30
-
31
-
32
-
33
-
34
-
35
-
36
-
37
-
38
-
39
-
40
-
41
-
42
-
43
-
44
-
45
-
46
-
47
-
48
-
49
-
50
-
51
-
52
-
53
-
54
-
55
-
56
-
57
-
58
-
59
-
60
-
61
-
62
-
63
-
64
-
65
-
66
 |
 |

8
RAID configuration and
RAID configuration and
RAID configuration and
RAID configuration and
RAID configuration and driver installation
driver installation
driver installation
driver installation
driver installation
5.
A message appears on screen, warning users that initialization will
erase all array information on the drives. Press <Y> to proceed or
press <N> to abort creating the RAID 0 set.
4.
When all the drives required for a RAID 0 set appear in the Selected
Selected
Selected
Selected
Selected
Drives
Drives
Drives
Drives
Drives field, press <Enter>.
6.
After disk initialization, the utility displays the Array Properties
Array Properties
Array Properties
Array Properties
Array Properties
menu. Select Array Type
Array Type
Array Type
Array Type
Array Type > RAID 0 (Stripe)
RAID 0 (Stripe)
RAID 0 (Stripe)
RAID 0 (Stripe)
RAID 0 (Stripe), then press <Enter>.