BenQ RM8602K DMS Local User Manual - Page 11
Adding Displays to DMS Local, Scheduling a Task for Your Displays
 |
View all BenQ RM8602K manuals
Add to My Manuals
Save this manual to your list of manuals |
Page 11 highlights
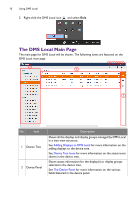
Using DMS Local 11 No. Item 3 Refresh 4 Add 5 Settings 6 User 7 Action Panel Description Click to refresh the status of the displays shown on the main page. DMS Local will automatically refresh the display status after a given interval of time. The refresh button is to allow users to get the most up-to-date information at any given time. Click to search for and add displays to the DMS Local management system, or to create groups for better organization in the device tree. See Adding Displays to DMS Local for more information on adding displays and display groups. Click to access various system management functions for administrators, such as error reports, e-mail alerts, database backups, and more. See Other Functions for more information on the system management functions available for the Settings button. Click to setup a login password for DMS Local. See Setting a Login Password for DMS Local for more information on setting up a login password. Provides various tools that allow you to further manage/ monitor displays and display groups, including the information tab ( ), control tab ( ), and the schedule tab ( ). See The Information Tab, Controlling Your Displays, or Scheduling a Task for Your Displays for more information on each tab in the Action Panel. The action panel only appears when a display or display group is selected in the device panel. The information tab only appears when a single display is selected in the device panel. Adding Displays to DMS Local In order to manage a display via the DMS Local software the display must first be added into the DMS Local device tree. Before adding any displays, it is suggested that you first update DMS Local's database of displays to ensure that DMS Local features the most up-to-date information regarding newly added displays, including their product names and available configurations. To update DMS Local's display database, follow the steps below: 1. Ensure that the computer running DMS Local is connected to the Internet.
-
 1
1 -
2
-
3
-
4
-
5
-
 6
6 -
 7
7 -
 8
8 -
 9
9 -
 10
10 -
 11
11 -
 12
12 -
 13
13 -
 14
14 -
 15
15 -
 16
16 -
17
-
18
-
19
-
20
-
21
-
22
-
23
-
24
-
25
-
26
-
27
-
28
-
29
-
30
-
31
-
32
-
33
-
34
-
35
 |
 |
