BenQ RM8602K DMS Local User Manual - Page 6
Initial Setup, Connecting the display(s) and computer to a network, Installing DMS Local, network
 |
View all BenQ RM8602K manuals
Add to My Manuals
Save this manual to your list of manuals |
Page 6 highlights
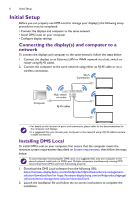
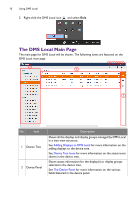
6 Initial Setup Initial Setup Before you can properly use DMS Local to manage your display(s) the following setup procedures must be completed: • Connect the displays and computer to the same network • Install DMS Local on your computer • Configure display settings Connecting the display(s) and computer to a network To connect the displays and computer to the same network, follow the steps below: 1. Connect the displays to an Ethernet LAN or WAN network via a hub, switch or router using RJ-45 cables. 2. Connect the computer to the same network using either an RJ-45 cable or via a wireless connection. Wi-Fi Connection Computer Hub, switch or router RJ-45 cables • For details on the location of ports and connectors, please refer to the documentations for the computer and displays. • It is suggested that you connect your computer to the network using a RJ-45 cable to ensure a stable connection. Installing DMS Local To install DMS Local on your computer, first ensure that the computer meets the minimum system requirements described on System requirements, then follow the steps below: To avoid improper functioning for DMS Local, it is suggested that only one computer in the shared network install and run DMS Local. Multiple computers simultaneously running DMS Local will prevent DMS Local from functioning properly. 1. Download the DMS Local software from the following URL: https://business-display.benq.com/en/findproduct/ifp/software/device-managementsolution/download.html or https://business-display.benq.com/en/findproduct/signage/ software/device-management-solution/download.html. 2. Launch the installation file and follow the on-screen instructions to complete the installation.
-
 1
1 -
 2
2 -
 3
3 -
 4
4 -
 5
5 -
 6
6 -
 7
7 -
 8
8 -
 9
9 -
 10
10 -
 11
11 -
 12
12 -
13
-
14
-
15
-
16
-
17
-
18
-
19
-
20
-
21
-
22
-
23
-
24
-
25
-
26
-
27
-
28
-
29
-
30
-
31
-
32
-
33
-
34
-
35
 |
 |
