Bernina 1008 Owners Manual - Page 4
Electronic 1008 - used
 |
View all Bernina 1008 manuals
Add to My Manuals
Save this manual to your list of manuals |
Page 4 highlights
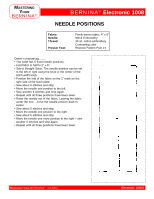
MASTERING YOUR BERNINA® BERNINA® Electronic 1008 SECTION A Care and Feeding of Your Machine Machine Set Up Owner's manual pg.____ • Storage of accessories • Attach cords foot control and machine • Power switch - light on/off function Owner's manual pg.____ • Extension table (optional) Threading the Needle • Side thread cutter - Owner's manual pg.____ • After the needle is threaded, put the thread under the presser foot • Lower the presser foot • Insert the thread into the cutter; it is cut to the proper length to begin sewing Presser Feet Owner's manual pgs.____ • Importance of using the correct foot • Stitch selection lever • Overview of included presser feet • Can also use one-piece BERNINA® presser feet Feed Dog Owner's manual pg. ____ Threads Owner's manual pg. ____ • Types of thread • Uses for each type of thread Needles Owner's manual pg.____ Bobbins Owner's manual pg.____ • Removing the bobbin case • Winding a bobbin • Use bobbin thread cutter • Clip the thread close to the case before removing the bobbin Threading the Upper Thread Owner's manual pg.____ • Two vertical spool pins - Owner's manual pg.___ • Optional supplementary thread guide • Optional BERNINA® thread stand • Thread machine with the presser foot up until ready to thread the needle Needle Positions Owner's manual pg. ____ • Five positions Practical/Decorative Stitches Owner's manual pgs.____ • Stitches built into the machine • Uses for the stitches - Owner's manual pgs.____ • How to select stitches - Owner's manual pgs.____ - selection lever - red vs. green stitches Straight Stitching • Seam measuring - stitch plate marks - Owner's manual pg.____ - the following measurements are indicated on the stitch plate: ¼", 3/8", ½", 5/8", ¾", and 1" - the horizontal lines to the far back and the line in front of the needle are 5/8" from needle • Optional piecing guide attaches to the bed of the machine. • Right and left seam guides and Seam Guides with Rulers are available as optional accessories for the one-piece BERNINA® presser feet • Straight stitch throat plate available • Basting - Owner's manual pg.___ - maximum stitch length and loosened the needle tension helps in removal of stitches Topstitching/Edgestitching Owner's manual pgs.____ MASTERING YOUR BERNINA® 1/10/02 Electronic 1008/4
-
 1
1 -
 2
2 -
 3
3 -
 4
4 -
 5
5 -
 6
6 -
 7
7 -
 8
8 -
 9
9 -
 10
10 -
11
-
12
-
13
-
14
-
15
-
16
-
17
-
18
-
19
-
20
-
21
-
22
-
23
-
24
-
25
-
26
-
27
-
28
-
29
-
30
-
31
-
32
-
33
-
34
-
35
-
36
-
37
-
38
-
39
-
40
-
41
-
42
-
43
-
44
-
45
-
46
-
47
-
48
-
49
-
50
-
51
-
52
-
53
-
54
-
55
-
56
-
57
-
58
-
59
-
60
-
61
 |
 |