Bernina 1008 Owners Manual - Page 9
Needle Positions - stitches
 |
View all Bernina 1008 manuals
Add to My Manuals
Save this manual to your list of manuals |
Page 9 highlights
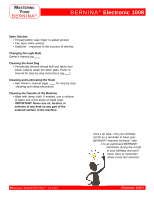
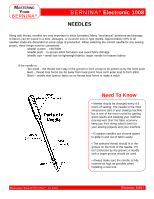
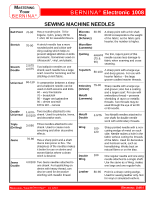
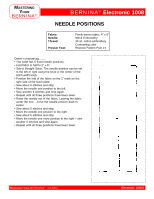
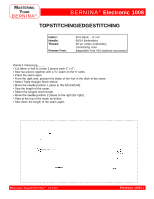
MASTERING YOUR BERNINA® BERNINA® Electronic 1008 NEEDLE POSITIONS Fabric: Needle: Thread: Presser Foot: Firmly woven fabric, 4" x 6" 90/14 Embroidery 30 wt. cotton embroidery Contrasting color Reverse Pattern Foot #1 Owner's manual pg.____ • The 1008 has 5 fixed needle positions. • Fold fabric in half to 2" x 6". • Select Straight Stitch. The needle position can be set to the left or right using the knob in the center of the stitch width knob. • Position the fold of the fabric on the 1" mark on the right side of the stitch plate. • Sew about 6 stitches and stop. • Move the needle one position to the left. • Sew another 6 stitches and stop again. • Repeat until all three positions have been sewn. • Raise the needle out of the fabric. Leaving the fabric under the foot - move the needle position back to center. • Sew about 6 stitches and stop. • Move the needle one position to the right. • Sew about 6 stitches and stop. • Move the needle one more position to the right - sew another 6 stitches and stop again. • Repeat until all three positions have been sewn. MASTERING YOUR BERNINA® 1/10/02 Electronic 1008/9
-
 1
1 -
2
-
3
-
 4
4 -
 5
5 -
 6
6 -
 7
7 -
 8
8 -
 9
9 -
 10
10 -
 11
11 -
 12
12 -
 13
13 -
 14
14 -
15
-
16
-
17
-
18
-
19
-
20
-
21
-
22
-
23
-
24
-
25
-
26
-
27
-
28
-
29
-
30
-
31
-
32
-
33
-
34
-
35
-
36
-
37
-
38
-
39
-
40
-
41
-
42
-
43
-
44
-
45
-
46
-
47
-
48
-
49
-
50
-
51
-
52
-
53
-
54
-
55
-
56
-
57
-
58
-
59
-
60
-
61
 |
 |