Bernina Artista 630 User Guide - Page 20
Feed Dog, Stitch Plate - embroidery module
 |
View all Bernina Artista 630 manuals
Add to My Manuals
Save this manual to your list of manuals |
Page 20 highlights
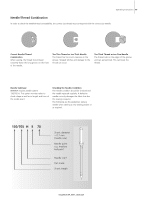
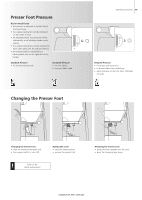
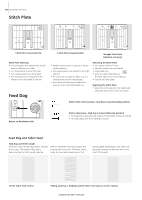
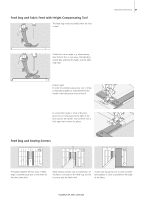
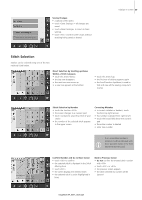
20 Operating instructions Stitch Plate A 5.5mm (mm measurements) Stitch Plate Markings • the stitch plates are marked with vertical lines in millimeters or inches • mm measurements are at the front • inch measurements are at the back • the measurements correspond to the distance from the needle to the line Feed Dog A A 5.5mm (inch measurements) Straight Stitch Plate (optional accessory) • needle insertion point is position 0 (center needle position) • the measurements are marked to the right and left • the lines help to guide the fabric e.g. for sewing seams and for topstitching • the horizontal markings are helpful for sewing corners and buttonholes, etc. Removing the Stitch Plate • turn power switch off («0») • raise the presser foot and needle • lower feed dog • press the stitch plate down at the back right corner until it flips up • remove the stitch plate Replacing the Stitch Plate • place the stitch plate over the opening A and press down until it clicks into place Button flush with housing = feed dog is raised (sewing position) Button on handwheel side Button depressed = feed dog is lowered (darning position) • for freehand sewing (darning, freehand embroidery, freehand quilting) • for embroidery with the embroidery module Feed Dog and Fabric Feed Feed Dog and Stitch Length With each stitch the feed dog moves forward by one step. The length of this step is determined by the stitch length selected. With an extremely short stitch length, the steps are also very short. The fabric moves under the foot quite slowly, even at full sewing speed. Buttonholes, satin stitch and decorative stitches are all sewn with a very short stitch length. Let the fabric feed evenly! Pulling, pushing or holding back the fabric will result in uneven stitches 031196.50.04_0507_a630_EN
-
 1
1 -
2
-
3
-
4
-
5
-
6
-
7
-
8
-
9
-
10
-
11
-
12
-
13
-
14
-
 15
15 -
 16
16 -
 17
17 -
 18
18 -
 19
19 -
 20
20 -
 21
21 -
 22
22 -
 23
23 -
 24
24 -
 25
25 -
26
-
27
-
28
-
29
-
30
-
31
-
32
-
33
-
34
-
35
-
36
-
37
-
38
-
39
-
40
-
41
-
42
-
43
-
44
-
45
-
46
-
47
-
48
-
49
-
50
-
51
-
52
-
53
-
54
-
55
-
56
-
57
-
58
-
59
-
60
-
61
-
62
-
63
-
64
-
65
-
66
-
67
-
68
-
69
-
70
-
71
-
72
-
73
-
74
-
75
-
76
-
77
-
78
-
79
-
80
-
81
-
82
-
83
-
84
-
85
-
86
-
87
-
88
-
89
-
90
-
91
-
92
-
93
-
94
-
95
-
96
-
97
-
98
-
99
-
100
-
101
-
102
-
103
-
104
-
105
-
106
-
107
-
108
-
109
-
110
-
111
-
112
-
113
-
114
-
115
-
116
-
117
-
118
-
119
-
120
-
121
-
122
-
123
-
124
-
125
-
126
-
127
-
128
-
129
-
130
-
131
-
132
-
133
-
134
-
135
-
136
-
137
-
138
-
139
-
140
-
141
-
142
-
143
-
144
-
145
-
146
-
147
-
148
-
149
-
150
-
151
-
152
-
153
-
154
-
155
-
156
-
157
-
158
-
159
-
160
-
161
-
162
-
163
-
164
-
165
-
166
-
167
 |
 |
