Bosch WFVC540SUC User Manual - Page 15
Leveling, Procedure
 |
UPC - 825225878995
View all Bosch WFVC540SUC manuals
Add to My Manuals
Save this manual to your list of manuals |
Page 15 highlights
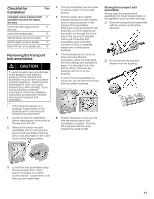
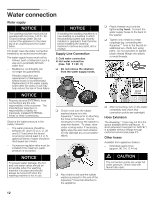
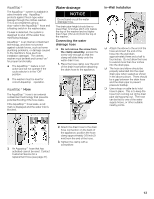
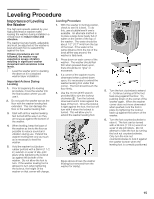
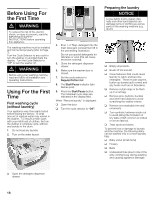
Leveling Procedure Importance of Leveling the Washer The high spin speeds realized by your high performance washer make leveling the washer during installation a critical issue to reduce noise and vibration. The washer feet are height-adjustable and must be adjusted so the washer is level and each foot is seated firmly against the floor. If these procedures are not followed, the washer may experience severe vibration resulting in significant washer movement and excessive noise levels. i Level the washer prior to stacking the dryer on it in a stacked washer/dryer installation. Important Actions During Leveling 1. Prior to beginning the leveling procedure, move the washer into the final location where you will use it. 2. Do not push the washer across the floor with the washer leveling feet extended. This can damage the floor or the washer leveling feet. 3. Start with all four washer leveling feet turned all the way in so they are snug up against the bottom of the washer. 4. When leveling, keep the base of the washer as low to the floor as possible to reduce sound and vibration during use. Extend the washer leveling feet only as much as is necessary to level the washer. 5. Hold the washer foot (bottom rubber portion) with a 36mm (1 1/2 in.) wrench or a pair of slip-joint pliers while tightening the locknut up against the bottom of the washer. Do not allow the foot to turn. If the washer leveling foot is allowed to turn when tightening the locknut, the height of the washer on that corner will change. Leveling Procedure 1. With the washer in its final position, check to see if it is level. To do this, use a bubble level if one is available. An alternate method is to place a large bowl nearly full of water on the center of the top of the washer. The water should be about 1/2" (12.7 mm) from the top of the bowl. If the water is the same distance from the top of the bowl all the way around, the washer is fairly level. 2. Press down on each corner of the washer. The washer should feel firm when pressed down upon, there should be no give" or movement. 3. If a corner of the washer moves downward when pushed down upon, it is necessary to extend the washer leveling foot under that corner. The foot should touch the floor firmly. 4. Use the 16 mm (5/8") wrench provided (1) to turn the locknut clockwise (2). Turn the locknut downward until it locks against the base of the foot. Once the locknut is tight against the foot, the foot will turn with it when the locknut is turned. This will allow you to extend the washer leveling foot. (figure above shows the washer leveling foot removed from the washer for clarity). 5. Turn the foot clockwise to extend it. Continue turning until the foot feels snug against the floor. Try pushing down on the corner of the washer again. When the washer corner does not move downward when pushed, lock the foot in place by tightening the locknut back up against the bottom of the washer. 6. Turn the foot counterclockwise to raise it. The foot can be turned with a 36 mm (1 1/2 in.) wrench or a pair of slip joint pliers. Do not attempt to raise the foot by turning the lock nut counterclockwise. Only turn the lock nut counterclockwise to lock it against the washer bottom when the leveling foot is correctly positioned. 15
-
 1
1 -
2
-
3
-
4
-
5
-
6
-
7
-
8
-
9
-
 10
10 -
 11
11 -
 12
12 -
 13
13 -
 14
14 -
 15
15 -
 16
16 -
 17
17 -
 18
18 -
 19
19 -
 20
20 -
21
-
22
-
23
-
24
-
25
-
26
-
27
-
28
-
29
-
30
-
31
-
32
-
33
-
34
-
35
-
36
-
37
-
38
-
39
-
40
-
41
-
42
-
43
-
44
-
45
-
46
-
47
-
48
-
49
-
50
-
51
-
52
-
53
-
54
-
55
-
56
-
57
-
58
-
59
-
60
-
61
-
62
-
63
-
64
-
65
-
66
-
67
-
68
-
69
-
70
-
71
-
72
-
73
-
74
-
75
-
76
-
77
-
78
-
79
-
80
-
81
-
82
-
83
-
84
-
85
-
86
-
87
-
88
-
89
-
90
-
91
-
92
-
93
-
94
-
95
-
96
-
97
-
98
-
99
-
100
-
101
-
102
-
103
-
104
 |
 |
