Bose Lifestyle 5 Owner's guide - Page 17
Connecting, Laserdisc, player, turntable, headphones
 |
View all Bose Lifestyle 5 manuals
Add to My Manuals
Save this manual to your list of manuals |
Page 17 highlights
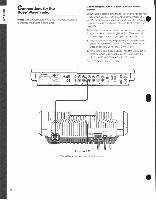
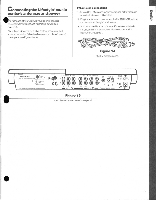
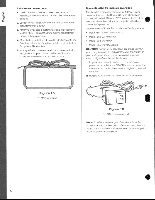
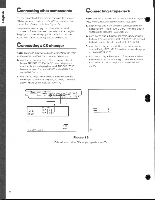
Connecting a TV, VCR, or Laserdisc player t ote:Ifyouneedmore detailedconnectioninformation, refer to the owner'smanual that came with your TV, VCR, or Laserdisc player. 1. Insert the red plug at one end of the connector cable into the right AUDIO OUTPUT of your TV, VCR, Laserdisc, or other video-sound source. Insert the black or white plug into the left AUDIO OUTPUT. Note:Ifyour video-soundsource doesnothavestereo outputs. you willneeda Yconnector to convertits singleaudiooutputjack totwojacks that willsupply theleftandright VIDEO SOUNDINPUTS. Contact yourBose' dealerforassistance. Your TVmayhave two sets ofoutputs -FIXEDand VARIABLE. Use theFIXEDoutputs toallow the volumecontrolonyour TVto adjust the volumeofyour TVindependently from the volumeof yourLifestyle' musicsystem. Use the VARIABLEoutputs to allowthe volumecontrolon your 7Vtosimultaneouslyadjust the volumeofyour TVandyourmusicsystem. 2. Insert the red plug at the other end of the same cable into the R (right) VIDEO SOUND INPUT of your Lifestyle' music center. Insert the black or white plug into theL(left)VIDEO SOUND INPUT. • Connectinga turntable To use a turntable, you will need an external phono preamplifier. Consult your Bost dealer to determine the appropriate preamplifier model. Connect the turntable to the preamplifier (preamp) as directed in the instructions for the preamp. Then connect the preamp's OUTPUT to the music centers unused AUX or VIDEO SOUND inputs. Connecting headphones There is a stereo mini-headphone jack on the left end of the music center. The jack will accept most popular headphone models directly. If you need an adapter, contact your dealer. Whenheadphones are connected,SPEAKERS A OUTPUT is disconnected. Volume adjustments apply to the SPEAKERS B listening area, if speakers are turned on (see `Listening in two different rooms; page 25). 17
-
 1
1 -
2
-
3
-
4
-
5
-
6
-
7
-
8
-
9
-
10
-
11
-
 12
12 -
 13
13 -
 14
14 -
 15
15 -
 16
16 -
 17
17 -
 18
18 -
 19
19 -
 20
20 -
 21
21 -
 22
22 -
23
-
24
-
25
-
26
-
27
-
28
-
29
-
30
-
31
-
32
-
33
-
34
-
35
 |
 |
