Brother International 2460N Users Manual - English - Page 191
Improving the print quality, This provides information on the following topics
 |
UPC - 012502600787
View all Brother International 2460N manuals
Add to My Manuals
Save this manual to your list of manuals |
Page 191 highlights
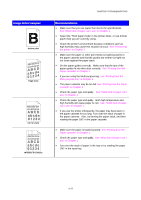
Improving the print quality This section provides information on the following topics: IImmaaggee ddeeffeeccttssaammpplleess ABCDEFGH abcdefghijk ABCD abcde 01234 Faint ABCDEFGH abcdefghijk ABCD abcde 01234 Gray background RReeccoommmmeennddaattiioonn • Check the printer's environment. Conditions such as humidity, high temperatures, etc., may cause this print defect to occur. See "Positioning the printer" in Chapter 1. • If the whole page is too light, the toner save mode may be on. Disable the toner save mode in the printer Properties tab of the Driver. • Try installing a new toner cartridge. See "Replacing the Toner cartridge" in Chapter 5. • You may clear the problem by wiping the scanner window with a soft cloth. See "Cleaning the printer interior" or the "Maintenance Tutorial" movie on the supplied CD-ROM. • Make sure that you use paper that meets the recommended specifications. See "What kind of paper can I use" in Chapter 1. • Check the printer's environment; high temperature and high humidity conditions can increase the amount of background shading. See "Positioning the printer" in Chapter 1. • Install a new toner cartridge. See "Replacing the Toner cartridge" in Chapter 5. Ghost ABCDEFGH abcdefghijk ABCD abcde 01234 Toner specks • Make sure that you use paper that meets the specifications. Rough surfaced paper, paper that has absorbed moisture or thick print media can cause this problem. See "What kind of paper can I use" in Chapter 1. • Make sure that you select the appropriate media type in the printer driver. See "What kind of paper can I use" in Chapter 1. • Try installing a new toner cartridge. See "Replacing the Toner cartridge" in Chapter 5. • Make sure that you use paper that meets the specifications. Rough surfaced paper may cause the problem. See "What kind of paper can I use" in Chapter 1. • The toner cartridge may be damaged. Install a new toner cartridge. See "Replacing the Toner cartridge" in Chapter 5. 6-26
-
 1
1 -
2
-
3
-
4
-
5
-
6
-
7
-
8
-
9
-
10
-
11
-
12
-
13
-
14
-
15
-
16
-
17
-
18
-
19
-
20
-
21
-
22
-
23
-
24
-
25
-
26
-
27
-
28
-
29
-
30
-
31
-
32
-
33
-
34
-
35
-
36
-
37
-
38
-
39
-
40
-
41
-
42
-
43
-
44
-
45
-
46
-
47
-
48
-
49
-
50
-
51
-
52
-
53
-
54
-
55
-
56
-
57
-
58
-
59
-
60
-
61
-
62
-
63
-
64
-
65
-
66
-
67
-
68
-
69
-
70
-
71
-
72
-
73
-
74
-
75
-
76
-
77
-
78
-
79
-
80
-
81
-
82
-
83
-
84
-
85
-
86
-
87
-
88
-
89
-
90
-
91
-
92
-
93
-
94
-
95
-
96
-
97
-
98
-
99
-
100
-
101
-
102
-
103
-
104
-
105
-
106
-
107
-
108
-
109
-
110
-
111
-
112
-
113
-
114
-
115
-
116
-
117
-
118
-
119
-
120
-
121
-
122
-
123
-
124
-
125
-
126
-
127
-
128
-
129
-
130
-
131
-
132
-
133
-
134
-
135
-
136
-
137
-
138
-
139
-
140
-
141
-
142
-
143
-
144
-
145
-
146
-
147
-
148
-
149
-
150
-
151
-
152
-
153
-
154
-
155
-
156
-
157
-
158
-
159
-
160
-
161
-
162
-
163
-
164
-
165
-
166
-
167
-
168
-
169
-
170
-
171
-
172
-
173
-
174
-
175
-
176
-
177
-
178
-
179
-
180
-
181
-
182
-
183
-
184
-
185
-
 186
186 -
 187
187 -
 188
188 -
 189
189 -
 190
190 -
 191
191 -
 192
192 -
 193
193 -
 194
194 -
 195
195 -
 196
196 -
197
-
198
-
199
-
200
-
201
-
202
-
203
-
204
-
205
-
206
-
207
-
208
-
209
-
210
-
211
-
212
-
213
-
214
-
215
-
216
-
217
-
218
-
219
-
220
-
221
-
222
-
223
-
224
-
225
-
226
-
227
-
228
-
229
-
230
-
231
-
232
-
233
-
234
-
235
-
236
-
237
-
238
-
239
-
240
-
241
-
242
-
243
-
244
-
245
 |
 |
