Brother International BM-917B Instruction Manual - English - Page 13
Test Operation, Caution, Turning The Machine Pulley By Hand
 |
View all Brother International BM-917B manuals
Add to My Manuals
Save this manual to your list of manuals |
Page 13 highlights
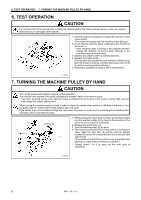
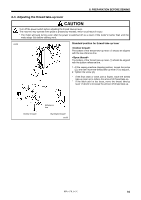
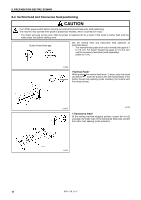
6. TEST OPERATION 7. TURNING THE MACHINE PULLEY BY HAND 6. TEST OPERATION CAUTION Do not touch any of the moving parts or press any objects against the machine while sewing, as this may result in personal injury or damage to the machine. 1. Insert the power cord plug into a wall outlet, and turn on the power switch. (The motor will operate and the machine pulley will turn.) 2. Check that the machine pulley is turning in the direction of the arrow (1). * If the machine pulley is turning in the opposite direction, change the direction of turning while referring to the instruction manual for the motor. 3. Depress the pedal to start the sewing machine. 4. Release the pedal quickly. (The machine will operate for a set number of stitches only, after the thread is trimmed, and then the presser arm will lift up and the sewing machine will stop.) 5. Repeat the operations in steps 3 and 4 several times. 1977M 7. TURNING THE MACHINE PULLEY BY HAND CAUTION Turn off the power switch before carrying out this operation. The machine may operate if the pedal is pressed by mistake, which could result in injury. * The motor will keep turning even after the power is switched off as a result of the motor's inertia. Wait until the motor stops fully before starting work. When turning the machine pulley by hand in order to check the needle down position in the hole of the button, turn the pulley until the needle is at the final position after one cycle. If the needle is at a point midway through the cycle when the power is turned on, the machine will immediately start operating, which could result in injury. Push down 1. While pushing the clutch body (1) down and holding it there, turn the machine pulley (2) by hand in the direction of the arrow for two or more full revolutions. 2. Release the clutch body (1). 3. Turn the machine pulley (2) by hand. 4. The machine pulley (2) will turn freely after the final stitch is sewn. Keep the stop cam (3) turning until the stopper bracket (4) comes into contact with the end of the stop cam segment (5). (The presser arm will lift up, and the cycle of operations for attaching a single button will then be complete.) * Repeat steps 1 to 4 to carry out the next cycle of operations 1978M 7 BM-917B, 917C
-
 1
1 -
2
-
3
-
4
-
5
-
6
-
7
-
 8
8 -
 9
9 -
 10
10 -
 11
11 -
 12
12 -
 13
13 -
 14
14 -
 15
15 -
 16
16 -
 17
17 -
 18
18 -
19
-
20
-
21
-
22
-
23
-
24
-
25
-
26
-
27
-
28
-
29
-
30
-
31
-
32
-
33
-
34
-
35
-
36
 |
 |
