Brother International HS-5300 Users Manual - English - Page 35
Power Save Mode, Maintenance, Color Adjust, Mode 1
 |
View all Brother International HS-5300 manuals
Add to My Manuals
Save this manual to your list of manuals |
Page 35 highlights
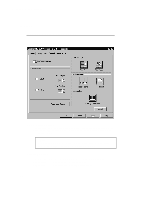
English: HS3 User's Guide, Chapter 2 CHAPTER 3 PRINTER DRIVER Power Save Mode The printer goes into power save mode automatically when the printer has not received any data or there has not been any key operation for a specified time. There are two power save modes: Mode 1 In this mode, the printer keeps the minimum temperature (115°C) at which the printer ink does not become solid. Power consumption is higher than Mode 2, but warm-up time is shorter (2 minutes). Mode 2 In this mode, the printer cools down and power consumption is almost at the same level as power off. In mode 2, it requires up to 9.5 minutes to warm up. The factory setting of the Power Save Modes is OFF, but once you turn the Power Save Mode ON, the default time-out of each mode is set to one hour which meets the Energy Star power conservation requirements. Receiving a print file or document or pressing any button automatically wakes up the printer to start printing. In this mode setting box, you can set the time-out value from 3 to 99 minutes. Maintenance Enter this mode by clicking a menu button and the printer starts head cleaning or printng the test page. Color Adjustment If you want to get the closest color match to your monitor on the printouts, calibrate the printer for your monitor by clicking this button. The method used to express color is different between Monitors and Printers. The monitor uses the 3 primary colors - Red, Green, Blue - to create full colors and the printer uses 4 colors - Cyan, Magenta, Yellow, and Black to create full colors. To use this mode, please click the Monitor Calibration button and follow the instruction. In the first step, you need to select the Advanced mode not the default Standard mode if you want to adjust each Cyan, Magenta, and Yellow color. 3-7
-
 1
1 -
2
-
3
-
4
-
5
-
6
-
7
-
8
-
9
-
10
-
11
-
12
-
13
-
14
-
15
-
16
-
17
-
18
-
19
-
20
-
21
-
22
-
23
-
24
-
25
-
26
-
27
-
28
-
29
-
 30
30 -
 31
31 -
 32
32 -
 33
33 -
 34
34 -
 35
35 -
 36
36 -
 37
37 -
 38
38 -
 39
39 -
 40
40 -
41
-
42
-
43
-
44
-
45
-
46
-
47
-
48
-
49
-
50
-
51
-
52
-
53
-
54
-
55
-
56
-
57
-
58
-
59
-
60
-
61
-
62
-
63
-
64
-
65
-
66
-
67
-
68
-
69
-
70
-
71
-
72
-
73
-
74
-
75
-
76
-
77
-
78
-
79
-
80
-
81
-
82
-
83
-
84
 |
 |
