Brother International Innov-is NQ1700E Operation Manual - Page 43
Split embroidery patterns
 |
View all Brother International Innov-is NQ1700E manuals
Add to My Manuals
Save this manual to your list of manuals |
Page 43 highlights
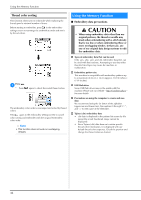
Embroidering ■ Method 2 Select a straight stitch frame pattern, and embroider a the pattern onto the base fabric. Place the appliqué fabric over the pattern embroidered b in step a and embroider the same pattern on the appliqué fabric. • Be sure that the appliqué fabric completely covers the stitched line. Split embroidery patterns Split embroidery patterns created with PE-DESIGN Ver.7 or later, or PE-DESIGN NEXT can be embroidered. With split embroidery patterns, embroidery designs larger than the embroidery hoop are divided into multiple sections, which combine to create a single pattern after each section is embroidered. For details on creating split embroidery patterns and for more detailed embroidery instructions, refer to the Instruction manual included with PE-DESIGN Ver.7 or later, or PEDESIGN NEXT. Insert the USB flash drive containing the created split a embroidery pattern, and then select the split embroidery pattern to be embroidered. • For details, refer to "Retrieving embroidery patterns" on page 47. 2 EMBROIDERY Remove the embroidery frame from the embroidery c unit, and cut around the outside of the stitches of the appliqué fabric. Select section to be embroidered and press . b Note • Do not remove the fabric from the embroidery frame to cut it. Also, do not pull or push on the fabric. Otherwise, the fabric may loosen in the frame. Reattach the embroidery frame to the embroidery unit. d Select the satin stitch frame pattern of the same shape e as the appliqué and embroider the satin stitch pattern to create an appliqué. • Do not change the size or position of the pattern. • Select the sections in alphabetical order. Press c and press . Press the "Start/Stop" button to embroider the pattern d section. When embroidering is finished, the following screen e appears. Press . A screen appears so that a section of the split embroidery pattern can be selected. Repeat steps b through e to embroider the f remaining sections of the pattern. 41
-
 1
1 -
2
-
3
-
4
-
5
-
6
-
7
-
8
-
9
-
10
-
11
-
12
-
13
-
14
-
15
-
16
-
17
-
18
-
19
-
20
-
21
-
22
-
23
-
24
-
25
-
26
-
27
-
28
-
29
-
30
-
31
-
32
-
33
-
34
-
35
-
36
-
37
-
 38
38 -
 39
39 -
 40
40 -
 41
41 -
 42
42 -
 43
43 -
 44
44 -
 45
45 -
 46
46 -
 47
47 -
 48
48 -
49
-
50
-
51
-
52
-
53
-
54
-
55
-
56
-
57
-
58
-
59
-
60
-
61
-
62
-
63
-
64
-
65
-
66
-
67
-
68
 |
 |
