Brother International KE-436C Inner Clamping Device Instruction Manual - Engli
Brother International KE-436C Manual
 |
View all Brother International KE-436C manuals
Add to My Manuals
Save this manual to your list of manuals |
Brother International KE-436C manual content summary:
- Brother International KE-436C | Inner Clamping Device Instruction Manual - Engli - Page 1
KE-435B, 435C KE-436B, 436C INSTRUCTION MANUAL INNER CLAMPING DEVICE〈FOR PNEUMATIC〉 Please read this manual before using the machine. Please keep this manual within easy reach for quick reference. - Brother International KE-436C | Inner Clamping Device Instruction Manual - Engli - Page 2
KE-435C,436C - Brother International KE-436C | Inner Clamping Device Instruction Manual - Engli - Page 3
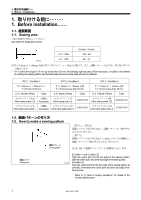
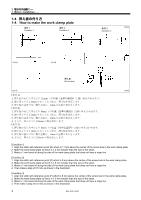
CONTENTS 1 1 1-1 1 1-2 1 1-3 2 1-4 3 1-5 4 2 5 2-1 5 2-2 7 2-3 8 2-4 (KE-435B、435C 9 2-5 (KE-436B、436C 11 2-6 (KE-436B、436C 12 3 13 3-1 13 3-2 13 3-3 14 3-4 15 4 16 1. Before installation 1 1-1. Sewing area 1 1-2. How to make a sewing pattern 1 1-3. How to make the feed - Brother International KE-436C | Inner Clamping Device Instruction Manual - Engli - Page 4
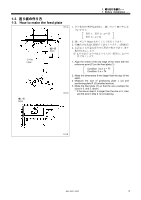
Sewing area Use within sewing area. [Condition 3] Align the center point for the top edge of the sewing pattern at point (B) 3 mm below the center point (A) at the top edge of the sewing area. * Refer to "4. Note to sewing operations" for details of the reverse stitching area. 1 KE-435C,436C - Brother International KE-436C | Inner Clamping Device Instruction Manual - Engli - Page 5
the feed plate (1) so that the size overlaps the sizes in 2. and 3. above. * If the size in step 2. is larger than the size in 3., then use the size in step 2. for processing. 2633Q KE-435C,436C 2 - Brother International KE-436C | Inner Clamping Device Instruction Manual - Engli - Page 6
all along the side of the work clamp plate that does not have a ridge line. 4. Then make a step of 0.5 mm as shown in the illustration. 3 KE-435C,436C - Brother International KE-436C | Inner Clamping Device Instruction Manual - Engli - Page 7
1-5 1-5. Removing the presser foot 1 1. Before installation...... 締ねじ(1 2 Loosen the screw (1), and then remove the presser foot (2). 2958Q KE-435C,436C 4 - Brother International KE-436C | Inner Clamping Device Instruction Manual - Engli - Page 8
注意 / CAUTION 0 Do not connect the power cord until installation is complete, otherwise the machine may operate if the foot switch is depressed by mistake, which could result in injury. the work clamp arm (9), and fix these components with work clamp guide plates (1). 2960Q 5 KE-435C,436C - Brother International KE-436C | Inner Clamping Device Instruction Manual - Engli - Page 9
clamp crank (6) so that it faces as shown in the illustration, align its groove with the washer (8), and then tighten the screw (1) to secure it. KE-435C,436C 6 - Brother International KE-436C | Inner Clamping Device Instruction Manual - Engli - Page 10
2-2 2-2. Pneumatic system 1 1 1. Remove the belt cover (1). (Refer to the Instruction Manual for the sewing machine.) 2963Q 抜く Pull out 押す Push down 2962Q 2965Q 2964Q 2 6 個)(2)の(A 6 本)(3 work table or beam. (Refer to the Instruction Manual for the sewing machine.) 7 KE-435C,436C - Brother International KE-436C | Inner Clamping Device Instruction Manual - Engli - Page 11
6. Open the control box cover (main P.C. board mounting plate). (Refer to the Instruction Manual for the sewing machine.) 7. Disconnect the valve harness (12P) (9). 8. Insert the pin terminals (#11, the belt cover. (Refer to the Instruction Manual for the sewing machine.) KE-435C,436C 8 - Brother International KE-436C | Inner Clamping Device Instruction Manual - Engli - Page 12
435B、435C) 2-4. Setting the memory switch (KE-435B, 435C) After changing the memory switch DISPLAY SET switches (4) so that "42" appears in the two left columns of the window (3). 6. Press the user program switches (P2 or P4) (5) so that "05" appears in the two right columns of the window (3). 7. - Brother International KE-436C | Inner Clamping Device Instruction Manual - Engli - Page 13
- 0025Q エンド End スタート Start 反転 Reverse 1/4 と 3/4 The inner clamping device operates at the 1/4-way and 3/4-way marks for the pattern being sewn. memo-13 ON 反転 Reverse 0026Q KE-435C,436C 10 - Brother International KE-436C | Inner Clamping Device Instruction Manual - Engli - Page 14
(3) so that "3b" appears in the PROGRAM No. display (4). 4. While pressing the STEP BACK switch (2), turn the dial (5) so that "05" appears in the display screen (6). 5. Press the TEST switch (1). * The display will return to normal. 6. Make the following settings if necessary. 11 KE-435C,436C - Brother International KE-436C | Inner Clamping Device Instruction Manual - Engli - Page 15
) 2-6. Setting the DIP switch (KE-436B, 436C) A の No.6 を"ON A の No.6 を"OFF Note: Be sure to turn off the power before changing any of the DIP switch settings. Turn the selector No.6 on the DIP switch A to "ON". * When the inner clamping device is not used, turn the selector No.6 on the - Brother International KE-436C | Inner Clamping Device Instruction Manual - Engli - Page 16
for the reversal cylinder to stay within such a range that the presser crank (4) rotates reversely when pressing the sewing material with the work clamp plate (3). (Approx. 0.3 Mpa) For adjustment, pull up and, turn the be evenly laid out between the left and right seams (B). 2623Q 13 KE-435C,436C - Brother International KE-436C | Inner Clamping Device Instruction Manual - Engli - Page 17
horizontal when the reversal cylinder piston rod (1) is moved to the left extreme. 3-3-1. 確認(KE-436B、436C) 3-3-1. Verification (KE-436B, 436C) 2624Q 2973Q 1 1 2 2 3 4 3 5 5 6 6 7 R(8 4 (8). 4. Press the TEST switch (3) again to end the test mode. 2974Q 2975Q KE-435C,436C 14 - Brother International KE-436C | Inner Clamping Device Instruction Manual - Engli - Page 18
, while the lower exhaust air throttle valve adjusts the descending speed. • Solenoid valve (3)......for the work clamp plate • Solenoid valve (4)......for the positioning plates 15 KE-435C,436C - Brother International KE-436C | Inner Clamping Device Instruction Manual - Engli - Page 19
used, the reverse stitching area will become smaller. 上がる Lift 2 1 memo-15 を ON 布の厚み Thickness of material 2630Q 2. When the work clamp crank (1) reverses after sewing to the setting, move the work clamp crank to the sewing end position (release the air and move the work clamp crank by - Brother International KE-436C | Inner Clamping Device Instruction Manual - Engli - Page 20
INSTRUCTION MANUAL 15-1, Naeshiro-cho, Mizuho-ku, Nagoya 467-8561, Japan. Phone: 81-52-824-2177 Printed in Japan 118-P34 S91P34-021 2002.12.B(1)
-
 1
1 -
 2
2 -
 3
3 -
 4
4 -
 5
5 -
 6
6 -
 7
7 -
8
-
9
-
10
-
11
-
12
-
13
-
14
-
15
-
16
-
17
-
18
-
19
-
20
 |
 |
KE-435B, 435C
KE-436B, 436C
中押え反転装置〈エアー仕様〉
この説明書を読んでから、製品をご使用ください。
この説明書は、必要なときにすぐに取り出せる場所に、保管してください。
INNER CLAMPING DEVICE
〈
FOR PNEUMATIC
〉
Please read this manual before using the machine.
Please keep this manual within easy reach for quick reference.
取扱説明書
INSTRUCTION MANUAL