目
次
CONTENTS
1.
取り付ける前に・・・・・・
......................
1
1-1.
縫製範囲
.....................................................
1
1-2.
縫製パターンの作り方
...............................
1
1-3.
送り板の作り方
..........................................
2
1-4.
押え板の作り方
..........................................
3
1-5.
押え足の取り外し
......................................
4
2.
取り付け方
...............................................
5
2-1.
押え関係
.....................................................
5
2-2.
エアー関係
.................................................
7
2-3.
配管
............................................................
8
2-4.
メモリースイッチの切り替え
(
KE-435B
、
435C
)
.................................
9
2-5.
メモリースイッチの切り替え
(
KE-436B
、
436C
)
.................................
11
2-6.
ディップスイッチの切り替え
(
KE-436B
、
436C
)
.................................
12
3.
調整
..............................................................
13
3-1.
空気圧の調整
..............................................
13
3-2.
位置決め板の調整
......................................
13
3-3.
押えクランクの水平位置調整
....................
14
3-4.
押え上げ速さの調整
...................................
15
4.
縫製時の注意
..........................................
16
1. Before installation
……
...................
1
1-1. Sewing area
................................................
1
1-2. How to make a sewing pattern
...................
1
1-3. How to make the feed plate
........................
2
1-4. How to make the work clamp plate
.............
3
1-5. Removing the presser foot
..........................
4
2. INSTALLATION
....................................
5
2-1. Work clamp unit
..........................................
5
2-2. Pneumatic system
......................................
7
2-3. Piping
..........................................................
8
2-4. Setting the memory switch
(KE-435B, 435C)
........................................
9
2-5. Setting the memory switch
(KE-436B, 436C)
........................................
11
2-6. Setting the DIP switch
(KE-436B, 436C)
........................................
12
3. ADJUSTMENT
.......................................
13
3-1. Adjustment of air pressure
..........................
13
3-2. Adjustment of the positioning plates
...........
13
3-3. Adjustment of the work clamp crank
horizontal position
.......................................
14
3-4. Adjustment of the work clamp
plate lifting speed
........................................
15
4.
NOTES TO SEWING OPERATIONS
.......
16

 1
1 2
2 3
3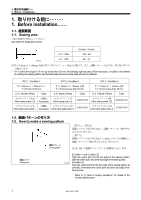 4
4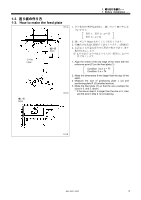 5
5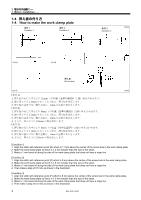 6
6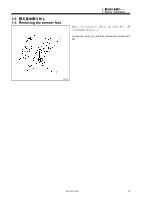 7
7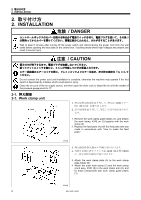 8
8 9
9

