Brother International KE-436C Inner Clamping Device Instruction Manual - Engli - Page 16
Adjustment
 |
View all Brother International KE-436C manuals
Add to My Manuals
Save this manual to your list of manuals |
Page 16 highlights
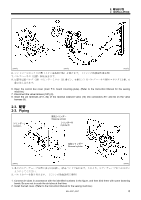
3. 調整 3. ADJUSTMENT 3. 調整 3. ADJUSTMENT 3-1 3-1. Adjustment of air pressure 高くなる Increase pressure 2972Q 高くなる Increase pressure 1 0.5Mpa 1 2 2 2 3 4 0.3Mpa 5 6 6 3 1 7 2622Q 1. Air pressure should be 0.5 Mpa. The air pressure can be adjusted by pulling up and turning the control knob (2) on the integrator (1). After adjustment is complete, push the control knob (2) downward to lock it. 2. Adjust the air pressure for the reversal cylinder to stay within such a range that the presser crank (4) rotates reversely when pressing the sewing material with the work clamp plate (3). (Approx. 0.3 Mpa) For adjustment, pull up and, turn the control knob (6) on the air regulator (5). After adjustment is complete, push the control knob (6) downward to lock it. 3. If water stands in the bottle of the integrator (1), turn the drain cock (7) in the direction indicated by an arrow to drain the water. 3-2 3-2. Adjustment of the positioning plates 縫い目(A 1 2 R(3 B 4 L(5 Loosen the screws (2), and adjust the position of the positioning plate R (3) so that the label (1) can be evenly laid out between the front and back seams (A). Next, loosen the screws (4), and adjust the position of the positioning plate L (5) so that the presser plate can be evenly laid out between the left and right seams (B). 2623Q 13 KE-435C,436C
-
 1
1 -
2
-
3
-
4
-
5
-
6
-
7
-
8
-
9
-
10
-
 11
11 -
 12
12 -
 13
13 -
 14
14 -
 15
15 -
 16
16 -
 17
17 -
 18
18 -
 19
19 -
 20
20
 |
 |
