Brother International KE-436C Inner Clamping Device Instruction Manual - Engli - Page 5
How to make the feed plate
 |
View all Brother International KE-436C manuals
Add to My Manuals
Save this manual to your list of manuals |
Page 5 highlights
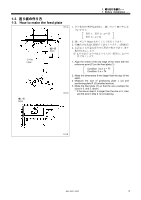
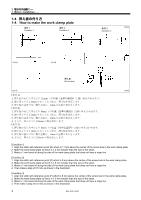
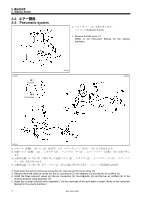
1 1. Before installation...... 1-3 1-3. How to make the feed plate 2631Q ラベル Label 縫い目 Stitch 縫い目 Stitch 2632Q 1. 送り板(1 C 条件 1、条件 2:a=77 条件 3:a=74 2 6mm 3 L(2)、R(3 4. 上記 2.と 3 板(1 2 3 2.の寸 1. Align the center of the top edge of the seam with the reference point (C) on the feed plate (1). Condition 1 & 2: a = 77 Condition 3: a = 74 2. Make the dimensions 6 mm larger than the size of the stitch. 3. Measure the size of positioning plate L (2) and positioning plate R (3) (shaded section). 4. Make the feed plate (1) so that the size overlaps the sizes in 2. and 3. above. * If the size in step 2. is larger than the size in 3., then use the size in step 2. for processing. 2633Q KE-435C,436C 2
-
 1
1 -
 2
2 -
 3
3 -
 4
4 -
 5
5 -
 6
6 -
 7
7 -
 8
8 -
 9
9 -
 10
10 -
 11
11 -
12
-
13
-
14
-
15
-
16
-
17
-
18
-
19
-
20
 |
 |

1. 取り付ける前に・・・
1. Before installation……
2
KE-435C,436C
1-3.
送り板の作り方
1-3. How to make the feed plate
1.
送り板
(1)
の基準位置
(C)
に、縫い目の上側の中心を
合わせます。
2.
縫い目より
6mm
大きくした寸法をとります。
3.
位置決め板
L(2)
、
R(3)
の寸法をとります。(斜線部)
4.
上記
2.
と
3.
を重ね合わせた形状の抜き寸法で、送り
板
(1)
を加工します。
※
2.
の寸法が
3.
の寸法よりも大きい場合は、
2.
の寸
法で加工します。
1. Align the center of the top edge of the seam with the
reference point (C) on the feed plate (1).
2. Make the dimensions 6 mm larger than the size of the
stitch.
3. Measure the size of positioning plate L (2) and
positioning plate R (3) (shaded section).
4. Make the feed plate (1) so that the size overlaps the
sizes in 2. and 3. above.
* If the size in step 2. is larger than the size in 3., then
use the size in step 2. for processing.
2632Q
2633Q
縫い目
Stitch
ラベル
Label
縫い目
Stitch
2631Q
条件
1
、条件
2
:
a
=
77
条件
3
:
a
=
74
Condition 1 & 2: a = 77
Condition 3: a = 74