Brother International KE-436C Inner Clamping Device Instruction Manual - Engli - Page 11
Piping
 |
View all Brother International KE-436C manuals
Add to My Manuals
Save this manual to your list of manuals |
Page 11 highlights
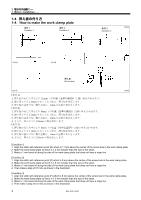
2 2. INSTALLATION 2966Q 2967Q 0021Q 6 7 12P)(9 8 10 11 4 9 11 番、4 6. Open the control box cover (main P.C. board mounting plate). (Refer to the Instruction Manual for the sewing machine.) 7. Disconnect the valve harness (12P) (9). 8. Insert the pin terminals (#11, #4) of the reversal solenoid valve (10) into connectors #11 and #4 on the valve harness (9). 2-3. 配管 2-3. Piping L Cylinder L Stepping cylinder R Cylinder R Reversal cylinder 2968Q 2969Q 1 2 1. Connect air tubes in accordance with the identified numbers in the figure, and then bind them with some fastening bands. Be sure not to crush the air tubes at that time. 2. Install the belt cover. (Refer to the Instruction Manual for the sewing machine.) KE-435C,436C 8
-
 1
1 -
2
-
3
-
4
-
5
-
 6
6 -
 7
7 -
 8
8 -
 9
9 -
 10
10 -
 11
11 -
 12
12 -
 13
13 -
 14
14 -
 15
15 -
 16
16 -
17
-
18
-
19
-
20
 |
 |

2. 取り付け方
2. INSTALLATION
8
KE-435C,436C
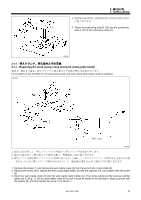
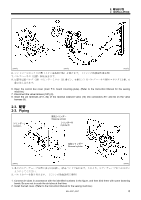
6.
コントロールボックスの蓋(メイン基板取付板)を開けます。(ミシンの取扱説明書参照)
7.
バルブハーネス(
12P
)
(9)
を抜きます。
8.
反転用電磁バルブ(
10
)のピンターミナル(
11
番ピン、
4
番ピン)をバルブハーネス
(9)
のコネクタ
11
番、
4
番に差し込みます。
6. Open the control box cover (main P.C. board mounting plate). (Refer to the Instruction Manual for the sewing
machine.)
7. Disconnect the valve harness (12P) (9).
8. Insert the pin terminals (#11, #4) of the reversal solenoid valve (10) into connectors #11 and #4 on the valve
harness (9).
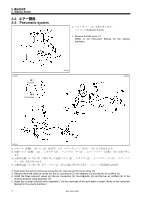
2-3.
配管
2-3. Piping
1.
各々のエアーチューブを同じ番号に接続し、結束バンドで束ねます。このとき、エアーチューブをつぶさない
ようにしてください。
2.
ベルトカバーを取り付けます。(ミシンの取扱説明書参照)
1. Connect air tubes in accordance with the identified numbers in the figure, and then bind them with some fastening
bands. Be sure not to crush the air tubes at that time.
2. Install the belt cover. (Refer to the Instruction Manual for the sewing machine.)
2966Q
0021Q
2967Q
2968Q
2969Q
シリンダー
L
Cylinder L
シリンダー
R
Cylinder R
反転シリンダー
Reversal cylinder
間欠シリンダー
Stepping cylinder