Brother International KE-436C Inner Clamping Device Instruction Manual - Engli - Page 4
Sewing area, 2. How to make a sewing pattern
 |
View all Brother International KE-436C manuals
Add to My Manuals
Save this manual to your list of manuals |
Page 4 highlights
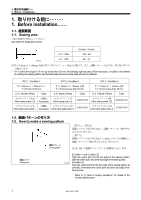
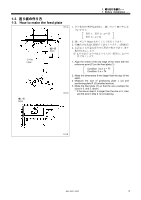
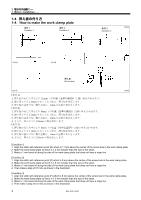
1 1. Before installation...... 1 1. Before installation...... 1-1 1-1. Sewing area Use within the range given below. X (mm) × Y (mm) 最大 / Max. 100 × 60 0001Q 最小 / Min. 20 × 13 ※ Y が 13mm 以上 20mm If Y is within the range of 13 mm up to less than 20 mm, the following optional parts will be necessary. In addition, the method of creating the sewing pattern and the feed plate and work clamp plate will also be different. 条件 1 / Condition 1 条件 2 / Condition 2 条件 3 / Condition 3 Y が 20mm 以上 60mm 以下 Y = 20 mm to 60 mm Y が 16mm 以上 20mm 未満 Y = 16 mm to less than 20 mm Y が 13mm 以上 16mm 未満 Y = 13 mm to less than 16 mm 品名 / Name of Parts Code 品名/ Name of Parts Code 品名 / Name of Parts Code LA 付属品 Work clamp crank, LA Accessory S Work clamp crank, S 154297-001 SS Work clamp crank, SS S04516-001 L Work clamp plate holder, L 付属品 Accessory S Work clamp plate holder, S 154291-001 S Work clamp plate holder, S 154291-001 1-2 1-2. How to make a sewing pattern Sewing pattern [条件 1 2 A 3 A)から 3mm B 4 Sewing area 2715Q [Condition 1 and Condition 2] Align the center point for the top edge of the sewing pattern with the center point (A) at the top edge of the sewing area. [Condition 3] Align the center point for the top edge of the sewing pattern at point (B) 3 mm below the center point (A) at the top edge of the sewing area. * Refer to "4. Note to sewing operations" for details of the reverse stitching area. 1 KE-435C,436C
-
 1
1 -
 2
2 -
 3
3 -
 4
4 -
 5
5 -
 6
6 -
 7
7 -
 8
8 -
 9
9 -
 10
10 -
11
-
12
-
13
-
14
-
15
-
16
-
17
-
18
-
19
-
20
 |
 |
