Brother International LS-1717B Users Manual - Multi - Page 41
Zigzag Stitching, Point zigzag
 |
View all Brother International LS-1717B manuals
Add to My Manuals
Save this manual to your list of manuals |
Page 41 highlights
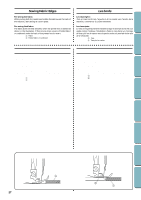
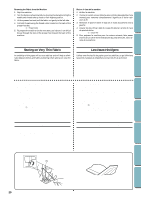
CONTENTS KNOWING YOUR SEWING MACHINE STRAIGHT AND ZIGZAG BUILT-IN STITCHES STITCHING Zigzag Stitching STITCH LENGTH STITCH WIDTH NEEDLE POSITION PRESSER FOOT NEEDLE 1-4 (For the Satin Stitch, set at F.) 1-5 (For twin needle sewing, always use a setting of less than 3.) M, L, R (For twin needle sewing, always set at M.) Zigzag Single or Twin Simple Zigzag Stitch Set the stitch length between 1 and 4 for a simple zigzag stitch. NOTE: Zigzag stitching requires less upper thread tension than straight stitching. 1. With the stitch length set between 0 and 1, sew 5-6 straight stitches for reinforcement. 2. Set the stitch width to your desired width and begin sewing. 3. Reset the stitch width to between 0 and 1 to reinforce the stitches again before removing the work from the machine. Satin Stitch When the stitch length is set in the F range and the stitch width is set above 1, it produces a Satin Stitch (a close zigzag stitch). The Satin Stitch can be used for making buttonholes and decorative stitches or edging. NOTE: It is recommended that a test sample be made on a fabric scrap before sewing on your project. Point zigzag Longueur de point Largeur de point Position de l'aiguille Pied-de-biche Aiguille 1-4 (pour le point bourdon, régler sur F.) 1-5 (lorsque l'aiguille jumelée est utilisée, toujours régler sur moins de 3.) M, L, R (lorsque l'aiguille jumelée est utilisée, toujours régler sur M.) Zigzag Simple ou jumelée Point zigzag simple Régler la longueur de point entre 1 et 4 pour un point zigzag simple. REMARQUE : La tension du fil supérieur n'a pas besoin d'être aussi importante pour la couture en zigzag que pour les points droits. 1. La longueur de point entre 0 et 1, faire 5-6 points droits de consolidation. 2. Régler la largeur de point en fonction de la largeur souhaitée et commencer à coudre. 3. Régler de nouveau la largeur de point entre 0 et 1 pour consolider de nouveau les points avant de retirer l'ouvrage de la machine. Point bourdon Lorsque la longueur de point est dans la plage F et la largeur de point sur un réglage supérieur à 1, on obtient un point bourdon (un point zigzag serré). Le point bourdon peut être utilisé pour les boutonnières et les points fantaisie ou pour les bords. REMARQUE : Il est conseillé de s'exercer sur une chute de tissu avant de commencer l'ouvrage proprement dit. BUTTONHOLE AND USING ATTACHMENTS BUTTON SEWING AND APPLICATIONS MAINTENANCE INDEX 31
-
 1
1 -
2
-
3
-
4
-
5
-
6
-
7
-
8
-
9
-
10
-
11
-
12
-
13
-
14
-
15
-
16
-
17
-
18
-
19
-
20
-
21
-
22
-
23
-
24
-
25
-
26
-
27
-
28
-
29
-
30
-
31
-
32
-
33
-
34
-
35
-
 36
36 -
 37
37 -
 38
38 -
 39
39 -
 40
40 -
 41
41 -
 42
42 -
 43
43 -
 44
44 -
 45
45 -
 46
46 -
47
-
48
-
49
-
50
-
51
-
52
-
53
-
54
-
55
-
56
-
57
-
58
-
59
-
60
-
61
-
62
-
63
-
64
-
65
-
66
-
67
-
68
-
69
-
70
-
71
-
72
-
73
-
74
-
75
-
76
-
77
-
78
-
79
-
80
-
81
-
82
 |
 |