Brother International LS-1717B Users Manual - Multi - Page 50
Button Sewing, Coudre un bouton
 |
View all Brother International LS-1717B manuals
Add to My Manuals
Save this manual to your list of manuals |
Page 50 highlights
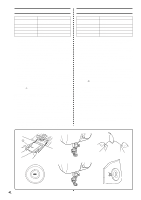
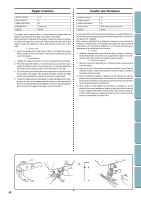
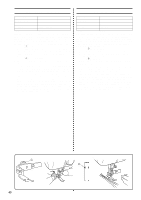
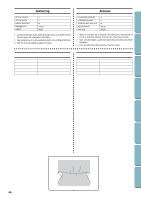
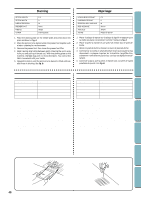
CONTENTS KNOWING YOUR SEWING MACHINE STRAIGHT AND ZIGZAG BUILT-IN STITCHES STITCHING Button Sewing STITCH LENGTH STITCH WIDTH NEEDLE POSITION PRESSER FOOT NEEDLE OTHEr 0 Set according to the distance between the holes. L or R Zigzag Single Darning Plate 1. Set the darning plate on the needle plate over the feed dogs as shown in the illustration and press down into place. 2. Place a button between the presser foot and the fabric. 3. You will need to adjust the stitch width to match the distance between the holes in the button. Turning the width knob will narrow or widen the "swing" of the stitch to accommodate most buttons. 4. To check the width, move the balance wheel toward you while observing the needle. Turn several times to make sure the needle goes easily into the both holes on the button without touching the button. 5. Slowly sew about 10 stitches. 6. Stop the machine and raise the needle from the fabric. 7. Remove the fabric from the machine and cut the upper and lower threads leaving at least 10 cm (4"). With a normal sewing needle, pull the threads to the back of the fabric and tie them together to secure the button. 8. Remove the darning plate for normal sewing by pulling up on the front edge. 1 Front edge slot on darning plate Button Fitting with Thread Shank The thread shank of a button is often needed when sewing on heavier fabric. 1. Place a button between the presser foot and the fabric, adjust the stitch width according to the distance between the holes in the button and sew on the button as previously explained. 2. After sewing about 10 stitches, remove the fabric from the machine leaving a longer upper thread (about 15 cm (6")) in order to form a thread shank. 3. Pull the upper thread through one of the holes on the button until it is between the button and the fabric and tightly wrap the thread around the stitches. 4. With a normal sewing needle, pull the threads to the back of the fabric and tie the ends together to secure the button. Coudre un bouton Longueur de point Largeur de point Position de l'aiguille Pied-de-biche Aiguille Autre 0 Selon la distance entre les orifices du bouton. L ou R Zigzag Simple Plaque à repriser 1. Mettre la plaque à repriser sur la plaque à aiguille sur les griffes d'entraînement comme l'indique l'illustration et appuyer pour la mettre en place correctement. 2. Placer un bouton entre le pied-de-biche et le tissu. 3. Il sera nécessaire de régler la largeur de point selon la distance entre les orifices du bouton. En tournant le sélecteur de largeur, le point deviendra plus ou moins large, ainsi il est possible de coudre toutes sortes de boutons. 4. Pour vérifier la largeur, faire tourner le volant vers soi tout en observant l'aiguille. Le tourner plusieurs fois pour vérifier que l'aiguille entre facilement dans les deux orifices sans heurter le bouton. 5. Faire 10 points lentement. 6. Arrêter la machine et sortir l'aiguille du tissu. 7. Retirer le tissu de la machine et couper les fils supérieur et inférieur en laissant dépasser au moins10 cm. A l'aide d'une aiguille à coudre normale, tirer les fils vers l'arrière du tissu et faire un noeud. 8. Retirer la plaque à repriser en tirant sur le bord avant pour recommencer la couture normale. 1 Bord avant de la plaque à repriser Mise en place d'un bouton à l'aide d'une queue de fil Il est souvent nécessaire de faire une queue de fil lorsque le bouton est cousu sur du tissu plus épais. 1. Placer un bouton entre le pied-de-biche et le tissu, régler la largeur de point selon la distance entre les orifices du bouton et coudre le bouton sur le tissu selon les explications précédentes. 2. Après environ 10 points, retirer le tissu de la machine en laissant dépasser un fil supérieur long (environ 15 cm) afin de former une queue de fil. 3. Tirer sur le fil supérieur pour le faire passer par un des orifices du bouton jusqu'à ce qu'il se trouve entre le bouton et le tissu, puis l'enrouler fermement autour des points. 4. A l'aide d'une aiguille à coudre normale, tirer les fils de l'autre côté du tissu et les nouer pour éviter que le bouton ne se défasse. BUTTONHOLE AND USING ATTACHMENTS BUTTON SEWING AND APPLICATIONS MAINTENANCE INDEX 40
-
 1
1 -
2
-
3
-
4
-
5
-
6
-
7
-
8
-
9
-
10
-
11
-
12
-
13
-
14
-
15
-
16
-
17
-
18
-
19
-
20
-
21
-
22
-
23
-
24
-
25
-
26
-
27
-
28
-
29
-
30
-
31
-
32
-
33
-
34
-
35
-
36
-
37
-
38
-
39
-
40
-
41
-
42
-
43
-
44
-
 45
45 -
 46
46 -
 47
47 -
 48
48 -
 49
49 -
 50
50 -
 51
51 -
 52
52 -
 53
53 -
 54
54 -
 55
55 -
56
-
57
-
58
-
59
-
60
-
61
-
62
-
63
-
64
-
65
-
66
-
67
-
68
-
69
-
70
-
71
-
72
-
73
-
74
-
75
-
76
-
77
-
78
-
79
-
80
-
81
-
82
 |
 |
