Brother International PR-1000 PE-DESIGN NEXT CW Instruction Manual PRCW1 - Page 12
Tutorial 1: Creating a Cutwork Pattern Filled with Net Stitching (Cutwork Wizard), Step 1 Creating
 |
View all Brother International PR-1000 manuals
Add to My Manuals
Save this manual to your list of manuals |
Page 12 highlights
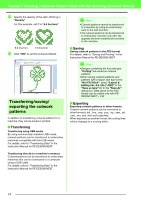
Tutorial 1: Creating a Cutwork Pattern Filled with Net Stitching (Cutwork Wizard) Tutorial 1: Creating a Cutwork Pattern Filled with Net Stitching (Cutwork Wizard) 4 By using the "Cutwork Wizard", a cutwork pattern can easily be created. The sample file for this tutorial can be found at the following location. Documents (My Documents)\PE-DESIGN NEXT\Tutorial\TutorialCW_1 Finish [Step 1] [Step 2] [Step 3] Creating an outline shape for cutwork Using the "Cutwork Wizard" Transferring/saving/exporting the cutwork patterns Step 1 Creating an outline shape for cutwork a Click 1, then 2, then 3 to display the Import dialog box. b Select "Outline Shapes 2" from the "Category" selector, select the clover pattern in the upper-left corner, and then click "Import". The pattern is imported into the Design Page. 1 2 3 b Memo: Patterns in "Outline Shapes 1" and "Outline Shapes 2" are appropriate for creating the cutwork patterns. 10
-
 1
1 -
2
-
3
-
4
-
5
-
6
-
 7
7 -
 8
8 -
 9
9 -
 10
10 -
 11
11 -
 12
12 -
 13
13 -
 14
14 -
 15
15 -
 16
16 -
 17
17 -
18
-
19
-
20
-
21
-
22
-
23
-
24
-
25
-
26
-
27
-
28
-
29
 |
 |
