Brother International PR-1000 PE-DESIGN NEXT CW Instruction Manual PRCW1 - Page 21
Step 3 Converting outlines to cutting lines, Step 3
 |
View all Brother International PR-1000 manuals
Add to My Manuals
Save this manual to your list of manuals |
Page 21 highlights
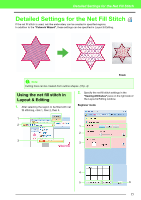
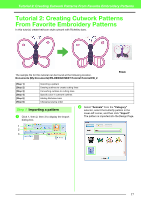
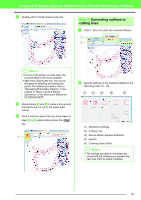
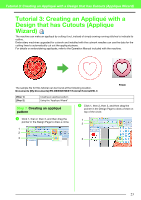
Tutorial 2: Creating Cutwork Patterns From Favorite Embroidery Patterns d Double-click to finish drawing the line. Step 3 Converting outlines to cutting lines a Click 1, then 2 to start the Cutwork Wizard. 1 2 b Memo: • If a line of the pattern crosses itself, the Cutwork Wizard will not be available. • After finish drawing the line, line can be reshaped by selecting and editing the points. For detailed procedure, refer to "Reshaping Embroidery Patterns" in the chapter of "Basic Layout & Editing Operations" of the Instruction Manual for PE-DESIGN NEXT. e Repeat steps c and d to draw a line around the area to be cut out in the lower-right corner. f Click 1 and then select the two lines drawn in step d to e while holding down the Ctrl key. 1 b Specify settings in the Cutwork Wizard in the following order (1) - (5). (1) (2) (3) (4) (5) (1) Stabilize Cut Edge (2) Cutting Line (3) Secure Water-Soluble Stabilizer (4) Net Fill (5) Covering Satin Stitch b Memo: • The settings specified in the wizard are stored with the software and recalled the next time that the wizard is started. 19
-
 1
1 -
2
-
3
-
4
-
5
-
6
-
7
-
8
-
9
-
10
-
11
-
12
-
13
-
14
-
15
-
 16
16 -
 17
17 -
 18
18 -
 19
19 -
 20
20 -
 21
21 -
 22
22 -
 23
23 -
 24
24 -
 25
25 -
 26
26 -
27
-
28
-
29
 |
 |
