Brother International PR-1000 PE-DESIGN NEXT CW Instruction Manual PRCW1 - Page 17
Detailed Settings for the Net Fill Stitch, Using the net fill stitch in Layout & Editing
 |
View all Brother International PR-1000 manuals
Add to My Manuals
Save this manual to your list of manuals |
Page 17 highlights
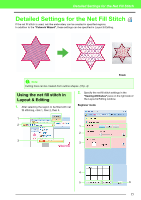
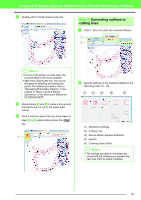
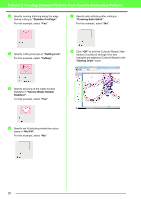
Detailed Settings for the Net Fill Stitch Detailed Settings for the Net Fill Stitch 4 If the net fill stitch is used, net-like embroidery can be created in specified regions. In addition to the "Cutwork Wizard", these settings can be specified in Layout & Editing. Finish a Note: Cutting lines can be created from outline shapes. ( cp. 4) Using the net fill stitch in Layout & Editing 1. After selecting the region to be filled with net fill stitching, click 1, then 2, then 3. 2. Specify the net fill stitch settings in the "Sewing Attributes" pane on the right side of the Layout & Editing window. Beginner mode 1 2 1 2 3 3 4 5 6 15
-
 1
1 -
2
-
3
-
4
-
5
-
6
-
7
-
8
-
9
-
10
-
11
-
 12
12 -
 13
13 -
 14
14 -
 15
15 -
 16
16 -
 17
17 -
 18
18 -
 19
19 -
 20
20 -
 21
21 -
 22
22 -
23
-
24
-
25
-
26
-
27
-
28
-
29
 |
 |

15
Detailed Settings for the Net Fill Stitch
Detailed Settings for the Net Fill Stitch
If the net fill stitch is used, net-like embroidery can be created in specified regions.
In addition to the
“Cutwork Wizard”
, these settings can be specified in Layout & Editing.
1.
After selecting the region to be filled with net
fill stitching, click 1, then 2, then 3.
2.
Specify the net fill stitch settings in the
“Sewing Attributes”
pane on the right side of
the Layout & Editing window.
Beginner mode
Finish
a
Note:
Cutting lines can be created from outline shapes. (
c
p. 4)
4
Using the net fill stitch in
Layout & Editing
1
2
3
1
4
5
2
3
6