Brother International PR-1000 PE-DESIGN NEXT CW Instruction Manual PRCW1 - Page 22
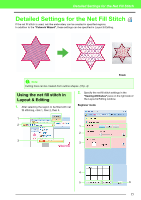
Stabilize Cut Edge, Cutting Line, Cutting, Secure Water-Soluble, Stabilizer, Net Fill
 |
View all Brother International PR-1000 manuals
Add to My Manuals
Save this manual to your list of manuals |
Page 22 highlights
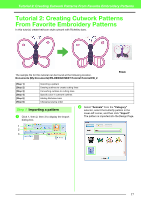
Tutorial 2: Creating Cutwork Patterns From Favorite Embroidery Patterns c Specify running stitching along the edge before cutting in "Stabilize Cut Edge". For this example, select "Yes". g Specify satin stitching after cutting in "Covering Satin Stitch". For this example, select "No". d Specify cutting line type in "Cutting Line". For this example, select "Cutting". h Click "OK" to exit the Cutwork Wizard. New frames of outline (3 through 8 for this example) are added by Cutwork Wizard in the "Sewing Order" pane. e Specify securing of the water-soluble stabilizer in "Secure Water-Soluble Stabilizer". For this example, select "Yes". f Specify net fill stitching inside the cutout areas in "Net Fill". For this example, select "No". 20
-
 1
1 -
2
-
3
-
4
-
5
-
6
-
7
-
8
-
9
-
10
-
11
-
12
-
13
-
14
-
15
-
16
-
 17
17 -
 18
18 -
 19
19 -
 20
20 -
 21
21 -
 22
22 -
 23
23 -
 24
24 -
 25
25 -
 26
26 -
 27
27 -
28
-
29
 |
 |

20
Tutorial 2: Creating Cutwork Patterns From Favorite Embroidery Patterns
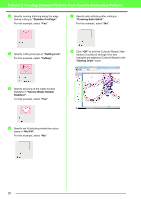
c
Specify running stitching along the edge
before cutting in
“Stabilize Cut Edge”
.
For this example, select
“Yes”
.
d
Specify cutting line type in
“Cutting Line”
.
For this example, select
“Cutting”
.
e
Specify securing of the water-soluble
stabilizer in
“Secure Water-Soluble
Stabilizer”
.
For this example, select
“Yes”
.
f
Specify net fill stitching inside the cutout
areas in
“Net Fill”
.
For this example, select
“No”
.
g
Specify satin stitching after cutting in
“Covering Satin Stitch”
.
For this example, select
“No”
.
h
Click
“OK”
to exit the Cutwork Wizard. New
frames of outline (3 through 8 for this
example) are added by Cutwork Wizard in the
“Sewing Order”
pane.