Brother International PR-1000 PE-DESIGN NEXT CW Instruction Manual PRCW1 - Page 13
Step 2 Using the “Cutwork Wizard”, Using the Cutwork, Wizard
 |
View all Brother International PR-1000 manuals
Add to My Manuals
Save this manual to your list of manuals |
Page 13 highlights
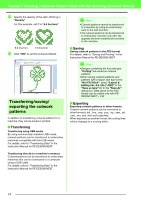
Tutorial 1: Creating a Cutwork Pattern Filled with Net Stitching (Cutwork Wizard) c Enlarge the pattern imported into the Design Page. While holding down the Shift key, drag a handle to enlarge the pattern from the center. Step 2 Using the "Cutwork Wizard" a Drag the pointer over the four leaves to select them. d Ungroup the pattern. Select the pattern, rightclick it, and then click "Ungroup". b Click 1, then 2 to start the Cutwork Wizard. 1 2 b Memo: • The Cutwork Wizard can also be used if multiple outline shapes (outlines and inside regions) are selected. • If a line of the pattern crosses itself, the Cutwork Wizard will not be available. a Note: If "Machine Type" (on the "Design Page" tab of the "Design Settings" dialog box) is set to a single-needle embroidery machine, Cutwork Wizard is not available. 11
-
 1
1 -
2
-
3
-
4
-
5
-
6
-
7
-
 8
8 -
 9
9 -
 10
10 -
 11
11 -
 12
12 -
 13
13 -
 14
14 -
 15
15 -
 16
16 -
 17
17 -
 18
18 -
19
-
20
-
21
-
22
-
23
-
24
-
25
-
26
-
27
-
28
-
29
 |
 |
