Brother International XL-3200 Users Manual - English
Brother International XL-3200 Manual
 |
View all Brother International XL-3200 manuals
Add to My Manuals
Save this manual to your list of manuals |
Brother International XL-3200 manual content summary:
- Brother International XL-3200 | Users Manual - English - Page 1
OPERATION MANUAL MANUAL DE INSTRUCCIONES 0 6.10.3 I t . xi% Z., ENGLISH ESPANOL 194239-011 Printed in Taiwan brother - Brother International XL-3200 | Users Manual - English - Page 2
the needle, threading the bobbin, or changing the presser foot. 15. Always unplug the sewing machine from the electrical outlet when removing covers, lubricating, or when making any other user service adjustments mentioned in this instruction manual. "SAVE THESE INSTRUCTIONS" "This sewing machine - Brother International XL-3200 | Users Manual - English - Page 3
KNOWING YOUR SEWING MACHINE Principal parts 1 Accessories 3 OPERATING YOUR SEWING MACHINE 4 Connecting Plugs 4 Main Power and Sewing Light Switches ....5 Foot Controller 5 Replacing the Needle 6 Checking the Needle 6 Changing the Presser Foot 7 Converting to Free-arm Style - Brother International XL-3200 | Users Manual - English - Page 4
the length of the stitches. (4) PRESSER FOOT LEVER Raises and lowers the presser foot. ® UPPER TENSION CONTROL DIAL Controls the tension of the upper thread. ® EXTENSION TABLE & ACCESSORIES COMPARTMENT Converts from a free-arm into a flat bed machine. (j) PATTERN INDICATION WINDOW Shows the stitch - Brother International XL-3200 | Users Manual - English - Page 5
Connect the three-prong plug into the machine. It is located between the foot controller and the power supply plug on the cord. 2. Connect the power supply plug into a wall outlet. CAUTION 1. When changing the needle, bobbin or light bulb or when the sewing machine is not in use, it is recommended - Brother International XL-3200 | Users Manual - English - Page 6
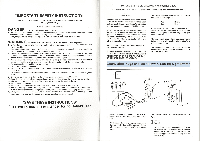
de no poner ningun objeto sobre el pedal cuando la maquina no este utilizada. ® Pedal 5 Checking the Needle 1. The sewing needle must always be straight and sharp for smooth sewing. 2. To check if the needle is bent, place the flat side of the needle down as shown in the illustration. 3. Replace - Brother International XL-3200 | Users Manual - English - Page 7
de golpe. 0 0 0 Converting to Free-arm Style Free-arm sewing is convenient for sewing tubular and hard-to-reach areas on a garment. To change your machine to the free-arm style, simply lift out the extension table. • Lift up on the extension table. @ Slide the extension table to the left - Brother International XL-3200 | Users Manual - English - Page 8
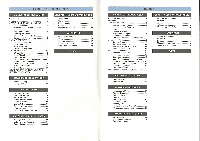
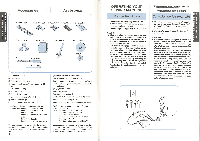
STITCHES PATTERN 1 2 3 4 5 6 7 8 9 10 11 12 13 14 15 STITCH NAME RECOMMENDED RECOMMENDED WIDTH LENGTH [mm(inch)] [mm(inch)] 1-STEP AUTOMATIC BUTTONHOLE STRAIGHT STITCH ZIGZAG STITCH BLIND HEM STITCH SHELL TUCK STITCH ELASTIC STITCH STRETCH BLIND STITCH DOUBLE ACTION STITCH LIGHTNING STITCH - Brother International XL-3200 | Users Manual - English - Page 9
sewing on a button. The "F" area is used for making a Satin Stitch (a close zigzag stitch) which can be used in making buttonholes and decorative stitches. The position needed for making foot pedal. To sew forward, release the Reverse Sewing Button. The machine will then sew forward. Reverse sewing - Brother International XL-3200 | Users Manual - English - Page 10
THREADING THE MACHINE , Winding the bobbin 1. Change the Clutch Release Switch from the needle mark to the bobbin mark. 2. Place a spool of thread onto the horizontal spool pin and firmly hold it with a spool holder so that the spool of thread will not turn. Pass the thread through the thread guide - Brother International XL-3200 | Users Manual - English - Page 11
fl • A JNIM • NN Lower Threading 1. Raise the needle to its highest position by turning the balance wheel toward you (counterclockwise) and raise the presser foot lever. 2. Open the shuttle cover behind the extension table on the front of the machine and remove the bobbin case by pulling its latch - Brother International XL-3200 | Users Manual - English - Page 12
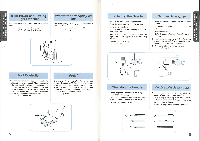
needle threader (When the machine is equipped with a needle threader) The needle threader can be used to thread the needle more easily. 1. Lower the presser foot lever. Lowerthe threader slightly and position the thread under the guide. ® Needle threader O Guide , hacia la parte posterior de la - Brother International XL-3200 | Users Manual - English - Page 13
of the machine near the horizontal spool pin. Place the second spool of thread onto the vertical spool pin as shown in fig. A. TWIN NEEDLE THREADING Each needle should be threaded separately. 1. Threading the Right Needle Follow the same instructions for single needle threading using the thread from - Brother International XL-3200 | Users Manual - English - Page 14
dado que una tension insuficiente o demasiado fuerte va a debilitar sus costuras o fruncir el tejido. 111 A O O ci) rn mz (4) Reverse (5) Surface C 4 O O (4) Reyes (5) Derecho 5 p airmyrr o pnbuvvyi a FA :=1NFL 1,S AND) Tun SEWING FABRICS NEEDLE SIZES THREAD SIZES VERY THIN Fine - Brother International XL-3200 | Users Manual - English - Page 15
parte pedal. Changing Sewing Direction 1. Stop the machine at the point where you wish to change directions with the needle still in the fabric. 2. Raise the presser foot and turn the fabric to line up its new direction using the needle as a turning point. 3. Lower the presser foot and start sewing - Brother International XL-3200 | Users Manual - English - Page 16
AND ZIGZAG STITCHING PUNTADAS RECTAS Y ZIGZAG Removing the Material from the Machine 1. Stop the machine. 2. Raise the needle to its highest position and make sure that the thread take-up lever is also in its highest position. 3. Lift the presser foot and pull the fabric out gently to the left side - Brother International XL-3200 | Users Manual - English - Page 17
the fabric on the bias, placing it under the presser foot so that the straight stitches are sewn on the seamline and the zigzag stitches are sewn slightly over the folded edge. 3. This stitch requires a tighter thread tension than normal. 4. Sew at a slow speed. Puntada Ondas Altimero de puntada - Brother International XL-3200 | Users Manual - English - Page 18
fabric together and center them under the presser foot. 2. Sew them together using the Elastic Stitch taking care 5. 2. Coloque una tela de refuerzo debajo de la parte a remendar. 3. Siguiendo la linea de la rasgadura, cosa This stitch can be used for making decorative top stitching and for smocking - Brother International XL-3200 | Users Manual - English - Page 19
This machine automatically produces a Scallop Stitch which may be used as a decorative edging. 1. Set the Pattern Selection Dial to 10. 2. Sew the Scallop Set the Pattern Selection Dial to 11. 2. Place the fabric right side up and sew 1 cm (3/8") from the edge of the fabric. 3. Trim close to the - Brother International XL-3200 | Users Manual - English - Page 20
Stitch can join together seams and finish them in one operation. This stitch is useful when sewing stretch material. 1. Set the Pattern Selection Dial to 12 or 13. 2. Position the fabric under the presser foot so that the seamline is approximately 3 mm (1/8") to the left of the center of the presser - Brother International XL-3200 | Users Manual - English - Page 21
MAKING A BUTTONHOLE 1 Using tailor's chalk, mark the position of the buttonhole on the fabric. 2. Attach the buttonhole foot and set the Pattern Selection Dial to 1. 3. Draw up the lower thread. 4. Lower the presser foot aligning the marks on the foot el remate de la parte delantera del ojal. 5. - Brother International XL-3200 | Users Manual - English - Page 22
, turn the material 90 degrees counterclockwise and sew Straight Stitches (2) to the end of the front bar tack of the buttonhole. 2. Remove the material from the machine. It is recommended that pins be placed across both ends of the buttonhole as protection against cutting the stitches. 3. Cut - Brother International XL-3200 | Users Manual - English - Page 23
foot and the fabric and make sure that the needle enters the holes without hitting the button. If it hits see step 1. 5. At a slow speed, sew approximately 10 stitches. 6. Remove the material from the machine. Cut the upper and lower threads and tie both threads situado en su parte posterior, instale - Brother International XL-3200 | Users Manual - English - Page 24
the portion to be darned under the presser , foot together with a fabric underlay for reinforcement. 4. Lower the presser foot. 5. Begin sewing, alternating between gently drawing the work away from you and pulling it toward you. With the darning plate on the machine the feed dogs will not move the - Brother International XL-3200 | Users Manual - English - Page 25
on the bottom of the inside hoop. 5. Place the work under the needle and lower the presser bar with the foot removed. 6. Pull the lower thread up through the work at the starting position by turning the balance wheel and make a few holding stitches. 7. Grip the hoop with the thumb and forefingers of - Brother International XL-3200 | Users Manual - English - Page 26
should be oiled once a week if it is used more than one hour a day. If the machine is used more often, oil every day. Sewing machine oil is available from your local sewing machine dealer or service center. Engrasado 1. Desenchufe la maquina. 2. Ponga 2 0 3 gotas de aceite en cada uno de los puntos - Brother International XL-3200 | Users Manual - English - Page 27
un cepillo. Performance Checklist Whenever sewing difficulties are encountered, review the section in this instruction manual that details the operation you are performing to make sure you are correctly using the machine. If the problem continues, the following check list may help you to improve - Brother International XL-3200 | Users Manual - English - Page 28
Page 18 No Bobbin is not threaded properly in the shuttle hook. Page 15 No Lower thread tension is too tight. Needle is incorrectly inserted. V Page 6 No Inferior needle is used. V Page 6 No The combination of needle size/ thread size/fabric is incorrect. Thread tension is incorrect - Brother International XL-3200 | Users Manual - English - Page 29
I No The combination of needle size/ thread size/fabric is incorrect. 4Y Page 21 No V Fabric is pulled excessively. Let the feed dogs move the fabric. Do not pull the fabric. No Foot controller is not used correctly. 4 Page 5 No V Clutch Release Switch is set at bobbin mark. Page 13 - Brother International XL-3200 | Users Manual - English - Page 30
53 A Accessories Applique B Blind Hem Stitch Buttonhole Buttonhole Fine Adjustment Button Sewing C Cleaning Connecting Plugs Darning Double Action Stitch Drawing Up Lower Thread E Elastic Stitch Elastic Overlock Stitch Embroidering F Feather Stitch Feed Dog Cleaning Foot Controller Free-arm Style - Brother International XL-3200 | Users Manual - English - Page 31
Stitch Triple Zigzag Stretch Stitch Troubleshooting Twin Needle Sewing U Upper Tension Control Dial Upper Threading 20 23 34 49, 51 19 20 16 W Winding the Bobbin 13 Z Zigzag Stitch 26 Zipper Insertion 40 M Modalidad brazo libre Monogramas 0 Ojales P Pedal Pulsador de retroceso Puntada de
-
 1
1 -
 2
2 -
 3
3 -
 4
4 -
 5
5 -
 6
6 -
 7
7 -
8
-
9
-
10
-
11
-
12
-
13
-
14
-
15
-
16
-
17
-
18
-
19
-
20
-
21
-
22
-
23
-
24
-
25
-
26
-
27
-
28
-
29
-
30
-
31
 |
 |
OPERATION
MANUAL
MANUAL
DE
INSTRUCCIONES
0
6.10.
3
I
t .
xi%
Z.,
ENGLISH
ESPANOL
194239-011
Printed
in
Taiwan
brother