Brother International XL-3200 Users Manual - English - Page 22
Buttonhole, Adjustment
 |
View all Brother International XL-3200 manuals
Add to My Manuals
Save this manual to your list of manuals |
Page 22 highlights
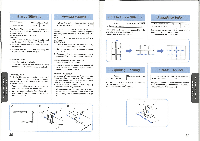
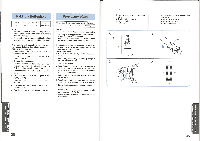
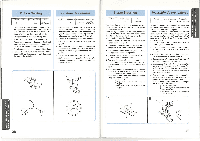
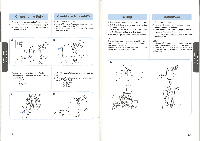
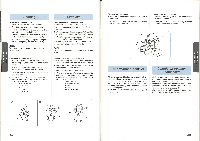
SECURING THE STITCHING AND CUTTING THE BUTTONHOLE 1. To secure the stitching, turn the material 90 degrees counterclockwise and sew Straight Stitches (2) to the end of the front bar tack of the buttonhole. 2. Remove the material from the machine. It is recommended that pins be placed across both ends of the buttonhole as protection against cutting the stitches. 3. Cut an opening in the middle of the buttonhole with a seam ripper tool. Be careful not to cut through any stitches. Para completer las puntadas y cortar el ojal 1. Para asegurar las puntadas, gire el tejido a 90 gradosen elsentido contrarioaldelasmanecillas de un reloj y cosa unas Puntadas Rectas (No 2) hasta el final de la linea del remate de la parte delantera. 2. Retire el tejido de la maquina. Se recomienda colocar alfileres en ambos extremos delojalpara evitar el code de las puntadas. 3. Code una apertura en el medio del ojal con el cortador especial que sirve para abrir costuras. Tenga cuidado en no cortar ninguna puntada. Buttonhole Fine Adjustment If the stitching on the two sides of the buttonhole do not appear uniform, the following adjustments can be made. 1. Set the Stitch Length Dial at "F" and stitch the left side of the buttonhole on a scrap of fabric while observing how the material is fed. 2. If the left side of the buttonhole is too coarse or fine, adjust the feeding of the material with the Stitch Length Dial. Ajuste fino de los ojales Silas puntadas en ambos lados del ojalno parecen seruniformes, sepuedenhacerlossiguientesajustes. 1. Ponga el selector de largo de puntada en "F" y cosa la parte izquierda del ojal en un pedazo de tejido, observando como se alimenta el tejido. 2. Sila parteizquierda delojales demasiada gruesa o fina, ajuste la alimentacion del tejido con el selector de largo de puntada. C) Left row • STITCH LENGTH ® Shorter ® Longer ® In case ® Lado izquierdo (0 Largo de puntada 0) Mas corto ® Mas largo ® En caso que L© F 1001°""-I. 3. After obtaining a satisfactory feeding on the left side, stitch the right side of the buttonhole and observe the feeding. 4. If the right side is too coarse or fine compared to the left side, adjust the buttonhole fine adjustment screw as described below. If the right side is too coarse, turn the screw with the enclosed large screwdriver in the - direction. If the right side is too fine, turn the screw with the enclosed large screwdriver in the + direction. This adjustment allows both sides of the buttonhole to appear uniform. ® Stitch length dial • Buttonhole fine adjusting screw (§) Right row 0) In case 6 0 3. Cuando se logro una alimentacion correcta para la parte izquierda, cosa la parte derecha del ojal y mire de nuevo la alimentacion del tejido. 4. Sila parte derecha delojal es demasiada gruesa o fina con relacion a la parte izquierda, apriete o suelte el tornillo para ajuste fino del ojal tal como se describe a continuaciOn. Si la parte derecha es demasiada gruesa, con el destornillador grande incluido, gire el tornillo en elsentidodel-. Silaparte derecha es demasiada fina, gire dicho tornillo en el sentido del +. Este ajustepermite que ambos lados delojalparezcan uniformes. ® Dial de longitud de puntada C) Tornillo de ajuste fino de ojal ® Lado derecho ® En caso que GNIWES OJALES Y COSTURA DE BOTONES :UTT0NH0LE . • :UTT•N S3NOIOB 30VIRUS0.9A S37Vr0 DNIM3S No.une CINV 31OHNO11118 7 CD CD 37 38
-
 1
1 -
2
-
3
-
4
-
5
-
6
-
7
-
8
-
9
-
10
-
11
-
12
-
13
-
14
-
15
-
16
-
 17
17 -
 18
18 -
 19
19 -
 20
20 -
 21
21 -
 22
22 -
 23
23 -
 24
24 -
 25
25 -
 26
26 -
 27
27 -
28
-
29
-
30
-
31
 |
 |
