Brother International XL-3200 Users Manual - English - Page 9
Stitch, Length, Selector, largo, puntada, Width, ancho, Reverse, Sewing, Button, Pulsador, retroceso
 |
View all Brother International XL-3200 manuals
Add to My Manuals
Save this manual to your list of manuals |
Page 9 highlights
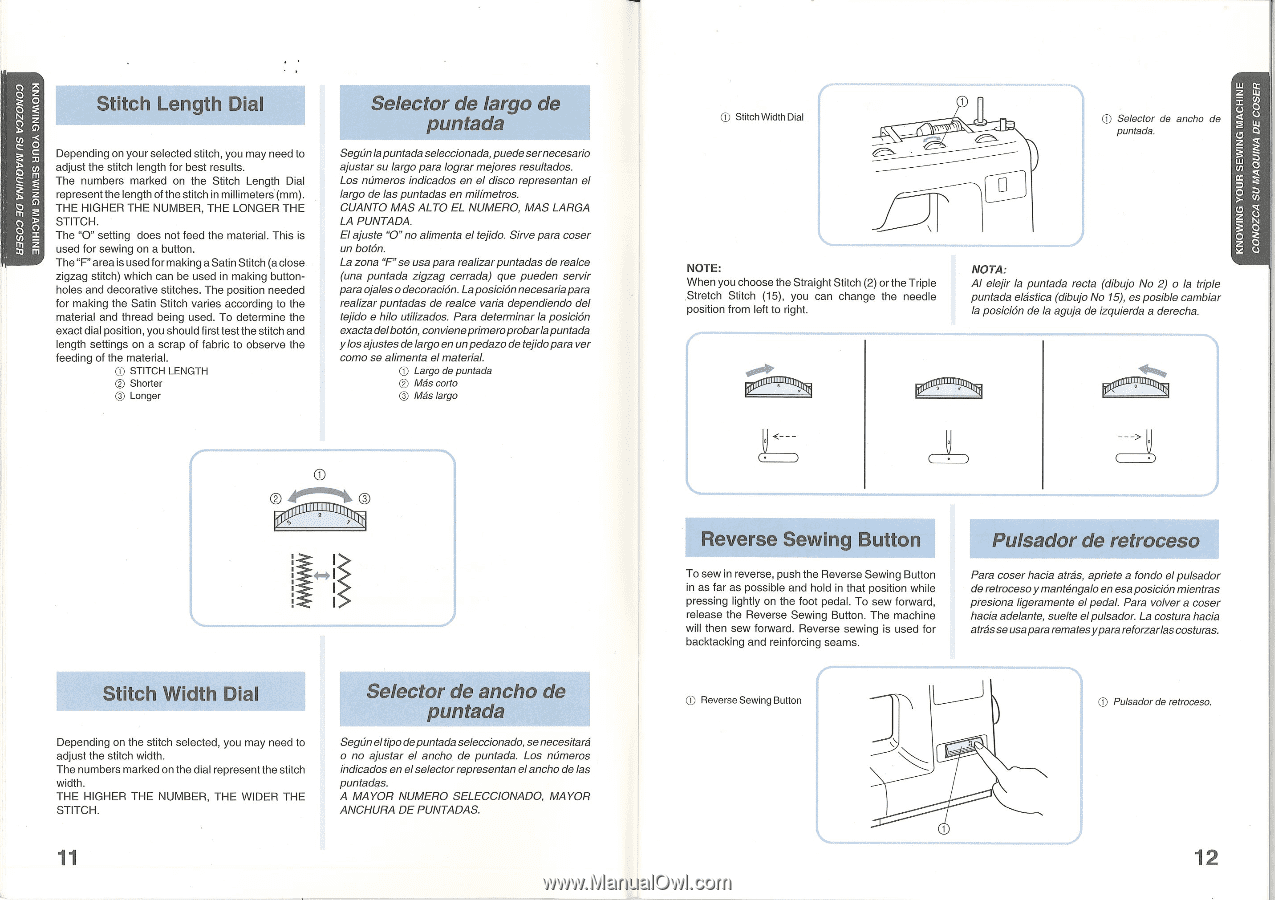
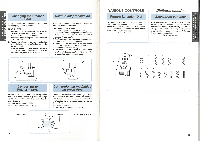
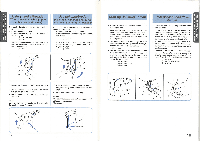
' • •CZ •C ' SUM ' .UINI 0 • " SEWING M , , W JNIM3S . fl • A JNIM • , •• d , -35.3 3I . KN • Stitch Length Dial Depending on your selected stitch, you may need to adjust the stitch length for best results. The numbers marked on the Stitch Length Dial represent the length of the stitch in millimeters (mm). THE HIGHER THE NUMBER, THE LONGER THE STITCH. The "0" setting does not feed the material. This is used for sewing on a button. The "F" area is used for making a Satin Stitch (a close zigzag stitch) which can be used in making buttonholes and decorative stitches. The position needed for making the Satin Stitch varies according to the material and thread being used. To determine the exact dial position, you should first test the stitch and length settings on a scrap of fabric to observe the feeding of the material. ® STITCH LENGTH C) Shorter ® Longer Selector de largo de puntada Seganlapuntada seleccionada,puedesernecesario ajustar su largo para lograr mejores resultados. Los numeros indicados en el disco representan el largo de las puntadas en milfmetros. CUANTO MAS ALTO EL NUMERO, MAS LARGA LA PUNTADA. El ajuste "O" no alimenta el tejido. Sirve para coser un bot6n. La zona "F"se usa para realizarpuntadas de realce (una puntada zigzag cerrada) que pueden servir para ojales o decoraci6n. Laposicionnecesariapara realizar puntadas de realce varia dependiendo del tejido e hilo utilizados. Para determinar la posickin exacta delbot6n, convieneprimeroprobarlapuntada ylos ajustes delargo enunpedazo de tejidopara ver como se alimenta el material. 0 Largo de puntada • Mas corto ® Mas largo (i) Stitch Width Dial ® Selector de ancho de puntada. NOTE: When you choose the Straight Stitch (2) or the Triple .Stretch Stitch (15), you can change the needle position from left to right. NOTA: Al elejir la puntada recta (dibujo No 2) o la triple puntada elastica (dibujo No 15), es posible cambiar la posicion de la aguja de izquierda a derecha. joli Ilki 141 Stitch Width Dial Depending on the stitch selected, you may need to adjust the stitch width. The numbers marked on the dial represent the stitch width. THE HIGHER THE NUMBER, THE WIDER THE STITCH. Selector de ancho de puntada Segalleltipo depuntada seleccionado, senecesitara o no ajustar el ancho de puntada. Los numeros indicados en elselectorrepresentan elancho de las puntadas. A MAYOR NUMERO SELECCIONADO, MAYOR ANCHURA DE PUNTADAS. 11 Reverse Sewing Button To sew in reverse, push the Reverse Sewing Button in as far as possible and hold in that position while pressing lightly on the foot pedal. To sew forward, release the Reverse Sewing Button. The machine will then sew forward. Reverse sewing is used for backtacking and reinforcing seams. Pulsador de retroceso Para coser hacia atras, apriete a fondo el pulsador de retrocesoymantengalo en esa posicionmientras presiona ligeramente el pedal. Para volver a coser hacia adelante, suelte elpulsador. La costura hacia atras se usapara rematesypara reforzarlas costuras. ® Reverse Sewing Button (I) Pulsador de retroceso. 12
-
 1
1 -
2
-
3
-
 4
4 -
 5
5 -
 6
6 -
 7
7 -
 8
8 -
 9
9 -
 10
10 -
 11
11 -
 12
12 -
 13
13 -
 14
14 -
15
-
16
-
17
-
18
-
19
-
20
-
21
-
22
-
23
-
24
-
25
-
26
-
27
-
28
-
29
-
30
-
31
 |
 |