Brother International XL-3200 Users Manual - English - Page 27
ElEffI7n€MICil2, IJMU[MIIIMA
 |
View all Brother International XL-3200 manuals
Add to My Manuals
Save this manual to your list of manuals |
Page 27 highlights
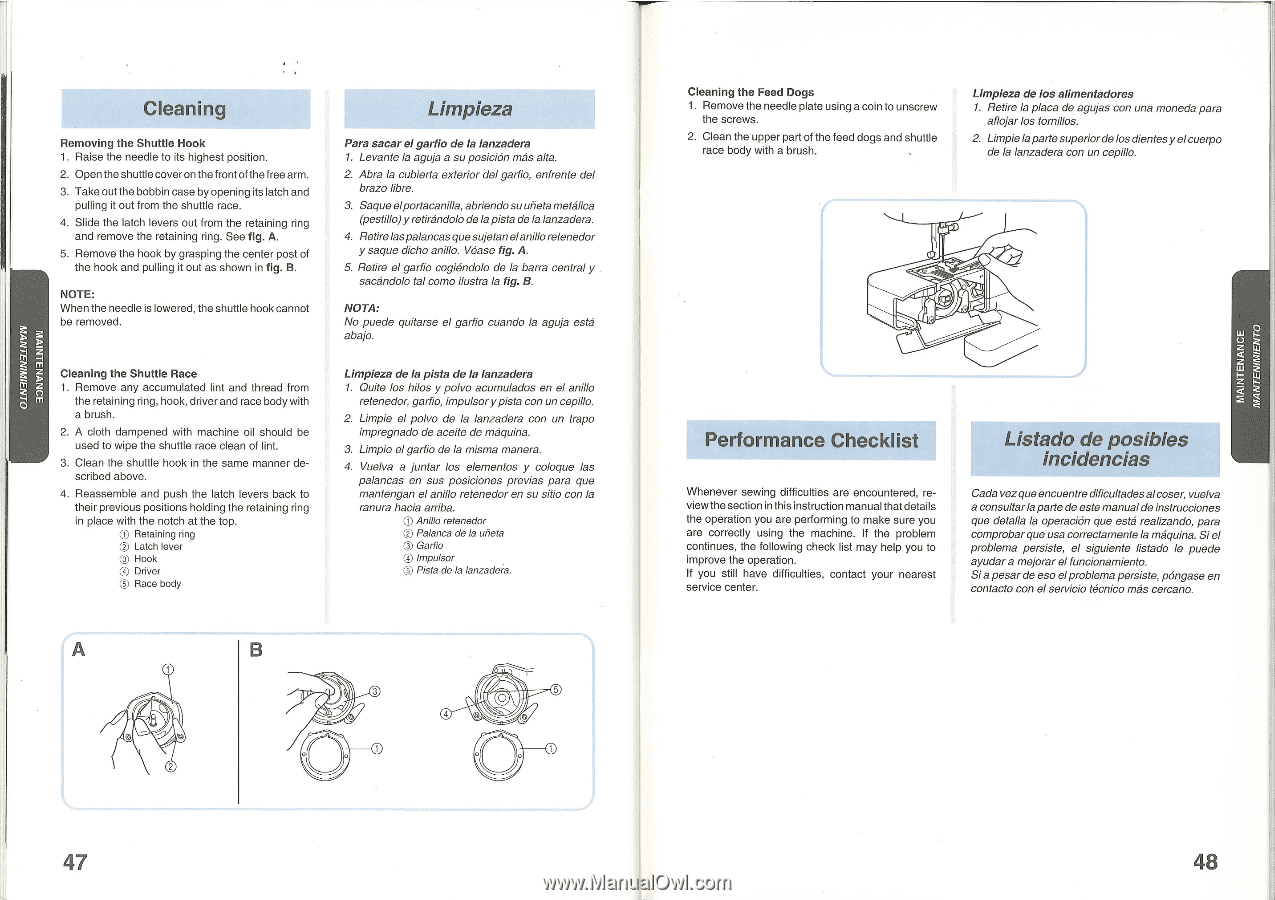
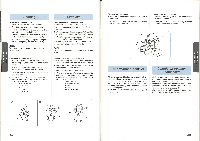
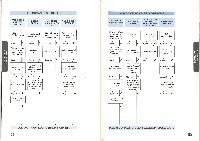
• ElEffI7n€MICil2 IJMU[MIIIMA • Cleaning Removing the Shuttle Hook 1. Raise the needle to its highest position. 2. Open the shuttle cover on the front of the free arm. 3. Take out the bobbin case by opening its latch and pulling it out from the shuttle race. 4. Slide the latch levers out from the retaining ring and remove the retaining ring. See fig. A. 5. Remove the hook by grasping the center post of the hook and pulling it out as shown in fig. B. NOTE: When the needle is lowered, the shuttle hook cannot be removed. Cleaning the Shuttle Race 1. Remove any accumulated lint and thread from the retaining ring, hook, driver and race body with a brush. 2. A cloth dampened with machine oil should be used to wipe the shuttle race clean of lint. 3. Clean the shuttle hook in the same manner described above. 4. Reassemble and push the latch levers back to their previous positions holding the retaining ring in place with the notch at the top. CD Retaining ring 0) Latch lever ® Hook () Driver ) Race body Limpieza Para sacar el garfio de la lanzadera 1. Levante la aguja a su posicion mas alta. 2. Abra la cubierta exterior del garfio, enfrente del brazo libre. 3. Saque elportacanilla, abriendosuutieta metalica (pestillo) y retirandolo de la pista de la lanzadera. 4. Retirelaspalancas que sujetan elanilloretenedor y saque dicho anillo. Vease fig. A. 5. Retire el garfio cogiendolo de la barra central y sacandolo tal como ilustra la fig. B. NOTA: No puede quitarse el garfio cuando la aguja esta abajo. Limpieza de la pista de la lanzadera 1. Quite los hilos y polvo acumulados en el anillo retenedor, garfio, impulsory pista con un cepillo. 2. Limpie el polvo de la lanzadera con un trapo impregnado de aceite de maquina. 3. Limpie el garfio de la misma manera. 4. Vuelva a juntar los elementos y coloque las palancas en sus posiciones previas para que mantengan el anillo retenedor en su sitio con la ranura hacia arriba. 0 Anillo retenedor Palanca de la utieta ® Garfio () Impulsor (6) Pista de la lanzadera. A B 2 3 5 O 4 47 Cleaning the Feed Dogs 1. Remove the needle plate using a coin to unscrew the screws. 2. Clean the upper part of the feed dogs and shuttle race body with a brush. Limpieza de los alimentadores 1. Retire la placa de agujas con una moneda para aflojar los tornillos. 2. Limpie la parte superior de los dientesy elcuerpo de la lanzadera con un cepillo. Performance Checklist Whenever sewing difficulties are encountered, review the section in this instruction manual that details the operation you are performing to make sure you are correctly using the machine. If the problem continues, the following check list may help you to improve the operation. If you still have difficulties, contact your nearest service center. Listado de posibles incidencias Cada vezqueencuentre dificultadesalcoser, vuelva a consultar la parte de este manual de instrucciones que detalla la operaci0n que esta realizando, para comprobar que usa correctamente la maquina. Si el problema persiste, el siguiente listado le puede ayudar a mejorar el funcionamiento. Sia pesar de eso elproblema persiste, p6ngase en contacto con el servicio tecnico mas cercano. 48
-
 1
1 -
2
-
3
-
4
-
5
-
6
-
7
-
8
-
9
-
10
-
11
-
12
-
13
-
14
-
15
-
16
-
17
-
18
-
19
-
20
-
21
-
 22
22 -
 23
23 -
 24
24 -
 25
25 -
 26
26 -
 27
27 -
 28
28 -
 29
29 -
 30
30 -
 31
31
 |
 |