Canon CD 300 User Guide - Page 27
Choisissez l'option [Copies 1] et appuyez
 |
UPC - 082966161872
View all Canon CD 300 manuals
Add to My Manuals
Save this manual to your list of manuals |
Page 27 highlights
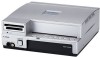
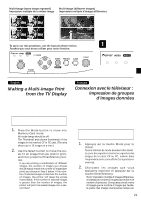
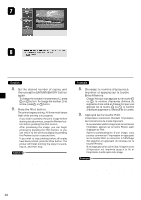
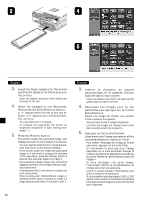
4. Move the cursor to [Copies 1] in the Menu area. Then press the Enter/Memory button. The Message area prompts you to select the number of copies you wish to make. 5. Set the desired number of copies, and then press the Enter/Memory button again. • To change the number in increments of 1, press or button. To change the number 10 at a time, press or button. 6. Press the Print button. The printer begins printing. All three mode lamps flash while printing is in progress. • If you wish to preview the print image before starting actual printout, press the Preview button before pressing the Print button. • After previewing the image, you can begin printing by pressing the Print button, or you can return to the previous display by pressing the Preview button a second time. • If you wish to stop printing before all copies have been printed, press the clear button. The printer will finish printing the copy it is working on, and then stop. • You can make various adjustments to the image quality before printing. For details, see "Adjusting the Image Quality." (¡ P.32) • You can also select whether to make a borderless print. For information, refer to "Borderless Printing." (¡ P.38) 4. Choisissez l'option [Copies 1] et appuyez sur la touche Enter/Memory. Un message est affiché vous demandant de choisir le nombre de copies. 5. Choisissez le nombre d'épreuves à imprimer et appuyez sur la touche Enter/Memory. • Chaque fois que vous appuyez sur la touche ou , le nombre d'épreuves diminue ou augmente d'une unité et chaque fois que vous appuyez sur la touche ou , le nombre d'épreuves augmente ou diminue de 10 unités. 6. Appuyez sur la touche Print. L'impression commence. Pendant l'impression, les trois témoins de mode clignotent. • Si vous souhaitez vérifier l'image avant de commencer l'impression, appuyez sur la touche Preview avant d'appuyer sur Print. • Après la prévisualisation d'une image, vous pouvez commencer l'impression en appuyant sur la touche Print ou retourner à l'affichage des vignettes en appuyant de nouveau sur la touche Preview. • Si vous appuyez sur la touche Clear, l'image en cours d'impression est imprimée jusqu'à la fin et l'imprimante s'arrête après cette image. • Pour le réglage de la qualité de l'image, référezvous à «Réglage de la qualité de l'image». (¡ P.32) • Pour le détourage de l'image, référez-vous à «Impression sur toute la surface du papier.» (¡ P.38) 25
-
 1
1 -
2
-
3
-
4
-
5
-
6
-
7
-
8
-
9
-
10
-
11
-
12
-
13
-
14
-
15
-
16
-
17
-
18
-
19
-
20
-
21
-
 22
22 -
 23
23 -
 24
24 -
 25
25 -
 26
26 -
 27
27 -
 28
28 -
 29
29 -
 30
30 -
 31
31 -
 32
32 -
33
-
34
-
35
-
36
-
37
-
38
-
39
-
40
-
41
-
42
-
43
-
44
-
45
-
46
-
47
-
48
-
49
-
50
-
51
-
52
-
53
-
54
 |
 |