Canon CD 300 User Guide - Page 33
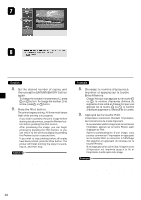
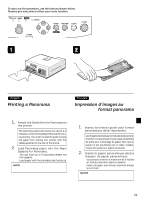
Press the Print button., Appuyez sur la touche Print.
 |
UPC - 082966161872
View all Canon CD 300 manuals
Add to My Manuals
Save this manual to your list of manuals |
Page 33 highlights
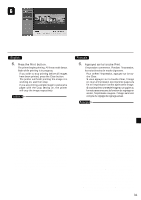
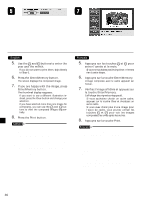
6. Press the Print button. The printer begins printing. All three mode lamps flash while printing is in progress. • If you wish to stop printing before all images have been printed, press the Clear button. The printer will finish printing the image it is working on, and then stop. • If you are printing a single image to panorama paper with the Crop setting on, the printer will crop the image respectively. The printer can create horizontal panoramas only. •• The printer may not be able to create a panorama if overlap of adjoining images is too large (exceeding half the image size) or extremely small. • Panorama results produced by the CD-300 may be somewhat different from results obtained using commercially available panorama software. • If you wish to merge and print a panorama image using a Ink Cassette for Standard, you need to follow a slightly different procedure. First, make sure that the printer is in Memory Card mode. Then select [Options] from the menu, press the Enter/Memory button, select [Panorama] from the submenu, and press the Enter/Memory button again. Then continue from Step 4 above. • If you replace the Ink Cassette for Panorama with a Ink Cassette for Standard after you have set up the panorama, you can proceed to print the panorama image onto the standard paper. In this case, the Menu area will show only [Copies], [Adjust], [Crop], and [Back]. If you wish to cancel the panorama print, select [Back] and then press the Enter/Memory button. 6. Appuyez sur la touche Print. L'impression commence. Pendant l'impression, les trois témoins de mode clignotent. • Pour arrêter l'impression, appuyez sur la touche Clear. Si vous appuyez sur la touche Clear, l'image en cours d'impression est imprimée jusqu'à la fin et l'imprimante s'arrête après cette image. • Si vous imprimez une seule image sur un papier au format panorama avec la fonction de rognage en service, l'imprimante coupera l'image sans tenir compte du réglage de rognage actuel. • L'imprimante ne peut créer que des panoramas horizontaux. • L'imprimante peut ne pas pouvoir créer une image panorama si la zone de chevauchement de deux images adjacentes est trop grande (dépassant la moitié de la taille de l'image) ou extrêmement petite. • Les résultats de l'image panorama produite par la CD-300 peuvent être parfois différente des résultats obtenus à l'aide d'un logiciel panorama en vente dans le commerce. • Si vous souhaitez fusionner et imprimer une image panorama en utilisant la cassette d'encre pour papier standard, vous devez suivre une procédure légèrement différente. Vérifiez que l'imprimante est en mode de carte à mémoire, choisissez [Options] dans le menu, et [Panorama], et appuyer de nouveau sur Enter/Memory, puis réalisez la procédure ci-dessus à partir de l'étape 4. • Si vous remplacez la cassette d'encre pour papier panorama par la cassette d'encre pour papier standard après avoir créé l'image panorama, vous pouvez imprimer l'image panorama sur un papier standard. Dans ce cas, la zone des menus indiquera seulement les boutons [Copies], [Adjust], [Crop] et [Back]. Si vous souhaitez annuler l'impression panorama, choisissez le bouton [Back] et appuyez sur la touche Enter/Memory. 31
-
 1
1 -
2
-
3
-
4
-
5
-
6
-
7
-
8
-
9
-
10
-
11
-
12
-
13
-
14
-
15
-
16
-
17
-
18
-
19
-
20
-
21
-
22
-
23
-
24
-
25
-
26
-
27
-
 28
28 -
 29
29 -
 30
30 -
 31
31 -
 32
32 -
 33
33 -
 34
34 -
 35
35 -
 36
36 -
 37
37 -
 38
38 -
39
-
40
-
41
-
42
-
43
-
44
-
45
-
46
-
47
-
48
-
49
-
50
-
51
-
52
-
53
-
54
 |
 |
