Canon CD 300 User Guide - Page 37
Enter/Memory button.
 |
UPC - 082966161872
View all Canon CD 300 manuals
Add to My Manuals
Save this manual to your list of manuals |
Page 37 highlights
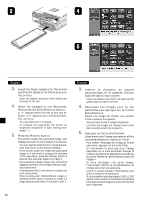
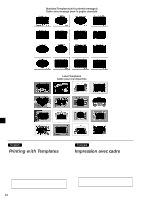
1. With the printer in Memory Card mode, select the image that you want to compose with illustrations. Then press the Enter/Memory button. • If you want to add an illustration to an image obtained in Video mode, load the image by carrying out Steps 1 to 3 under "Printing from Video Input." (¡ P.24) 2. Move the cursor to [Templates] in the Menu area. Then press the Enter/ Memory button. The Message area asks whether you want to apply an illustration to the image. 3. Select [Yes] and press the ENTER/ MEMORY button. The thumbnail area displays the available illustrations. • The display shows four illustrations at a time. You can use the and buttons as necessary to view all available standard and label templates. 4. Move the cursor to the illustration you want to use, and then press the Enter/ Memory button. • If you selected a standard illustration, proceed to Step 5. • If you selected a label illustration, go to Step 7. 1. Quand l'imprimante est en mode de carte à mémoire, choisissez l'image pour laquelle vous souhaitez ajouter un cadre. Puis appuyez sur la touche Enter/Memory. • Si vous souhaitez ajouter un cadre à une image capturée en mode vidéo, capturez d'abord l'image en réalisant les étapes 1 à 3 de «Impression d'images vidéo.» (¡ P.24) 2. Choisissez [Templates] dans le menu et appuyez sur la touche Enter/Memory. Un message apparaît. 3. Choisissez [Yes] et appuyez sur la tou- che Enter/Memory. Les vignettes des cadres apparaissent dans la zone des vignettes. • Vous pouvez apercevoir quatre vignettes a la fois. Appuyez sur les touches et pour passer des cadres pour le papier standard aux cadres pour les étiquettes. 4. Choisissez le cadre souhaité et appuyez sur la touche Enter/Memory. • Si vous choisissez un cadre standard, passez à l'étape 5. • Si vous choisissez un cadre pour étiquette, passez à l'étape 7. 35
-
 1
1 -
2
-
3
-
4
-
5
-
6
-
7
-
8
-
9
-
10
-
11
-
12
-
13
-
14
-
15
-
16
-
17
-
18
-
19
-
20
-
21
-
22
-
23
-
24
-
25
-
26
-
27
-
28
-
29
-
30
-
31
-
 32
32 -
 33
33 -
 34
34 -
 35
35 -
 36
36 -
 37
37 -
 38
38 -
 39
39 -
 40
40 -
 41
41 -
 42
42 -
43
-
44
-
45
-
46
-
47
-
48
-
49
-
50
-
51
-
52
-
53
-
54
 |
 |
