Canon CR-X300 Remote Camera Control Application User Manual
Canon CR-X300 Manual
 |
View all Canon CR-X300 manuals
Add to My Manuals
Save this manual to your list of manuals |
Canon CR-X300 manual content summary:
- Canon CR-X300 | Remote Camera Control Application User Manual - Page 1
Remote Camera Control Application User Manual This document should be read before using the network camera. - Canon CR-X300 | Remote Camera Control Application User Manual - Page 2
Third Party Software ...4 License Agreement of Software ...4 Trademarks...4 User Manual...5 Notes ...5 Software Screenshots ...5 Symbols Used in This Document ...5 What Computer Environment...7 Verified Mobile Environment ...7 Supported Cameras...7 Limitations...7 Installation ...8 Launching the - Canon CR-X300 | Remote Camera Control Application User Manual - Page 3
List of Operations Available on a Keyboard ...34 Configuring Pan/Tilt Direction Settings ...35 Exporting or Importing the Settings ...36 Exporting Settings...36 Importing Settings...36 Troubleshooting ...37 3 - Canon CR-X300 | Remote Camera Control Application User Manual - Page 4
Introduction This document explains Remote Camera Control Application (hereafter referred to as "this software") settings and operations. Carefully read this document before use to ensure correct use of this software. Precautions for Use Third Party Software This product contains third party - Canon CR-X300 | Remote Camera Control Application User Manual - Page 5
User Manual This document is intended to be read on a computer screen. Notes 1. Any unauthorized reproduction of this document is prohibited. 2. The contents of this document are - Canon CR-X300 | Remote Camera Control Application User Manual - Page 6
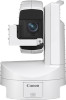
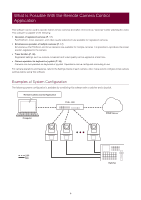
be operated via keyboard or joystick. Operations can be configured according to use. For camera operations and features, refer to the Settings Guide of each camera. Also, make sure to configure initial camera settings before using this software. Examples of System Configuration The following system - Canon CR-X300 | Remote Camera Control Application User Manual - Page 7
i7-1065G7 16 GB Supported Cameras Refer to the "Remote Camera Control Application Compatible Cameras" from the website along with the User Manual. The screenshots may differ depending the latest operating environment information when applying a service pack or updating the operating system. 7 - Canon CR-X300 | Remote Camera Control Application User Manual - Page 8
Installation 1 Double-click [RemoteCameraControlApplicationSetup.exe] in the installation package. The installation screen appears. 2 Follow the instructions on the screen and when the installation complete window appears, click [Close]. Double-click on the software added to the desktop to start. - Canon CR-X300 | Remote Camera Control Application User Manual - Page 9
Launching the Remote Camera Control Application When this software is installed, the Remote Camera Control Application icon appears in the desktop. Double-click the icon to launch this software and display the main screen. Main Screen (5) (1) (2) (6) (3) (4) (1) Menu button Displays the menu. - Canon CR-X300 | Remote Camera Control Application User Manual - Page 10
White balance Trace [Details] White Balance Image Quality Exposure Other Functions Note Click the menu and select [Full-Screen Mode] to hide the title bar and Windows taskbar. To exit full screen mode, click the menu and select [Exit Full Screen Mode]. 10 - Canon CR-X300 | Remote Camera Control Application User Manual - Page 11
Registering Cameras Before registering the camera in this software, perform initial settings such as user settings and network connection. The camera can be registered even in standby. 1 Click the menu and select [Camera Management]. 2 In the [Camera Management] dialog, click [Add]. 3 In the [ - Canon CR-X300 | Remote Camera Control Application User Manual - Page 12
4 Select a camera to register, then click [OK]. Note • To search for a camera again, click [Search]. • Cameras that have already been registered will not be displayed. 5 Enter the following items in the [Add Camera] dialog. (1) (2) (3) (4) (5) (6) (1) [Camera Name] Decide on the name to be displayed - Canon CR-X300 | Remote Camera Control Application User Manual - Page 13
[Edit Camera] dialog. • Configure camera settings such as user privileges on the Camera Settings Page. For further details, see the camera User Manual. 6 Click [Connect]. The camera is registered and displayed in the [Camera Management] dialog. The camera status is displayed as follows in [Status - Canon CR-X300 | Remote Camera Control Application User Manual - Page 14
Camera List Registered cameras are displayed in the camera list. (1) (2) (3) (4) (1) Camera name Displays registered camera name. (2) Status display area The following is displayed depending in camera status: • Video displayed: Camera connected, power on • displayed: Camera connected, in - Canon CR-X300 | Remote Camera Control Application User Manual - Page 15
Displaying Camera Video in the Video Display Area Click a camera in the camera list to display its video in the video display area. (2) (3) (4) (1) (5) (1) [Camera List] Click the displayed camera to show/hide the video in the video display area. Cameras whose video is shown in the video display - Canon CR-X300 | Remote Camera Control Application User Manual - Page 16
Changing the Video Display Area Layout Click the menu video size). and select [Video Layout] to change the video display area layout (number of displayed cameras or For example, if [1+5] is clicked, one large video and five small videos are displayed. Cameras are assigned numbers in the video - Canon CR-X300 | Remote Camera Control Application User Manual - Page 17
Selecting Cameras to Operate Select cameras to operate from this software. Turning On the Camera All cameras can be turned on or put into standby simultaneously using this software. • Turning on the cameras Click the menu and select [Camera Power] > [All On]. All cameras on standby in the video - Canon CR-X300 | Remote Camera Control Application User Manual - Page 18
Changes the focus settings. Autofocus is enabled when [AF] is set for [Focus], and manual focus is enabled when [AF] is off. [Near], [Far] Click [Near] to for autofocus, once [One Shot AF] is clicked, it will be on manual focus. Note • Depending on the model being used, autofocus or tracking may not - Canon CR-X300 | Remote Camera Control Application User Manual - Page 19
When part of the face is hidden • The system may accidentally track another subject with similar characteristics. In this case, select the subject again. Manual Focus When the operation selection button is set to position with autofocus and then fixed. , by clicking on the camera video, the focus - Canon CR-X300 | Remote Camera Control Application User Manual - Page 20
[Preset] It is possible to call the presets registered to the camera. Register presets on [Preset/Trace Settings]. For details, refer to "Preset Function" (P. 29). (1) (2) (3) (4) (5) (1) Speed Mode Specify the time or speed to move to the Pan/Tilt/Zoom position. Click [Time (sec.)] to - Canon CR-X300 | Remote Camera Control Application User Manual - Page 21
and iris are adjusted automatically. (Iris priority AE) The iris is adjusted manually. The shutter speed and gain are adjusted automatically. (Manual) The exposure (shutter speed, gain, iris, etc.) is adjusted manually. (Portrait) Blurs the background to make the subject stand out. (Sports) Captures - Canon CR-X300 | Remote Camera Control Application User Manual - Page 22
Note • The exposure settings (iris, shutter speed, gain, etc.) are automatically adjusted for Portrait, Sports, Low Light, and Spotlight. White balance and image quality cannot be operated. • In Portrait and Sports mode, the captured video may not appear smooth or may flicker. • For precautions - Canon CR-X300 | Remote Camera Control Application User Manual - Page 23
(P. 23). • About Shooting with Slow Shutter By setting the [Shooting Mode] to manual, shutter priority AE to set a slow shutter speed, or setting it to low [Color Temperature] Specify [Color Temperature] to adjust the white balance. [Manual] Set [R Gain] and [B Gain] for the white balance to the - Canon CR-X300 | Remote Camera Control Application User Manual - Page 24
brightness changes or the ND filter is switched, adjust the white balance again. [R Gain], [B Gain] Adjusts the white balance when [Mode] is set to [Manual]. Move the slider knob or click or to change the value. [Color Temperature] When [Mode] is set to [Color Temperature], move the slider knob or - Canon CR-X300 | Remote Camera Control Application User Manual - Page 25
[Details] Tab Provides more advanced settings than the [Basic] tab. The [Details] items are enabled only when there is only one camera to operate. [White Balance] In infrared shooting, [Details] > [White Balance] cannot be set. [White Balance: R Gain] Adjusts the shift amount of the red tint in - Canon CR-X300 | Remote Camera Control Application User Manual - Page 26
[Sharpness: Level] Adjusts the level of edge enhancement. Move the slider knob or click or to change the value. [Sharpness: Limit] Adjusts the level at which the edge enhancement is limited. Move the slider knob or click or to change the value. [Black: Master Pedestal] Adjusts the black level. The - Canon CR-X300 | Remote Camera Control Application User Manual - Page 27
[Details] > [White Balance], [Image Quality], [Exposure] > [Enhanced ND Filter] • When the infrared is [On] in manual focus, the focus will be fixed once in auto focus, then return to manual focus. • Depending on the light source, auto focus may not function properly during zoom operation. • Because - Canon CR-X300 | Remote Camera Control Application User Manual - Page 28
Using Preset/Trace Functions Click on the menu and select [Preset/Trace Settings] to open the [Preset/Trace Settings] dialog. By clicking [Preset] or [Trace], the bottom of the dialog can be switched accordingly. (1) (2) (5) (3) (4) (6) (1) [Camera Name] Displays the name of registered camera. (2) - Canon CR-X300 | Remote Camera Control Application User Manual - Page 29
Preset Function Able to register or delete presets from this software. [Preset] tab (1) (2) (3) (4) (5) (6) (1) Preset List Displays [Number], [Preset Name], and [Register] of the presets as a list. Change the [Preset Name] by doubleclicking [Preset Name] and entering an arbitrary name. (2) - Canon CR-X300 | Remote Camera Control Application User Manual - Page 30
Note • [home] is the setting when the camera was launched (home position). It can be overwritten but cannot be deleted. Overwriting changes the position that is called up when [Home] is clicked in the [Preset] of the camera operation area. • Able to register up to 100 presets (including home - Canon CR-X300 | Remote Camera Control Application User Manual - Page 31
Recording a Trace A trace can be recorded by the following steps: 1 In the [Preset/Trace Settings] dialog, open the [Trace] tab. 2 In the [Camera Name] list, select the camera for recording a trace. Camera video appears in the video display area. 3 Use the camera operation area to set a camera to - Canon CR-X300 | Remote Camera Control Application User Manual - Page 32
1 Select the registered trace and click [Prepare Trace]. The camera moves to the start position. Once the camera is moved to the start position, the button display changes to [Execute]. 2 Click [Execute]. The trace is executed. Note Click [Cancel] to cancel the trace execution. 32 - Canon CR-X300 | Remote Camera Control Application User Manual - Page 33
Using a Keyboard or Joystick Cameras can be operated using a keyboard or joystick by this software. Settings for operating cameras using a keyboard or joystick can be changed according to use. Assigning Arbitrary Keys Keys are assigned to each function available for the keyboard in the initial - Canon CR-X300 | Remote Camera Control Application User Manual - Page 34
List of Operations Available on a Keyboard The functions available as keyboard operations and default assigned keys are as follows: [Keyboard Shortcuts] screen display name Pan Left Pan Right Tilt Up Tilt Down Pan/Tilt Left and Up Pan/Tilt Right and Up Pan/Tilt Left and Down Pan/Tilt Right and - Canon CR-X300 | Remote Camera Control Application User Manual - Page 35
or imported by clicking [Export] or [Import]. For details, see "Exporting or Importing the Settings" (P. 36). • For the operation of the joystick, refer to the instruction manual of each product. In addition, the operation of all joysticks are not guaranteed. 35 - Canon CR-X300 | Remote Camera Control Application User Manual - Page 36
Exporting or Importing the Settings Some of the settings in this software can be exported or imported in json format. Exporting Settings Click the menu and select [Maintenance] > [Export]. When the [Export] dialog appears, select the item to export and click [Export]. Once clicked, set where to save - Canon CR-X300 | Remote Camera Control Application User Manual - Page 37
on troubleshooting for the camera, controller, or switcher, refer to each manual . Problem Cannot the Camera's Settings Page. For details, refer to the Settings Guide of the camera. • Check if the camera power is on. the camera supports the default web browser being used. Check if the import - Canon CR-X300 | Remote Camera Control Application User Manual - Page 38
BIE-7289-002 © CANON INC. 2021
-
 1
1 -
 2
2 -
 3
3 -
 4
4 -
 5
5 -
 6
6 -
 7
7 -
8
-
9
-
10
-
11
-
12
-
13
-
14
-
15
-
16
-
17
-
18
-
19
-
20
-
21
-
22
-
23
-
24
-
25
-
26
-
27
-
28
-
29
-
30
-
31
-
32
-
33
-
34
-
35
-
36
-
37
-
38
 |
 |
This document should be read before using the network camera.
Remote Camera Control Application
User Manual