Canon FAXPHONE L120 FAXPHONE L120 Advanced Guide - Page 19
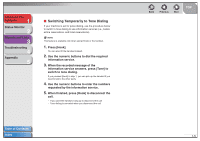
Reception Restriction, Remote Reception, Use [Up/Down] to select <8 REMOTE RX?> - how to change to fax mode
 |
View all Canon FAXPHONE L120 manuals
Add to My Manuals
Save this manual to your list of manuals |
Page 19 highlights
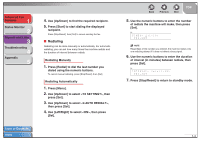
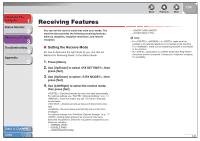
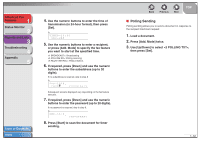
Advanced Fax Features 1 Status Monitor 2 Reports and Lists 3 Troubleshooting 4 Appendix 5 ■ Reception Restriction You can restrict incoming fax calls from only the numbers registered in the machine for speed dialing. This can help eliminate unsolicited calls. NOTE - The sender's fax number must be registered in their machine and must match the number registered in your machine for speed dialing. - If you entered a pause or a space in the last four digits of a fax number registered for speed dialing, you cannot receive calls from that number. 1. Press [Menu]. 2. Use [Up/Down] to select , then press [Set]. 3. Use [Up/Down] to select , then press [Set]. 4. Use [Left/Right] to select , then press [Set]. 5. Press [Stop/Reset] to return to standby mode. ■ Remote Reception Remote reception allows you to use an external telephone connected to the machine to receive faxes manually. This can be useful when the machine is not nearby or being used by someone else at the moment. Table of Contents Index Back Previous Next TOP Registering Remote Reception ID Follow this procedure if you want to change the default remote reception ID of 25. 1. Press [Menu]. 2. Use [Up/Down] to select , then press [Set]. 3. Use [Up/Down] to select , then press [Set]. 4. Use [Left/Right] to select , then press [Set]. 5. Use the numeric buttons to enter a two-digit remote reception ID (00 to 99), then press [Set]. 6. Press [Stop/Reset] to return to standby mode. 1-9
-
 1
1 -
2
-
3
-
4
-
5
-
6
-
7
-
8
-
9
-
10
-
11
-
12
-
13
-
 14
14 -
 15
15 -
 16
16 -
 17
17 -
 18
18 -
 19
19 -
 20
20 -
 21
21 -
 22
22 -
 23
23 -
 24
24 -
25
-
26
-
27
-
28
-
29
-
30
-
31
-
32
-
33
-
34
-
35
-
36
-
37
-
38
-
39
-
40
-
41
-
42
-
43
-
44
-
45
-
46
-
47
-
48
-
49
-
50
-
51
-
52
-
53
-
54
-
55
-
56
-
57
-
58
 |
 |
