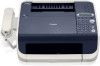
Canon FAXPHONE L120 FAXPHONE L120 Basic Guide
Canon FAXPHONE L120 Manual
 |
View all Canon FAXPHONE L120 manuals
Add to My Manuals
Save this manual to your list of manuals |
Canon FAXPHONE L120 manual content summary:
- Canon FAXPHONE L120 | FAXPHONE L120 Basic Guide - Page 1
Basic Guide What Can I Do with This Machine? Before Using the Machine Document Handling Print Media Sending Faxes Receiving Faxes Copying Printing Maintenance Troubleshooting Machine Settings Appendix Please read this guide before operating this equipment. After you finish reading this guide, - Canon FAXPHONE L120 | FAXPHONE L120 Basic Guide - Page 2
- Canon FAXPHONE L120 | FAXPHONE L120 Basic Guide - Page 3
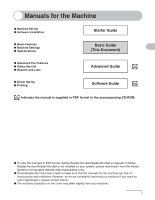
● Software Installation Starter Guide ● Basic Features ● Machine Settings ● Specifications Basic Guide (This Document) ● Advanced Fax Features ● Status Monitor ● Reports and Lists Advanced Guide CD-ROM ● Driver Set-Up ● Printing Software Guide CD-ROM CD-ROM Indicates the manual is supplied - Canon FAXPHONE L120 | FAXPHONE L120 Basic Guide - Page 4
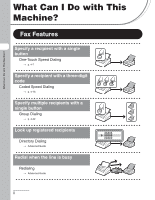
→ p. 4-7 Specify a recipient with a three-digit code Coded Speed Dialing → p. 4-15 Specify multiple recipients with a single button Group Dialing → p. 4-22 Look up registered recipients Directory Dialing → Advanced Guide Redial when the line is busy Redialing → Advanced Guide AAAAA BBBBB CCCCC ii - Canon FAXPHONE L120 | FAXPHONE L120 Basic Guide - Page 5
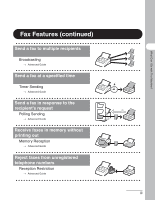
a fax to multiple recipients Broadcasting → Advanced Guide Send a fax at a specified time Timer Sending → Advanced Guide Send a fax in response to the recipient's request Polling Sending → Advanced Guide Receive faxes in memory without printing out Memory Reception → Advanced Guide Reject faxes from - Canon FAXPHONE L120 | FAXPHONE L120 Basic Guide - Page 6
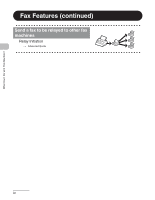
What Can I Do with This Machine? Fax Features (continued) Send a fax to be relayed to other fax machines Relay Initiation → Advanced Guide iv - Canon FAXPHONE L120 | FAXPHONE L120 Basic Guide - Page 7
What Can I Do with This Machine? Copy Features Select a scan mode depending on the quality of image to be scanned ABC Image Quality ABC ABC → p. 6-3 ABC Adjust the density level of scanned images Density → p. 6-4 Enlarge or reduce copied images Zoom Ratio → p. 6-5 AA v - Canon FAXPHONE L120 | FAXPHONE L120 Basic Guide - Page 8
Manuals for the Machine i What Can I Do with This Machine ii Fax Features ii Copy Features v Contents vi Preface xi Important Safety Instructions xi Handling and Maintenance xi Location xii Power Supply xiii Customer Support (U.S.A xiii Customer Support (Canada xiv How to Use This Guide - Canon FAXPHONE L120 | FAXPHONE L120 Basic Guide - Page 9
LCD (Standby Mode 1-5 Fax Mode 1-5 Copy Mode 1-5 Handset 1-6 Maintaining the Handset 1-6 Toner Cartridge 1-7 Maintaining the Toner Cartridge 1-7 2 Document Handling 2-1 Document Requirements 2-1 Scanned Area 2-2 Loading Documents 2-3 3 Print Media 3-1 Paper Requirements 3-1 Printable - Canon FAXPHONE L120 | FAXPHONE L120 Basic Guide - Page 10
26 Using Speed Dialing 4-27 Using One-Touch Speed/Group Dialing 4-27 Using Coded Speed Dialing 4-28 Manual Sending 4-29 Sending Faxes Manually 4-29 Entering Pauses 4-30 5 Receiving Faxes 5-1 6 Copying 6-1 Scan Settings 6-3 Image Quality 6-3 Density 6-4 Zoom Ratio 6-5 7 Printing 7-1 viii - Canon FAXPHONE L120 | FAXPHONE L120 Basic Guide - Page 11
Used Cartridges 8-9 The Clean Earth Campaign 8-9 U.S.A. PROGRAM 8-10 CANADA PROGRAM-CANADA PROGRAMME ........8-13 Transporting the Machine 8-15 9 Troubleshooting 9-1 Clearing Jams 9-1 Document Jams 9-1 Paper Jams 9-3 Inside the Machine 9-3 Paper Feeder 9-5 LCD Messages 9-6 Error Codes - Canon FAXPHONE L120 | FAXPHONE L120 Basic Guide - Page 12
What Can I Do with This Machine? 11 Appendix 11-1 Specifications 11-1 General 11-1 Facsimile 11-2 Copier 11-3 Telephone 11-3 Printer 11-4 Index 11-5 x - Canon FAXPHONE L120 | FAXPHONE L120 Basic Guide - Page 13
with This Machine? Preface Thank you for choosing a Canon product. Before using the machine, please read the following instructions for your safety. Important Safety Instructions WARNING Except as specifically described in this guide, do not attempt to service the machine yourself. Never attempt to - Canon FAXPHONE L120 | FAXPHONE L120 Basic Guide - Page 14
instructions in this guide. Improper adjustment of other controls may result in damage and may require extensive work by a qualified technician to restore the product to normal operation. - If the machine has been dropped or the cabinet has been damaged. - If the machine exhibits a distinct change - Canon FAXPHONE L120 | FAXPHONE L120 Basic Guide - Page 15
documents stored in the machine's memory will be deleted when you unplug trouble-free operation. If you encounter a problem with the machine's operation, try to solve it by using the information in Chapter 9. If you cannot solve the problem or if you think your machine needs servicing, contact Canon - Canon FAXPHONE L120 | FAXPHONE L120 Basic Guide - Page 16
What Can I Do with This Machine? Customer Support (Canada) Canon Canada Inc., offers a full range of customer technical support options*: - For step-by-step troubleshooting, e-mail technical support, the latest driver or document downloads, and answers to frequently asked questions visit http://www - Canon FAXPHONE L120 | FAXPHONE L120 Basic Guide - Page 17
with This Machine? How to Use This Guide The following symbols are used throughout the manuals for the machine and indicate the warnings, operating restrictions and how to avoid minor difficulties. In addition, this guide uses distinctive notations to identify buttons and information in the LCD: - - Canon FAXPHONE L120 | FAXPHONE L120 Basic Guide - Page 18
in any form or by any means, electronic, mechanical, magnetic, optical, chemical, manual, or otherwise, without the prior written permission of Canon, Inc. Disclaimer The information in this document is subject to change without notice. CANON INC. MAKES NO WARRANTY OF ANY KIND WITH REGARD TO THIS - Canon FAXPHONE L120 | FAXPHONE L120 Basic Guide - Page 19
Do with This Machine? Trademarks Canon and FAXPHONE are registered trademarks, and UHQ is a trademark of Canon Inc. All other product and brand names are registered trademarks, trademarks or service marks of their respective owners. As an ENERGY STAR® Partner, Canon has determined that this product - Canon FAXPHONE L120 | FAXPHONE L120 Basic Guide - Page 20
Users in the U.S.A. Pre-Installation Requirements for Canon Facsimile Equipment A. Location Supply a suitable table, cabinet, or desk. See p. 11-1 for the machine's weight and dimensions. B. Order Information 1. Only a single line ringing and special codes, which may cause a fax error. C. Power - Canon FAXPHONE L120 | FAXPHONE L120 Basic Guide - Page 21
the Starter Guide for details guide, disconnect the equipment from the telephone line and unplug the power cord. The telephone line should not be reconnected or the power cord plugged in until the problem is completely resolved. Users should contact Canon Authorized Service Facilities for servicing - Canon FAXPHONE L120 | FAXPHONE L120 Basic Guide - Page 22
FAXPHONE L120 with the instructions, may off and on, the user is encouraged to try changes or modifications to the equipment unless otherwise specified in this manual. If such changes or modifications should be made, you could be required to stop operation of the equipment. Canon U.S.A. Inc. One Canon - Canon FAXPHONE L120 | FAXPHONE L120 Basic Guide - Page 23
person to use a computer or other electronic device to send any message via a telephone fax machine unless such message clearly contains in a margin at the top or bottom of each transmitted page or on the to program this information into the machine, follow the instructions in the Starter Guide. xxi - Canon FAXPHONE L120 | FAXPHONE L120 Basic Guide - Page 24
Users in Canada Pre-Installation Requirements for Canon Facsimile Equipment A. Location Supply a suitable table, cabinet, or desk. See p. 11-1 for the machine's weight and dimensions. B. Order Information 1. Provide only a single-line ringing and special codes, which may cause a fax error. C. Power - Canon FAXPHONE L120 | FAXPHONE L120 Basic Guide - Page 25
Canada. Ceci n'implique pas que le produit ait été approuvé par I'industrie du Canada. Before installing this equipment, users of service in some user to disconnect the equipment. Users should ensure for their own protection that the electrical ground connections of the power utility, telephone lines - Canon FAXPHONE L120 | FAXPHONE L120 Basic Guide - Page 26
consister en n'importe quelle combinaison d'appareils, à la condition seulement que la somme des Nombres d'équivalence Ringer de tous les appareils ne soit pas supérieure à 5. CANON CANADA INC. 1-800-263-1121 24 HOURS A DAY, SEVEN DAYS A WEEK xxiv - Canon FAXPHONE L120 | FAXPHONE L120 Basic Guide - Page 27
as a Class 1 laser product under the U.S. Department of Health and Human Services (DHHS) Radiation Performance , the laser beam cannot escape from the machine during any phase of user operation. CDRH this manual may result in hazardous radiation exposure. The label is attached to the laser scanner - Canon FAXPHONE L120 | FAXPHONE L120 Basic Guide - Page 28
Extension for the paper output tray. C Cartridge cover Open it when replacing the toner cartridge or removing jammed paper. D Notch Used to open the cartridge cover. E Operation panel Controls the machine. F Document release lever Releases jammed document. G Document guides Set to the width - Canon FAXPHONE L120 | FAXPHONE L120 Basic Guide - Page 29
N Scanning Platform Scans document. O Handset For using the machine as a telephone or receiving faxes remotely. P Handset cradle Cradle for the handset. Q USB port Connect the USB cable. R Handset jack Connect the handset. S External device jack Connect an external device if necessary. T Line jack - Canon FAXPHONE L120 | FAXPHONE L120 Basic Guide - Page 30
02 03 A 04 05 06 07 08 09 10 11 12 13 14 15 FAXPHONE L120 B Add.Mode Menu Status Copy C D E ImageQualityDirectory CodedDial F G H Redial Pause Hook Set I J K 1 2 3 ABC DEF QP Clear L GHI JKL MNO 456 Stop/Reset PQRS TUV WXYZ 789 Start OPER SYMBOLS 0# Tone - Canon FAXPHONE L120 | FAXPHONE L120 Basic Guide - Page 31
menu and registered recipients. Q Set button Confirms an operation or registers information you enter. R Clear button Clears an entry in the LCD. S Stop/Reset button Cancels machine operations and returns to the standby mode. T Start button Starts scanning documents for sending or copying. 1-4 - Canon FAXPHONE L120 | FAXPHONE L120 Basic Guide - Page 32
LCD (Standby Mode) Fax Mode A B C 16:00 STD 100% -SET DOC.- FAX ONLY D E A Time B Image quality C Memory available D Message E Receive mode Copy Mode A B C TEXT x1.00 3 LT D E A Image quality B Zoom ratio C Quantity D Density E Paper size and type (for non-plain paper) Before - Canon FAXPHONE L120 | FAXPHONE L120 Basic Guide - Page 33
the machine as a telephone and a fax machine, and to receive faxes manually. Use a sharp object (i.e., pen) to select the ring volume of the handset. NOTE For how to install the handset, see "Connect Telephone Cables and Install Handset," in the Starter Guide. Maintaining the Handset - Do not leave - Canon FAXPHONE L120 | FAXPHONE L120 Basic Guide - Page 34
component of the machine that needs to be replaced is the toner cartridge. The machine comes with a starter cartridge, which yields approximately 1,000 pages based on 5% coverage of an A4-size page. A Canon genuine replacement cartridge yields approximately 2,000 pages based on 5% coverage of an A4 - Canon FAXPHONE L120 | FAXPHONE L120 Basic Guide - Page 35
Before Using the Machine 1-8 - Canon FAXPHONE L120 | FAXPHONE L120 Basic Guide - Page 36
use any of the following: - Wrinkled or creased paper - Carbon paper or carbon-backed paper - Curled or rolled paper - Coated paper - Torn paper - Onion skin or thin paper - Documents with staples or paper clips attached - Paper with fresh glue, ink, or correction fluid that is not completely dry - Canon FAXPHONE L120 | FAXPHONE L120 Basic Guide - Page 37
Document Handling Scanned Area Make sure your document's text and graphics fall within the shaded area in the following diagram. Note that the margin widths listed are approximate and there may be slight variations in actual use. 0.08" (2 mm) 0.08" (2 mm) 0.04" (1 mm) 0.04" (1 mm) 2-2 - Canon FAXPHONE L120 | FAXPHONE L120 Basic Guide - Page 38
Document Handling Loading Documents 1 Adjust the document guides to the width of the document. 2 Fan the document stack and even the edges. 3 Insert the document top edge first in the ADF with the printed side facing up. The document is ready for scanning. 2-3 - Canon FAXPHONE L120 | FAXPHONE L120 Basic Guide - Page 39
Document Handling 2-4 - Canon FAXPHONE L120 | FAXPHONE L120 Basic Guide - Page 40
(210 × 297 mm) Quantity Max. stack height: 0.6 in. (15 mm) (Approx. 150 sheets of 20 lb. (75 g/ m2) paper) Paper Type Setting *1 *2 Paper Type Plain paper Heavy paper Transparencies Weight 16 to 24 lb. (60 to 90 g/m2) 24 to 43 lb. (91 to 163 g/m2 - Canon FAXPHONE L120 | FAXPHONE L120 Basic Guide - Page 41
Print Media Printable Area The shaded area indicates the approximate printable area of Letter-size paper. 0.08" (2 mm) 0.20" (5 mm) 0.08" (2 mm) 0.08" (2 mm) 3-2 - Canon FAXPHONE L120 | FAXPHONE L120 Basic Guide - Page 42
large quantities. ● Store all paper wrapped and on a flat surface until ready for use. Keep opened packs in their original packaging in a cool, dry location. ● Store paper at 64.4°F-75.2°F (18°C-24°C), 40%-60% relative humidity. ● Use only the transparencies designed for laser printers. 3-3 - Canon FAXPHONE L120 | FAXPHONE L120 Basic Guide - Page 43
Paper For loading Letter-size paper, see "Load Paper," in the Starter Guide. paper or deeply embossed paper - Envelopes with peel-off sealing strips - Envelopes with letters enclosed - Make sure to set the correct envelope size in the printer driver. (See Chapter 2, "Printing," in the Software Guide - Canon FAXPHONE L120 | FAXPHONE L120 Basic Guide - Page 44
Print Media NOTE Make sure the back end of the cover does not catch the front paper guide. 3 Pull out the paper guide rail. 4 Insert the envelope stack (up to 10 envelopes) with the print side facing up. 5 Adjust the side paper guides to the size of the stack. 3-5 - Canon FAXPHONE L120 | FAXPHONE L120 Basic Guide - Page 45
Print Media 6 Push back the paper guide rail to the front edge of the stack. 7 Pinch and slide the front paper guide to match the envelope size. 8 Insert the paper stack cover. NOTE Make sure the back end of the cover does not catch and lower the scanning platform. 3-6 - Canon FAXPHONE L120 | FAXPHONE L120 Basic Guide - Page 46
the machine, follow this procedure to change the paper type/size setting. FAXPHONE L120 Add.Mode Menu Status Copy ImageQualityDirectory CodedDial Redial Pause Hook Set ABC DEF 123 GHI JKL MNO 456 PQRS TUV WXYZ 789 OPER SYMBOLS 0# Tone Clear Stop/Reset Start [Set] 1 Press [Menu - Canon FAXPHONE L120 | FAXPHONE L120 Basic Guide - Page 47
FAXPHONE L120 Add.Mode Menu Status Copy ImageQualityDirectory CodedDial Redial Pause Hook Set ABC DEF 123 GHI JKL MNO 456 PQRS TUV WXYZ 789 OPER SYMBOLS 0# Tone Clear Stop/Reset Start [Set] 4 Use [Left/Right] to select the paper size, then press [Set]. : Letter. : - Canon FAXPHONE L120 | FAXPHONE L120 Basic Guide - Page 48
Tone Clear Stop/Reset Start Press [Image Quality]. Use [Left/ Right] to select resolution and image type, and press [Set]. Select from the following: : Standard : Fine : Superfine : Halftone (and select resolution) For details, see "Scan Settings," on p. 4-3. Sending Faxes - Canon FAXPHONE L120 | FAXPHONE L120 Basic Guide - Page 49
, then press [Clear]. Or hold [Clear] to delete the entire entry and try again. 4 Send the Document Add.Mode Menu Status Copy Clear Stop/Reset Start Press [Start]. What if... ● You want to cancel sending: See Chapter 1, "Advanced Fax Features," in the Advanced Guide. ● The message - Canon FAXPHONE L120 | FAXPHONE L120 Basic Guide - Page 50
or after the document is scanned. Contrast FAXPHONE L120 Add.Mode Menu Status Copy ImageQualityDirectory CodedDial Redial Pause Hook Set ABC DEF 123 GHI JKL MNO 456 PQRS TUV WXYZ 789 OPER SYMBOLS 0# Tone Clear Stop/Reset Start [Set] Sending Faxes 1 Press [Menu]. 2 Use [Up - Canon FAXPHONE L120 | FAXPHONE L120 Basic Guide - Page 51
Image Quality FAXPHONE L120 Add.Mode Menu Status Copy ImageQualityDirectory CodedDial Redial Pause Hook Set ABC DEF 123 GHI JKL MNO 456 PQRS TUV WXYZ 789 OPER SYMBOLS 0# Tone Clear Stop/Reset For documents that contain half-tone images such as photographs. Sending Faxes 4-4 - Canon FAXPHONE L120 | FAXPHONE L120 Basic Guide - Page 52
FAXPHONE L120 Add.Mode Menu Status Copy ImageQualityDirectory CodedDial Redial Pause Hook Set ABC DEF 123 GHI JKL MNO 456 PQRS TUV WXYZ 789 OPER SYMBOLS 0# Tone Clear Stop/Reset Start [Set] 3 If you selected , use [Left/Right] to select resolution, then press [Set]. - Canon FAXPHONE L120 | FAXPHONE L120 Basic Guide - Page 53
Coded Speed Dialing (p. 4-15) - Specify a registered recipient using [Coded Dial] followed by a three-digit code. You can register up to 100 coded speed dialing codes - Name (optional) - Fax number (required) - Subaddress (optional): A string of characters used to route a fax to one or more numbers - Canon FAXPHONE L120 | FAXPHONE L120 Basic Guide - Page 54
Speed Dialing FAXPHONE L120 Add.Mode Menu Status Copy ImageQualityDirectory CodedDial Redial Pause Hook Set ABC DEF 123 GHI JKL MNO 456 PQRS TUV WXYZ 789 OPER SYMBOLS 0# Tone Clear Stop/Reset Start to 20 characters), then press [Set]. Ex. NAME=CAN OK= [A] Sending Faxes 4-7 - Canon FAXPHONE L120 | FAXPHONE L120 Basic Guide - Page 55
FAXPHONE L120 Add.Mode Menu Status Copy ImageQualityDirectory CodedDial Redial Pause Hook Set ABC DEF 123 GHI JKL MNO 456 PQRS TUV WXYZ 789 OPER SYMBOLS 0# Tone Clear Stop/Reset Start 6 Use the numeric buttons to enter the recipient's number (up to 50 digits). Ex. = - Canon FAXPHONE L120 | FAXPHONE L120 Basic Guide - Page 56
FAXPHONE L120 Add.Mode Menu Status Copy ImageQualityDirectory CodedDial Redial Pause Hook Set ABC DEF 123 GHI JKL MNO 456 PQRS TUV WXYZ 789 OPER SYMBOLS 0# Tone Clear Stop/Reset Start [Set] 7 Press [ , skip to step 9. Ex. PWD=1234_ YES=SET 9 Press [Set]. Sending Faxes 4-9 - Canon FAXPHONE L120 | FAXPHONE L120 Basic Guide - Page 57
FAXPHONE L120 Add.Mode Menu Status Copy ImageQualityDirectory CodedDial Redial Pause Hook Set ABC DEF 123 GHI JKL MNO 456 PQRS TUV WXYZ 789 OPER SYMBOLS 0# Tone Clear Stop/Reset Start [Set] 10 Repeat the procedure as necessary from step 4. 11 Press [Stop/Reset] to return to - Canon FAXPHONE L120 | FAXPHONE L120 Basic Guide - Page 58
Speed Dialing FAXPHONE L120 Add.Mode Menu Status Copy ImageQualityDirectory CodedDial Redial Pause Hook Set ABC DEF 123 GHI JKL MNO 456 PQRS TUV WXYZ 789 OPER SYMBOLS 0# Tone Clear Stop/Reset to 15) for the recipient you want to edit, then press [Clear]. Sending Faxes 4-11 - Canon FAXPHONE L120 | FAXPHONE L120 Basic Guide - Page 59
FAXPHONE L120 Add.Mode Menu Status Copy ImageQualityDirectory CodedDial Redial Pause Hook Set ABC DEF 123 GHI JKL MNO 456 PQRS TUV WXYZ 789 OPER SYMBOLS 0# Tone Clear Stop/Reset Start [Set] 5 Use [Left/Right] to select , then press [Set]. 6 Use [Left/Right], [Clear], and - Canon FAXPHONE L120 | FAXPHONE L120 Basic Guide - Page 60
FAXPHONE L120 Add.Mode Menu Status Copy ImageQualityDirectory CodedDial Redial Pause Hook Set ABC DEF 123 GHI JKL MNO 456 PQRS TUV WXYZ 789 OPER SYMBOLS 0# Tone Clear Stop/Reset Start [Set] 8 If you want to change or enter the subaddress, press [Down]. If no subaddress is - Canon FAXPHONE L120 | FAXPHONE L120 Basic Guide - Page 61
Deleting One-Touch Speed Dialing FAXPHONE L120 Add.Mode Menu Status Copy ImageQualityDirectory CodedDial Redial Pause Hook Set ABC DEF 123 GHI JKL MNO 456 PQRS TUV WXYZ 789 OPER SYMBOLS 0# Tone Clear Stop/Reset Start [Set] 01 02 03 04 05 06 07 08 09 10 11 12 13 - Canon FAXPHONE L120 | FAXPHONE L120 Basic Guide - Page 62
Registering Coded Speed Dialing FAXPHONE L120 Add.Mode Menu Status Copy ImageQualityDirectory CodedDial Redial Pause Hook Set ABC DEF 123 GHI JKL MNO 456 PQRS TUV WXYZ 789 OPER SYMBOLS 0# Tone Clear Stop/Reset Start [Set] 1 Press [Menu]. 2 Use [Up/Down] to select - Canon FAXPHONE L120 | FAXPHONE L120 Basic Guide - Page 63
FAXPHONE L120 Add.Mode Menu Status Copy ImageQualityDirectory CodedDial Redial Pause Hook Set ABC DEF 123 GHI JKL MNO 456 PQRS TUV WXYZ 789 OPER SYMBOLS 0# Tone Clear Stop/Reset Start ," on p. 4-30.) - If no subaddress or password is required, skip to step 9. Sending Faxes 4-16 - Canon FAXPHONE L120 | FAXPHONE L120 Basic Guide - Page 64
Sending Faxes FAXPHONE L120 Add.Mode Menu Status Copy ImageQualityDirectory CodedDial Redial Pause Hook Set ABC DEF 123 GHI JKL MNO 456 PQRS TUV WXYZ 789 OPER SYMBOLS 0# Tone Clear Stop/Reset Start [Set] 7 Press [Down] and use the numeric buttons to enter the subaddress (up - Canon FAXPHONE L120 | FAXPHONE L120 Basic Guide - Page 65
Editing Coded Speed Dialing FAXPHONE L120 Add.Mode Menu Status Copy ImageQualityDirectory CodedDial Redial Pause Hook Set ABC DEF 123 GHI JKL MNO 456 PQRS TUV WXYZ 789 OPER SYMBOLS 0# Tone Clear Stop/Reset Start [Set] 1 Press [Menu]. 2 Use [Up/Down] to select - Canon FAXPHONE L120 | FAXPHONE L120 Basic Guide - Page 66
FAXPHONE L120 Add.Mode Menu Status Copy ImageQualityDirectory CodedDial Redial Pause Hook Set ABC DEF 123 GHI JKL MNO 456 PQRS TUV WXYZ 789 OPER SYMBOLS 0# Tone Clear Stop/Reset Start [Set] 5 Use [Left/Right] to select , then press [Set]. 6 Use [Left/Right], [Clear], and - Canon FAXPHONE L120 | FAXPHONE L120 Basic Guide - Page 67
FAXPHONE L120 Add.Mode Menu Status Copy ImageQualityDirectory CodedDial Redial Pause Hook Set ABC DEF 123 GHI JKL MNO 456 PQRS TUV WXYZ 789 OPER SYMBOLS 0# Tone Clear Stop/Reset Start [Set] 8 If you want to change or enter the subaddress, press [Down]. If no subaddress is - Canon FAXPHONE L120 | FAXPHONE L120 Basic Guide - Page 68
Deleting Coded Speed Dialing FAXPHONE L120 Add.Mode Menu Status Copy ImageQualityDirectory CodedDial Redial Pause Hook Set ABC DEF 123 GHI JKL MNO 456 PQRS TUV WXYZ 789 OPER SYMBOLS 0# Tone Clear Stop/Reset Start [Set] 1 Press [Menu]. 2 Use [Up/Down] to select - Canon FAXPHONE L120 | FAXPHONE L120 Basic Guide - Page 69
FAXPHONE L120 Add.Mode Menu Status Copy ImageQualityDirectory CodedDial Redial Pause Hook Set ABC DEF 123 GHI JKL MNO 456 PQRS TUV WXYZ 789 OPER SYMBOLS 0# Tone Clear Stop/Reset Start [Set] 01 02 03 04 05 06 07 08 09 10 11 12 13 14 15 FAXPHONE L120 Faxes 4-22 - Canon FAXPHONE L120 | FAXPHONE L120 Basic Guide - Page 70
Clear Stop/Reset Start [Set] 01 02 03 04 05 06 07 08 09 10 11 12 13 14 15 FAXPHONE L120 Copy Function Utility Copy 6 Press the required one-touch speed dialing button (01 to 15) or [Coded Dial] followed by the three-digit coded speed dialing code standby mode. Sending Faxes 4-23 - Canon FAXPHONE L120 | FAXPHONE L120 Basic Guide - Page 71
Dialing FAXPHONE L120 Add.Mode Menu Status Copy ImageQualityDirectory CodedDial Redial Pause Hook Set ABC DEF 123 GHI JKL MNO 456 PQRS TUV WXYZ 789 OPER SYMBOLS 0# Tone Clear Stop/Reset Start [Set] 01 02 03 04 05 06 07 08 09 10 11 12 13 14 15 FAXPHONE L120 Copy - Canon FAXPHONE L120 | FAXPHONE L120 Basic Guide - Page 72
Sending Faxes FAXPHONE L120 Add.Mode Menu Status Copy ImageQualityDirectory CodedDial Redial Pause Hook Set ABC DEF 123 GHI JKL MNO 456 PQRS TUV WXYZ 789 OPER SYMBOLS 0# Tone Clear Stop/Reset Start [Set] 6 Use [Left/Right], [Clear], and the numeric buttons to change the name - Canon FAXPHONE L120 | FAXPHONE L120 Basic Guide - Page 73
Dialing FAXPHONE L120 Add.Mode Menu Status Copy ImageQualityDirectory CodedDial Redial Pause Hook Set ABC DEF 123 GHI JKL MNO 456 PQRS TUV WXYZ 789 OPER SYMBOLS 0# Tone Clear Stop/Reset Start [Set] 01 02 03 04 05 06 07 08 09 10 11 12 13 14 15 FAXPHONE L120 Copy - Canon FAXPHONE L120 | FAXPHONE L120 Basic Guide - Page 74
Advanced Guide.) Using One-Touch Speed/Group Dialing 01 02 03 04 05 06 07 08 09 10 11 12 13 14 15 FAXPHONE L120 Copy Function Utility Copy 1 Load a document. 2 Press the one-touch speed dialing button (01 to 15) for the required recipient or group. - The machine scans - Canon FAXPHONE L120 | FAXPHONE L120 Basic Guide - Page 75
Using Coded Speed Dialing FAXPHONE L120 Add.Mode Menu Status Copy ImageQualityDirectory CodedDial Redial Pause Hook Set ABC DEF 123 GHI JKL MNO 456 PQRS TUV WXYZ 789 OPER SYMBOLS 0# Tone Clear Stop/Reset Start 1 Load a document. 2 Press [Coded Dial]. 3 Use the numeric buttons - Canon FAXPHONE L120 | FAXPHONE L120 Basic Guide - Page 76
using the handset. Sending Faxes Manually FAXPHONE L120 Add.Mode Menu Status Copy ImageQualityDirectory CodedDial Redial Pause Hook Set ABC DEF 123 GHI JKL MNO 456 PQRS TUV WXYZ 789 OPER SYMBOLS 0# Tone Clear - Canon FAXPHONE L120 | FAXPHONE L120 Basic Guide - Page 77
an overseas number. FAXPHONE L120 Add.Mode Menu Status Copy ImageQualityDirectory CodedDial Redial Pause Hook Set ABC DEF 123 GHI JKL MNO 456 PQRS TUV WXYZ 789 OPER SYMBOLS 0# Tone Clear Stop/Reset Start 1 Press [Pause] to enter a pause in a fax number. Each pause entered - Canon FAXPHONE L120 | FAXPHONE L120 Basic Guide - Page 78
features, see Chapter 1, "Advanced Fax Features," in the Advanced Guide. 1 Enter the Setting Menu Add.Mode Menu Status Copy ImageQualityDirectory CodedDial Redial Pause Hook Set ABC DEF 123 GHI JKL MNO 456 PQRS TUV WXYZ 789 OPER SYMBOLS 0# Tone Clear Stop/Reset Start 2 Enter - Canon FAXPHONE L120 | FAXPHONE L120 Basic Guide - Page 79
TUV WXYZ 789 OPER SYMBOLS 0# Tone Clear Stop/Reset Start Use [Left/Right] to select the receive mode, then press [Set]. : Switches between fax and voice calls automatically. : Does not answer any call. You have to manually receive faxes. : Answers all calls as - Canon FAXPHONE L120 | FAXPHONE L120 Basic Guide - Page 80
copy, see Chapter 2, "Document Handling." 2 Enter the Copy Mode Add.Mode Menu Status Copy ImageQualityDirectory CodedDial Redial Pause Hook Set ABC DEF 789 OPER SYMBOLS 0# Tone Clear Stop/Reset Start Press [Copy]. The copy mode automatically resets to the fax mode after one minute of - Canon FAXPHONE L120 | FAXPHONE L120 Basic Guide - Page 81
456 PQRS TUV WXYZ 789 OPER SYMBOLS 0# Tone Clear Stop/Reset Start Press [Start]. Did you know... ● You can adjust image quality and density: See "Scan Settings," on p. 6-3. What if... ● You want to cancel copying: See Chapter 1, "Advanced Fax Features," in the Advanced Guide. 6-2 Copying - Canon FAXPHONE L120 | FAXPHONE L120 Basic Guide - Page 82
to be scanned. These settings return to the default values if you press [Stop/Reset]. Image Quality FAXPHONE L120 Add.Mode Menu Status Copy ImageQualityDirectory CodedDial Redial Pause Hook Set ABC DEF 123 GHI JKL MNO 456 PQRS TUV WXYZ 789 OPER SYMBOLS 0# Tone Clear Stop/Reset - Canon FAXPHONE L120 | FAXPHONE L120 Basic Guide - Page 83
Density FAXPHONE L120 Add.Mode Menu Status Copy ImageQualityDirectory CodedDial Redial Pause Hook Set ABC DEF 123 GHI JKL MNO 456 PQRS TUV WXYZ 789 OPER SYMBOLS 0# Tone Clear Stop/Reset Start 1 Press [Left/Right] to adjust scan density. [Right]: For a darker copy. [Left]: For - Canon FAXPHONE L120 | FAXPHONE L120 Basic Guide - Page 84
Zoom Ratio FAXPHONE L120 Add.Mode Menu Status Copy ImageQualityDirectory CodedDial Redial Pause Hook Set ABC DEF 123 GHI JKL MNO 456 PQRS TUV WXYZ 789 OPER SYMBOLS 0# Tone Clear Stop/Reset Start 1 Press [Up/Down] to enlarge or reduce the copied image in 1% (0.01) increments. [ - Canon FAXPHONE L120 | FAXPHONE L120 Basic Guide - Page 85
Copying 6-6 - Canon FAXPHONE L120 | FAXPHONE L120 Basic Guide - Page 86
printer driver is installed. For details on printer driver settings, see the Software Guide (in the User Software CD). 1 2 Start the Print Command Select the Printer Printing From an open document on an application, click [File] ➞ [Print]. Select the printer icon for the machine ([Canon L120 - Canon FAXPHONE L120 | FAXPHONE L120 Basic Guide - Page 87
3 Adjust Preferences 4 Print the Document Printing Click [Preferences] to open the dialog box. After finished, click [OK]. Click [Print]. What if... ● You want to cancel printing: See Chapter 2, "Printing," in the Software Guide. 7-2 - Canon FAXPHONE L120 | FAXPHONE L120 Basic Guide - Page 88
your machine: - Before cleaning the machine, print or send any documents stored in memory and disconnect the power cord. - Make sure to use a soft cloth to avoid scratching the components. - Do not use tissue paper, paper towels, or similar materials for cleaning; they can stick to the components or - Canon FAXPHONE L120 | FAXPHONE L120 Basic Guide - Page 89
machine's print area periodically to prevent toner powder and paper dust from accumulating inside. 3 Open the cartridge cover by the notch (A). A 1 Disconnect the power cord from the machine. 2 Close the paper delivery tray extension (A), and then the paper delivery tray (B) itself. 4 Remove the - Canon FAXPHONE L120 | FAXPHONE L120 Basic Guide - Page 90
5 Use a clean, soft, dry, lint-free 7 Insert the cartridge into the cloth to remove any toner or machine as far as it will go. paper debris from the machine's interior. Align the guide (A) on the left side of the cartridge with the groove inside the machine. CAUTION A - Do not touch the - Canon FAXPHONE L120 | FAXPHONE L120 Basic Guide - Page 91
B the machine. 2 Lift the paper stack cover and pull it out completely. A 5 After the scanning area becomes dry, lift the scanning platform back into place. NOTE Make sure the back end of the cover does not catch the front paper guide. 3 Lower the scanning platform (A) in the document delivery - Canon FAXPHONE L120 | FAXPHONE L120 Basic Guide - Page 92
When the LCD displays , redistribute toner in the cartridge. If the message persists, replace the cartridge. 2 Open the cartridge cover by the notch (A). A Redistributing Toner 1 Close the paper delivery tray extension (A), and then the paper delivery tray (B) itself. 3 Remove - Canon FAXPHONE L120 | FAXPHONE L120 Basic Guide - Page 93
by its handle. Open the paper delivery tray and The arrow (A) on the cartridge should be facing away from you and pointing down. the extension. A 6 Insert the cartridge into the machine as far as it will go. Align the guide (A) on the left side of the cartridge with the groove inside the - Canon FAXPHONE L120 | FAXPHONE L120 Basic Guide - Page 94
hold the cartridge by its handle. 4 Remove the new cartridge from the protective material. CAUTION Do not close the paper delivery tray without folding the extension first. 2 Open the cartridge cover by the notch (A). 5 Gently rock it several times to A distribute toner inside. Maintenance - Canon FAXPHONE L120 | FAXPHONE L120 Basic Guide - Page 95
seal at an angle. 10 Open the paper delivery tray and 7 Hold the cartridge by its handle. the extension. The arrow (A) on the cartridge should be facing away from you and pointing down. A 8 Insert the cartridge into the machine as far as it will go. Align the guide (A) on the left side of the - Canon FAXPHONE L120 | FAXPHONE L120 Basic Guide - Page 96
are supported in the U.S. through sponsorships of the National Park Foundation, the National Wildlife Federation, and The Nature Conservancy and in Canada through donations to the World Wildlife Fund Canada and The Nature Conservancy of Canada. Since its inception, The Canon Cartridge Recycling - Canon FAXPHONE L120 | FAXPHONE L120 Basic Guide - Page 97
Becoming a part of this worthwhile program is easy. When your cartridge is of no further use, simply follow the instructions detailed for U.S. or Canadian residents. We appreciate your support of The Canon Cartridge Recycling Program. Working together we can make a significant contribution to a - Canon FAXPHONE L120 | FAXPHONE L120 Basic Guide - Page 98
exceeds the above limits, please call 1-800-OK-Canon for special shipping information. Please Note: Do not send defective cartridges for replacement. Defective cartridges under warranty should be exchanged by an authorized dealer or service facility as provided in the warranty. 8-11 Maintenance - Canon FAXPHONE L120 | FAXPHONE L120 Basic Guide - Page 99
Canon set up alternative mail service with the U.S. Postal Service. Please call 1-800-OK-Canon to receive U.S. Postal Service merchandise returning label. ■ Option A: UPS Pick-up ● Give the shipment to your UPS driver your used cartridge(s) will be forwarded to the Canon Cartridge Collection Center - Canon FAXPHONE L120 | FAXPHONE L120 Basic Guide - Page 100
the new cartridge's box. ● Place the empty cartridge in the box of your new cartridge. Seal the box. ● Apply the Canon Canada Inc./Canada Post label provided in this brochure. Canon's labels are specially marked so that Canon pays the postage. ● Deposit your empty cartridge in any full size street - Canon FAXPHONE L120 | FAXPHONE L120 Basic Guide - Page 101
preserve endangered species is a long-standing Canon interest. To this end, for every cartridge collected, Canon Canada donates $1, shared equally between World Wildlife Fund Canada and the Nature Conservancy of Canada. This donation is utilized in Canada. ● For further information about The Clean - Canon FAXPHONE L120 | FAXPHONE L120 Basic Guide - Page 102
to light, place it in its protective bag or wrap it in a thick cloth. 5 Close the cartridge cover. BA CAUTION Do not close the paper delivery tray without folding the extension first. 3 Open the cartridge cover by the notch (A). A NOTE Be careful not to get your fingers caught. Maintenance 8-15 - Canon FAXPHONE L120 | FAXPHONE L120 Basic Guide - Page 103
6 Push down the document feeder tray extension (A), then close the document feeder tray (B). B A 7 Fold the document delivery tray extension (A), and then push the document delivery tray (B) into the machine. A B CAUTION Do not open or close the document delivery tray extension after the - Canon FAXPHONE L120 | FAXPHONE L120 Basic Guide - Page 104
Troubleshooting Clearing Jams NOTE 2 Do not force jammed document or paper out of the machine. Contact Canon Customer Care Center for assistance. Lift the paper not catch the front paper guide. 3 Lower the scanning platform (A) in the document delivery slot. Troubleshooting A If a multi- - Canon FAXPHONE L120 | FAXPHONE L120 Basic Guide - Page 105
pull out the jammed document. 7 Lower the document release lever back into place. 5 Lift the scanning platform back into place. 8 Press [Stop/Reset] to return to standby mode. 6 Insert the paper stack cover. Troubleshooting NOTE Make sure the back end of the cover does not catch and lower the - Canon FAXPHONE L120 | FAXPHONE L120 Basic Guide - Page 106
hold the cartridge by its handle. - To avoid exposing the cartridge to light, place it in its protective bag or wrap it in a thick cloth. 4 Carefully pull jammed paper out of the machine. BA CAUTION Do not close the paper delivery tray without folding the extension first. Troubleshooting 9-3 - Canon FAXPHONE L120 | FAXPHONE L120 Basic Guide - Page 107
, wash with cold water. Warm water will set the toner. 5 Hold the cartridge by its handle. The arrow (A) on the cartridge should be facing away from you and pointing down. A NOTE Be careful not to get your fingers caught. 8 Open the paper delivery tray and the extension. Troubleshooting 9-4 - Canon FAXPHONE L120 | FAXPHONE L120 Basic Guide - Page 108
back end of the cover does not catch and lower the scanning platform. NOTE Make sure the back end of the cover does not catch the front paper guide. 2 Carefully pull jammed paper from inside the slot. Troubleshooting NOTE If you tear the paper, remove any torn pieces to avoid further jams. 9-5 - Canon FAXPHONE L120 | FAXPHONE L120 Basic Guide - Page 109
OPEN The cartridge cover is open. CLOSE CRG. COVER CHECK SCAN PLATFORM The scanning platform is dirty, or not set into scanning position. Comm.Err Communication is disconnected. (only in the copy mode) COMM.ERROR (xxxx) DESTINATION SET BY MANUAL UP TO 16 DRAM LOST DUPLICATE SETTING Fax Err - Canon FAXPHONE L120 | FAXPHONE L120 Basic Guide - Page 110
Message FILE FULL/RX CANCEL FILE FULL/TX CANCEL HANG UP THE PHONE LINE PROBLEM CHECK LINE MEM. FULL/RX CANCEL MEM. FULL/TX CANCEL NO POLL RX DOC. Description Reception cannot be completed because all memory files are used. Transmission is canceled because all memory files are used. The handset or - Canon FAXPHONE L120 | FAXPHONE L120 Basic Guide - Page 111
made previously. Clear the document jam. Load paper or clear the paper jam, and press [Stop/ Reset]. Clear the paper jam. Load the correct-size paper or change the paper size setting. Check if the software is installed properly or if the printer cable is properly connected. Troubleshooting 9-8 - Canon FAXPHONE L120 | FAXPHONE L120 Basic Guide - Page 112
SUB OR PWD ERROR SYSTEM ERROR (Exxx) THE PARTY IS FULL TONER IS OUT CHANGE TONER Description All redialing Canon Customer Care Center. Resend the document to other recipients if necessary. Register a different onetouch speed dialing button for group dialing. Install a new cartridge. Troubleshooting - Canon FAXPHONE L120 | FAXPHONE L120 Basic Guide - Page 113
Message WRONG NUMBER SET WRONG PASSWORD Description An invalid number was entered in the date and time setting. A wrong password was entered. Action Enter a correct date or time. Enter the correct password. Troubleshooting 9-10 - Canon FAXPHONE L120 | FAXPHONE L120 Basic Guide - Page 114
and Lists," in the Advanced Guide. See the table below for individual error codes. Error Code 0001 0070 0071 0080 008D 00A0 00A1 00FF Description The sender may not be using a G3 fax machine. Reception was manually canceled on the machine. The machine's memory is full. The recipient's machine did - Canon FAXPHONE L120 | FAXPHONE L120 Basic Guide - Page 115
LCD displays when power is restored and automatically prints a Lost Report (unless the cartridge is empty or there is no paper in the machine) that lists the documents (received in the last 60 transactions) that were lost from memory as a result of the power cut. 9-12 Troubleshooting - Canon FAXPHONE L120 | FAXPHONE L120 Basic Guide - Page 116
have the following information ready when you contact Canon: - Product name (FAXPHONE L120) - Serial number (On the label located at the back of the machine) - Place of purchase - Nature of problem - Steps you have taken to solve the problem and the results CAUTION If the machine makes strange - Canon FAXPHONE L120 | FAXPHONE L120 Basic Guide - Page 117
Troubleshooting 9-14 - Canon FAXPHONE L120 | FAXPHONE L120 Basic Guide - Page 118
. Printing the Machine Status List FAXPHONE L120 Add.Mode Menu Status Copy ImageQualityDirectory CodedDial Redial Pause Hook Set ABC DEF 123 GHI JKL MNO 456 PQRS TUV WXYZ 789 OPER SYMBOLS 0# Tone Clear - Canon FAXPHONE L120 | FAXPHONE L120 Basic Guide - Page 119
FAXPHONE L120 Add.Mode Menu Status Copy ImageQualityDirectory CodedDial Redial Pause Hook Set ABC DEF 123 GHI JKL MNO 456 PQRS TUV WXYZ 789 OPER SYMBOLS 0# Tone Clear Stop/Reset Start [Set] 3 Use [Up/Down] to select , then press [Set]. Machine Settings 10-2 - Canon FAXPHONE L120 | FAXPHONE L120 Basic Guide - Page 120
Accessing the Setting Menu FAXPHONE L120 Add.Mode Menu Status Copy ImageQualityDirectory CodedDial Redial Pause Hook Set ABC DEF 123 GHI JKL MNO 456 PQRS TUV WXYZ 789 OPER SYMBOLS 0# Tone Clear Stop/Reset Start [Set] 1 Press [Menu]. 2 Use [Up/Down] to select the required menu, - Canon FAXPHONE L120 | FAXPHONE L120 Basic Guide - Page 121
FAXPHONE L120 Add.Mode Menu Status Copy ImageQualityDirectory CodedDial Redial Pause Hook Set ABC DEF 123 GHI JKL MNO 456 PQRS TUV WXYZ 789 OPER SYMBOLS 0# Tone Clear Stop/Reset Start [Set] 3 Use [Up/Down] to select the required setting item, then press [Set]. 4 To register - Canon FAXPHONE L120 | FAXPHONE L120 Basic Guide - Page 122
the line monitor volume. Sets whether to follow the daylight saving time. PAPER SOURCE SETUP Setting Item 1 CASSETTE PAPER Description Sets the paper type and size. (See "Setting Paper Type and Size," on p. 3-7.) Machine Settings TEL REGISTRATION Setting Item 1 1-TOUCH SPD DIAL 2 CODED DIAL - Canon FAXPHONE L120 | FAXPHONE L120 Basic Guide - Page 123
memory at what time, with password protection if required. (See Chapter 1, "Advanced Fax Features," in the Advanced Guide.) Sets whether the machine is to ring for how many times before it answers a call. Sets whether to reduce or truncate the image when a faxed page is larger than the size of paper - Canon FAXPHONE L120 | FAXPHONE L120 Basic Guide - Page 124
reception remotely using a telephone. (See Chapter 1, "Advanced Fax Features," in the Advanced Guide.) COMM.SETTING Setting Item 1 TEL LINE TYPE Description Sets the telephone line type. (See "Set the Telephone Line Type," in the Starter Guide.) REPORTING SETTING Setting Item 1 ACTIVITY REPORT - Canon FAXPHONE L120 | FAXPHONE L120 Basic Guide - Page 125
time and date. (See "Register Sender Information," in the Starter Guide.) Sets the machine's fax number. (See "Register Sender Information," in the Starter Guide.) Sets the user name. (See "Register Sender Information," in the Starter Guide.) NOTE Depending on the country of purchase, some settings - Canon FAXPHONE L120 | FAXPHONE L120 Basic Guide - Page 126
● Power Source ● Power Consumption ● Warm-up Time ● Weight ● Dimensions ● Installation Space ● Environmental Conditions ● Display Languages ● ADF Capacity ● Printable Area ● Scanned Area Personal Desktop - 120-127 V - 60 Hz Max. 700 W (when copying) Approx. 12 seconds Approx. 20.5 lb./9.2 kg (with - Canon FAXPHONE L120 | FAXPHONE L120 Basic Guide - Page 127
from memory Approx. 340/346 pages*2 - STD: 203 pels/in. x 98 lines/in. (8 pels/mm x 3.85 lines/mm) - FINE: 203 pels/in. x 196 lines/in. (8 pels/mm x 7.7 lines/mm) - S-FINE: 203 pels/in. x 392 lines/in. (8 pels/mm x 15.4 lines/mm) - Speed dialing One-touch speed dialing (15 destinations) Coded speed - Canon FAXPHONE L120 | FAXPHONE L120 Basic Guide - Page 128
Copier ● Scanning Resolution ● Printing Resolution ● Enlargement/ Reduction ● First Copy Time ● Copy Speed ● No. of Copies 300 x 300 dpi 600 x 600 dpi 0.50 (50%) to 2.00 (200%) in 0. - Canon FAXPHONE L120 | FAXPHONE L120 Basic Guide - Page 129
256 ● Printing Cartridge » p. 1-7. ● Toner Saver Approx. 50% reduction in toner consumption *1 The Public Switched Telephone Network (PSTN) currently supports 28.8 Kbps modem speed or lower, depending on telephone line conditions. *2 Based on ITU-T Standard Chart No. 1, standard mode. NOTE - Canon FAXPHONE L120 | FAXPHONE L120 Basic Guide - Page 130
A A4 3-1 [Add. Mode] button 1-3 ADF 1-1, 2-3 Automatic document feeder 1-1 C Cartridge 1-7 Recycling 8-9 Replacing 8-7 Cartridge cover 1-1 CHANGE TONER message 8-5 Cleaning the machine Exterior 8-1 Interior 8-2 Scanning area 8-4 [Clear] button 1-4 [Coded Dial] button 1-3, 4-28 Coded speed dialing - Canon FAXPHONE L120 | FAXPHONE L120 Basic Guide - Page 131
I If a power failure occurs 9-12 If you cannot solve a problem 9-13 Image quality Copy 6-3 Fax 4-4 [Image Quality] button 1-3 J Jack External device 1-2 Handset 1-2 Line 1-2 Jams Document 9-1 Inside the machine 9-3 Paper 9-3 Paper feeder 9-5 L LCD 1-3, 1-5 Messages 9-6 [Left/Right] button 1-4 Legal - Canon FAXPHONE L120 | FAXPHONE L120 Basic Guide - Page 132
General 11-1 Printer 11-4 Telephone 11-3 Speed dialing 4-6 Standby mode 1-5 Copy 1-5 Fax 1-5 [Start] button 1-4 [Status] button 1-3, 10-1 [Stop/Reset] button 1-4 Subaddress 4-6 T TEL REGISTRATION 10-5 [Tone] button 1-3 Toner cartridge 1-7 Transporting the machine 8-15 Troubleshooting 9-1 TX SETTING - Canon FAXPHONE L120 | FAXPHONE L120 Basic Guide - Page 133
U [Up/Down] button 1-4 USB port 1-2 USER SETTING 10-8 Using Speed Dialing 4-27 Z Zoom ratio 6-5 11-8 Appendix - Canon FAXPHONE L120 | FAXPHONE L120 Basic Guide - Page 134
3-chome, Ohta-ku, Tokyo 146-8501, Japan CANON U.S.A., INC. One Canon Plaza, Lake Success, NY 11042, U.S.A. CANON CANADA INC. 6390 Dixie Road Mississauga, Ontario L5T 1P7, Canada CANON EUROPA N.V. Bovenkerkerweg 59-61 1185 XB Amstelveen, The Netherlands CANON FRANCE S.A.S. 17, quai du Président Paul
-
 1
1 -
 2
2 -
 3
3 -
 4
4 -
 5
5 -
 6
6 -
 7
7 -
8
-
9
-
10
-
11
-
12
-
13
-
14
-
15
-
16
-
17
-
18
-
19
-
20
-
21
-
22
-
23
-
24
-
25
-
26
-
27
-
28
-
29
-
30
-
31
-
32
-
33
-
34
-
35
-
36
-
37
-
38
-
39
-
40
-
41
-
42
-
43
-
44
-
45
-
46
-
47
-
48
-
49
-
50
-
51
-
52
-
53
-
54
-
55
-
56
-
57
-
58
-
59
-
60
-
61
-
62
-
63
-
64
-
65
-
66
-
67
-
68
-
69
-
70
-
71
-
72
-
73
-
74
-
75
-
76
-
77
-
78
-
79
-
80
-
81
-
82
-
83
-
84
-
85
-
86
-
87
-
88
-
89
-
90
-
91
-
92
-
93
-
94
-
95
-
96
-
97
-
98
-
99
-
100
-
101
-
102
-
103
-
104
-
105
-
106
-
107
-
108
-
109
-
110
-
111
-
112
-
113
-
114
-
115
-
116
-
117
-
118
-
119
-
120
-
121
-
122
-
123
-
124
-
125
-
126
-
127
-
128
-
129
-
130
-
131
-
132
-
133
-
134
 |
 |
ENG
What Can I Do with This Machine?
Before Using the Machine
Document Handling
Print Media
Sending Faxes
Receiving Faxes
Copying
Printing
Maintenance
Troubleshooting
Machine Settings
Appendix
Basic Guide
Please read this guide before operating this equipment.
After you finish reading this guide, store it in a safe place for future reference.