Canon PIXMA MP620 Getting Started - Page 72
Print Head Alignment is now, complete., Next, read 5 Confirming the, Setup Flow
 |
View all Canon PIXMA MP620 manuals
Add to My Manuals
Save this manual to your list of manuals |
Page 72 highlights
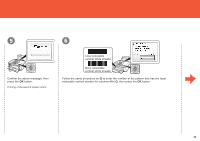
7 Confirm the above message, then press the OK button. Printing of the third pattern starts. 8 9 Less noticeable horizontal white stripes More noticeable horizontal white stripes Enter the number of the pattern that has the least noticeable horizontal stripes for columns a to j, then press OK button. Confirm that the above screen appears. Print Head Alignment is now complete. Print Head Alignment is now complete. Next, read "5 Confirming the Setup Flow" on page 9! • If it is difficult to pick the best pattern, pick the setting that produces the least noticeable white stripes. 70
-
 1
1 -
2
-
3
-
4
-
5
-
6
-
7
-
8
-
9
-
10
-
11
-
12
-
13
-
14
-
15
-
16
-
17
-
18
-
19
-
20
-
21
-
22
-
23
-
24
-
25
-
26
-
27
-
28
-
29
-
30
-
31
-
32
-
33
-
34
-
35
-
36
-
37
-
38
-
39
-
40
-
41
-
42
-
43
-
44
-
45
-
46
-
47
-
48
-
49
-
50
-
51
-
52
-
53
-
54
-
55
-
56
-
57
-
58
-
59
-
60
-
61
-
62
-
63
-
64
-
65
-
66
-
 67
67 -
 68
68 -
 69
69 -
 70
70 -
 71
71 -
 72
72 -
 73
73
 |
 |

·0
8
9
7
Confirm that the above screen appears.
Print Head Alignment is now complete.
Enter the number of the pattern that has the least noticeable
horizontal stripes for columns
a
to
j
, then press
OK
button.
If it is difficult to pick the best pattern, pick the setting that produces
the least noticeable white stripes.
•
Less noticeable
horizontal white
stripes
More noticeable
horizontal white
stripes
Print Head Alignment is now
complete.
Next, read "5 Confirming the
Setup Flow" on page 9!
Confirm the above message, then
press the
OK
button.
Printing of the third pattern starts.