Canon PowerShot A70 Direct Print User Guide - Page 18
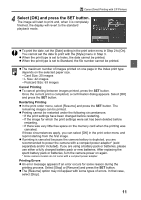
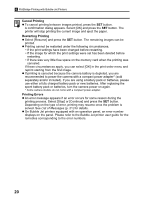
Select [Trimming] and press the SET, button., Trim the image., Press the SET button to close
 |
View all Canon PowerShot A70 manuals
Add to My Manuals
Save this manual to your list of manuals |
Page 18 highlights
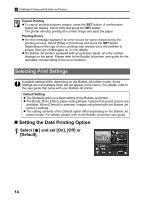
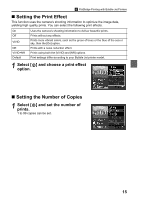
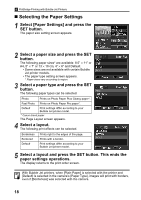
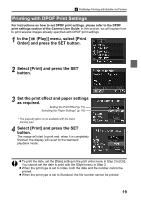
PictBridge Printing with Bubble Jet Printers „ Setting the Printing Area (Trimming) Please set [Paper Settings] first (p. 18) before setting the trimming settings. If the print style is changed after having made trimming settings, you must select the settings again. 1 Select [Trimming] and press the SET button. The trimming frame will appear at the center of the image. If a trimming setting has already been selected for the image, the frame will appear around the previously selected portion. The trimming setting screen differs depending on the camera model. Check which of the following screens appear before selecting settings. Trimming Frame Steps 2a and 3a Steps 2b and 3b 2a Trim the image. Changing the Size of the Trimming Frame z Press the zoom lever or the zoom button to adjust the size of the trimming frame. z The trimming frame can be changed to a minimum selection of approximately half the displayed image or a maximum selection that is virtually the same size as the image. z Expanding the trimming frame beyond its maximum size cancels the trimming setting. z When printing an image that has been magnified using the trimming option, the image quality may become coarser and grainier depending on the level of magnification. If this happens, the trimming frame displays in red. Moving the Trimming Frame z Move the trimming frame using the multicontroller or the up, down, right and left buttons. Rotating the Trimming Frame z You can rotate the trimming frame by pressing the DISP. button or the DISPLAY button. 3a Press the SET button to close the setting menu. Pressing the MENU button cancels the settings. 16
-
 1
1 -
2
-
3
-
4
-
5
-
6
-
7
-
8
-
9
-
10
-
11
-
12
-
 13
13 -
 14
14 -
 15
15 -
 16
16 -
 17
17 -
 18
18 -
 19
19 -
 20
20 -
 21
21 -
 22
22 -
 23
23 -
24
-
25
-
26
-
27
-
28
-
29
-
30
-
31
-
32
-
33
-
34
-
35
-
36
-
37
-
38
-
39
-
40
-
41
-
42
-
43
-
44
-
45
-
46
-
47
-
48
-
49
-
50
-
51
-
52
-
53
-
54
-
55
-
56
-
57
-
58
-
59
-
60
-
61
-
62
-
63
-
64
-
65
-
66
-
67
-
68
-
69
-
70
-
71
-
72
-
73
-
74
-
75
-
76
 |
 |
