Canon PowerShot ELPH 110 HS User Guide - Page 110
Shooting Range and Focusing
 |
View all Canon PowerShot ELPH 110 HS manuals
Add to My Manuals
Save this manual to your list of manuals |
Page 110 highlights
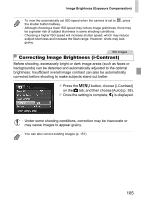
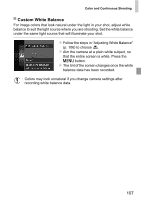
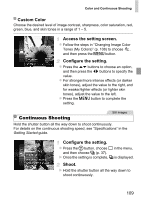
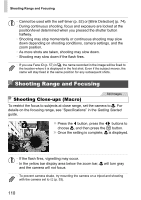
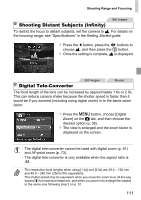
Shooting Range and Focusing • Cannot be used with the self-timer (p. 52) or [Blink Detection] (p. 74). • During continuous shooting, focus and exposure are locked at the position/level determined when you pressed the shutter button halfway. • Shooting may stop momentarily or continuous shooting may slow down depending on shooting conditions, camera settings, and the zoom position. • As more shots are taken, shooting may slow down. • Shooting may slow down if the flash fires. • If you use Face ID (p. 57) in W, the name recorded in the image will be fixed to the location where it is displayed in the first shot. Even if the subject moves, the name will stay fixed in the same position for any subsequent shots. Shooting Range and Focusing Still Images Shooting Close-ups (Macro) To restrict the focus to subjects at close range, set the camera to e. For details on the focusing range, see "Specifications" in the Getting Started guide. z Press the q button, press the qr buttons to choose e, and then press the m button. X Once the setting is complete, e is displayed. • If the flash fires, vignetting may occur. • In the yellow bar display area below the zoom bar, e will turn gray and the camera will not focus. • To prevent camera shake, try mounting the camera on a tripod and shooting with the camera set to [ (p. 53). 110
-
 1
1 -
2
-
3
-
4
-
5
-
6
-
7
-
8
-
9
-
10
-
11
-
12
-
13
-
14
-
15
-
16
-
17
-
18
-
19
-
20
-
21
-
22
-
23
-
24
-
25
-
26
-
27
-
28
-
29
-
30
-
31
-
32
-
33
-
34
-
35
-
36
-
37
-
38
-
39
-
40
-
41
-
42
-
43
-
44
-
45
-
46
-
47
-
48
-
49
-
50
-
51
-
52
-
53
-
54
-
55
-
56
-
57
-
58
-
59
-
60
-
61
-
62
-
63
-
64
-
65
-
66
-
67
-
68
-
69
-
70
-
71
-
72
-
73
-
74
-
75
-
76
-
77
-
78
-
79
-
80
-
81
-
82
-
83
-
84
-
85
-
86
-
87
-
88
-
89
-
90
-
91
-
92
-
93
-
94
-
95
-
96
-
97
-
98
-
99
-
100
-
101
-
102
-
103
-
104
-
 105
105 -
 106
106 -
 107
107 -
 108
108 -
 109
109 -
 110
110 -
 111
111 -
 112
112 -
 113
113 -
 114
114 -
 115
115 -
116
-
117
-
118
-
119
-
120
-
121
-
122
-
123
-
124
-
125
-
126
-
127
-
128
-
129
-
130
-
131
-
132
-
133
-
134
-
135
-
136
-
137
-
138
-
139
-
140
-
141
-
142
-
143
-
144
-
145
-
146
-
147
-
148
-
149
-
150
-
151
-
152
-
153
-
154
-
155
-
156
-
157
-
158
-
159
-
160
-
161
-
162
-
163
-
164
-
165
-
166
-
167
-
168
-
169
-
170
-
171
-
172
-
173
-
174
-
175
-
176
-
177
-
178
-
179
-
180
-
181
-
182
-
183
-
184
-
185
-
186
-
187
-
188
-
189
-
190
-
191
-
192
-
193
-
194
-
195
-
196
-
197
-
198
-
199
-
200
-
201
-
202
-
203
-
204
-
205
-
206
-
207
-
208
-
209
-
210
-
211
-
212
-
213
-
214
-
215
-
216
-
217
-
218
 |
 |