Canon PowerShot ELPH 110 HS User Guide - Page 129
Editing Face ID Information
 |
View all Canon PowerShot ELPH 110 HS manuals
Add to My Manuals
Save this manual to your list of manuals |
Page 129 highlights
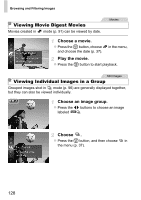
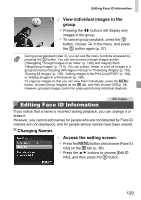
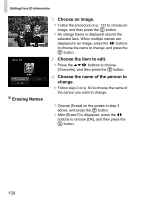
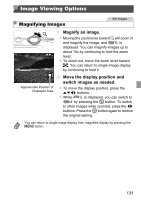
Editing Face ID Information View individual images in the group. z Pressing the qr buttons will display only images in the group. z To cancel group playback, press the m button, choose in the menu, and press the m button again (p. 37). • During group playback (step 3), you can use the menu functions accessed by pressing the m button. You can also browse through images quickly ("Navigating Through Images in an Index" (p. 126)) and magnify them ("Magnifying Images" (p. 131)). You can protect, erase, or print all images in a group at once by choosing "All Images in Group" in "Protecting Images" (p. 135), "Erasing All Images" (p. 139), "Adding Images to the Print List (DPOF)" (p. 184), or "Adding Images to a Photobook" (p. 188). • To ungroup images so that you can view them individually, press the n button, choose [Group Images] on the 1 tab, and then choose [Off] (p. 38). However, grouped images cannot be ungrouped during individual playback. Editing Face ID Information Still Images If you notice that a name is incorrect during playback, you can change it or erase it. However, you cannot add names for people who are not detected by Face ID (names are not displayed), and for people whose names have been erased. Changing Names Access the setting screen. z Press the n button and choose [Face ID Info] on the 1 tab (p. 38). z Press the op buttons to choose [Edit ID Info], and then press the m button. 129
-
 1
1 -
2
-
3
-
4
-
5
-
6
-
7
-
8
-
9
-
10
-
11
-
12
-
13
-
14
-
15
-
16
-
17
-
18
-
19
-
20
-
21
-
22
-
23
-
24
-
25
-
26
-
27
-
28
-
29
-
30
-
31
-
32
-
33
-
34
-
35
-
36
-
37
-
38
-
39
-
40
-
41
-
42
-
43
-
44
-
45
-
46
-
47
-
48
-
49
-
50
-
51
-
52
-
53
-
54
-
55
-
56
-
57
-
58
-
59
-
60
-
61
-
62
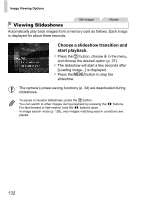
-
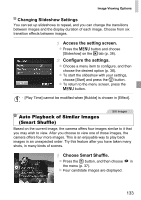
63
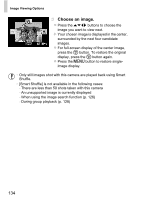
-
64
-
65
-
66
-
67
-
68
-
69
-
70
-
71
-
72
-
73
-
74
-
75
-
76
-
77
-
78
-
79
-
80
-
81
-
82
-
83
-
84
-
85
-
86
-
87
-
88
-
89
-
90
-
91
-
92
-
93
-
94
-
95
-
96
-
97
-
98
-
99
-
100
-
101
-
102
-
103
-
104
-
105
-
106
-
107
-
108
-
109
-
110
-
111
-
112
-
113
-
114
-
115
-
116
-
117
-
118
-
119
-
120
-
121
-
122
-
123
-
 124
124 -
 125
125 -
 126
126 -
 127
127 -
 128
128 -
 129
129 -
 130
130 -
 131
131 -
 132
132 -
 133
133 -
 134
134 -
135
-
136
-
137
-
138
-
139
-
140
-
141
-
142
-
143
-
144
-
145
-
146
-
147
-
148
-
149
-
150
-
151
-
152
-
153
-
154
-
155
-
156
-
157
-
158
-
159
-
160
-
161
-
162
-
163
-
164
-
165
-
166
-
167
-
168
-
169
-
170
-
171
-
172
-
173
-
174
-
175
-
176
-
177
-
178
-
179
-
180
-
181
-
182
-
183
-
184
-
185
-
186
-
187
-
188
-
189
-
190
-
191
-
192
-
193
-
194
-
195
-
196
-
197
-
198
-
199
-
200
-
201
-
202
-
203
-
204
-
205
-
206
-
207
-
208
-
209
-
210
-
211
-
212
-
213
-
214
-
215
-
216
-
217
-
218
 |
 |