D-Link 502G User Guide - Page 21
DSL-502G ADSL Router User's Guide - driver dsl
 |
View all D-Link 502G manuals
Add to My Manuals
Save this manual to your list of manuals |
Page 21 highlights
DSL-502G ADSL Router User's Guide 2. Next, the "Found New Hardware Wizard" dialog box is displayed. 3. Insert the CD that came with the DSL-502G into the CDROM drive. 4. Click "Next" Note: The various versions of Windows have different Hardware Installation Wizards, which may cause the windows on your computer to appear a bit different than those shown in this Guide. Further, the Wizard may function differently in that it may automatically locate and load the driver files. Nonetheless, all options listed in this guide should appear in the Wizard windows shown on your computer even though they may be worded differently. 5. Select "Search for a suitable driver for my device..." 6. Click "Next" 9
-
 1
1 -
2
-
3
-
4
-
5
-
6
-
7
-
8
-
9
-
10
-
11
-
12
-
13
-
14
-
15
-
 16
16 -
 17
17 -
 18
18 -
 19
19 -
 20
20 -
 21
21 -
 22
22 -
 23
23 -
 24
24 -
 25
25 -
 26
26 -
27
-
28
-
29
-
30
-
31
-
32
-
33
-
34
-
35
-
36
-
37
-
38
-
39
-
40
-
41
-
42
-
43
-
44
-
45
-
46
-
47
-
48
-
49
-
50
-
51
-
52
-
53
-
54
-
55
-
56
-
57
-
58
-
59
-
60
-
61
-
62
-
63
-
64
-
65
-
66
-
67
-
68
-
69
-
70
-
71
-
72
-
73
-
74
-
75
-
76
-
77
-
78
-
79
-
80
-
81
-
82
-
83
-
84
-
85
-
86
 |
 |

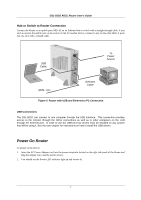
DSL-502G ADSL Router User’s Guide
9
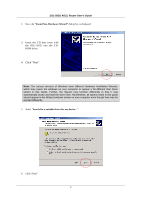
2.
Next, the
“Found New Hardware Wizard”
dialog box is displayed.
3. Insert the CD that came with
the DSL-502G into the CD-
ROM drive.
4. Click “Next”
Note:
The various versions of Windows have different Hardware Installation Wizards,
which may cause the windows on your computer to appear a bit different than those
shown in this Guide. Further, the Wizard may function differently in that it may
automatically locate and load the driver files. Nonetheless, all options listed in this guide
should appear in the Wizard windows shown on your computer even though they may be
worded differently.
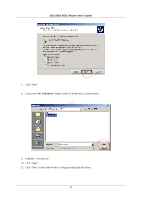
5.
Select “
Search for a suitable driver for my device…
”
6.
Click “Next”