D-Link DWL-1700AP Product Manual
D-Link DWL-1700AP - AirPremier - Wireless Access Point Manual
 |
UPC - 790069251498
View all D-Link DWL-1700AP manuals
Add to My Manuals
Save this manual to your list of manuals |
D-Link DWL-1700AP manual content summary:
- D-Link DWL-1700AP | Product Manual - Page 1
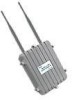
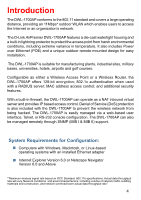
D-Link AirPremier DWL-1700AP Outdoor 2.4 GHz Wireless Access Point Manual This product should be installed ONLY by experienced, professional installers who are familiar with local building and safety codes, and wherever applicable, are licensed by - D-Link DWL-1700AP | Product Manual - Page 2
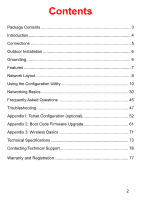
Utility 10 Networking Basics 30 Frequently Asked Questions 45 Troubleshooting 47 Appendix I: Telnet Configuration (optional 52 Appendix 2: Boot Code Firmware Upgrade 61 Appendix 3: Wireless Basics 71 Technical Specifications 73 Contacting Technical Support 76 Warranty and Registration 77 2 - D-Link DWL-1700AP | Product Manual - Page 3
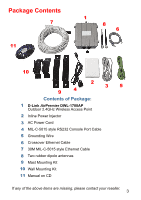
of Package: 1 D-Link AirPremier DWL-1700AP Outdoor 2.4GHz Wireless Access Point 2 Inline Power Injector 3 AC Power Cord 4 MIL-C-5015 style RS232 Console Port Cable 5 Grounding Wire 6 Crossover Ethernet Cable 7 30M MIL-C-5015 style Ethernet Cable 8 Two rubber dipole antennas 9 Mast Mounting - D-Link DWL-1700AP | Product Manual - Page 4
distance, providing an 11Mbps* outdoor WLAN which enables users to access the Internet or an organization's network. The D-Link AirPremier DWL-1700AP features a die-cast watertight housing and a built-in lightning protector to protect the access point from harsh environmental conditions, including - D-Link DWL-1700AP | Product Manual - Page 5
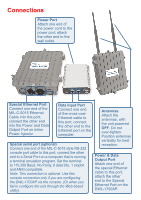
connection only if you are configuring the DWL-1700AP via the console. (Or when you fail to configure the unit through the Web-based utility). Antennas Attach the antennas, with the unit powered OFF. Do not over-tighten. Position antennas vertically for best reception. Power & Data Output Port - D-Link DWL-1700AP | Product Manual - Page 6
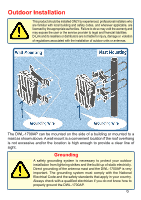
the warranty and may expose the user or the service provider to legal and financial liabilities. D-Link and its resellers or distributors are not liable for injury, damage or violation of regulations associated with the installation of outdoor units or antennas. The DWL-1700AP can be mounted on the - D-Link DWL-1700AP | Product Manual - Page 7
- Provides outdoor users with wireless Internet Access Robust Outdoor Housing - Designed for harsh outdoor environments, with die-cast, watertight housing and built-in lightning protector 2 Different Operation modes - Capable of operatingas either a Router or an Access Point. Compatible - D-Link DWL-1700AP | Product Manual - Page 8
Network Layout Mount the DWL-1700AP to an unobstructed wall or mast. Make sure that is is grounded. Connect the DWL-1700AP to the Inline Power Injector Connect a Hub, Switch or Router to the Inline Power Injector Connect a desktop computer to the router. You can use this - D-Link DWL-1700AP | Product Manual - Page 9
, laptops, with wireless network cards installed, will be able to connect wirelessly to the DWL-1700AP in order to surf the Internet. For more information regarding installation, please see the sections on Grounding and Connections in this manual, and the Quick Installation Guide that came with - D-Link DWL-1700AP | Product Manual - Page 10
DWL-1700AP, use a computer which is connected to the DWL-1700AP with an Ethernet cable (see the Network Layout diagram). First, disable the Access Explorer, Netscape Navigator) . Type the IP Address and HTTP port of the DWL-1700AP (the default port is 2000; the IP is 192.168.0.50) in the address - D-Link DWL-1700AP | Product Manual - Page 11
the default IP Address assigned to the DWL-1700AP, make sure to enter the correct IP Address. Type admin in the User Name field The default password is root. (However, if you have changed the password, please enter the correct password.) Click OK Home > Wizard The Home>Wizard screen - D-Link DWL-1700AP | Product Manual - Page 12
that is sent over the WLAN. Select Enabled or Disabled. Disabled is the default setting. (Note: If you enable encryption on the DWL-1700AP make sure to also enable encryption on all the wireless clients or wireless connection will not be established.) Select the level of encryption desired: 64-bit - D-Link DWL-1700AP | Product Manual - Page 13
Using the Configuration Utility (continued) Home > WAN > Dynamic IP Address Most Cable modem users will select Dynamic IP Address to obtain an IP Address automatically from their ISP (Internet Service Provider.) Host Name- This field is optional, but may be required by some ISPs. The Host Name is - D-Link DWL-1700AP | Product Manual - Page 14
Gateway Address will be provided by your ISP. Primary DNS AddressSecondary DNS Address- This will be provided by your ISP. DNS (Domain Name System or Service) is an Internet service that translates domain names into IP Addresses. (Optional) The Secondary DNS Address is provided by your ISP. 14 - D-Link DWL-1700AP | Product Manual - Page 15
. This information will be provided by your ISP. User Name- Enter a user name. This is optional. Password- Enter a password. This is optional. Retype Password- Retype the password. This is optional. Service Name- This is optional. IP Address- This is optional for Static PPPoE only. Maximum - D-Link DWL-1700AP | Product Manual - Page 16
for the DWL-1700AP. These settings may be referred to as Private settings. You may change the LAN IP Address if needed. The LAN IP Address is private to your internal network and cannot be seen on the Internet. IP Address- The IP Address of the LAN interface. The default LAN IP Address is - D-Link DWL-1700AP | Product Manual - Page 17
. (We suggest that you enable the DHCP server for wireless clients.) Trigger DHCP Service- Select Enable to use the DHCP feature of the DWL-1700AP. Select Disable to disable this function Default Gateway- Enter the LAN IP Address of the DWL-1700AP Net Mask- The subnet mask of the LAN interface - D-Link DWL-1700AP | Product Manual - Page 18
can be configured as a Virtual Server so that remote users accessing Web and FTP services via the public IP Address can be automatically redirected to local servers in the LAN (Local Area Network.) The DWL-1700AP firewall feature filters out unrecognized packets to protect your LAN network so all - D-Link DWL-1700AP | Product Manual - Page 19
MAC Addresses are not listed in the filter list. Computers listed are blocked from the Internet. MAC Address Apply - Enter the MAC Address of the wireless LAN user that will be denied Internet access when the filter is enabled. Click Apply if you have made any changes MAC Address - Media - D-Link DWL-1700AP | Product Manual - Page 20
that passes through the DWL-1700AP. The Firewall Rules that you create will appear in the list at the bottom of the page. Please be sure to Click Apply, after you have made changes or additions. Firewall Service- Select Enabled to enable the Firewall Service the IP Address - D-Link DWL-1700AP | Product Manual - Page 21
Beacon IntervalRTS ThresholdFragmentationSSID BroadcastApply- Beacons are packets sent by an Access Point to synchronize a wireless network. Specify a value. 100 is the default setting and is recommended. This value should remain at its default setting of 250. If you encounter inconsistent data flow - D-Link DWL-1700AP | Product Manual - Page 22
Using the Configuration Menu (continued) Advanced > 802.1x 802.1x function - Disabled is the default setting Accessible 802.1x Users on - Select Local or Remote RADIUS SERVER parameters Server IP Share Key - Enter the IP Address of the RADIUS SERVER Enter the Shared key. It must be the same as - D-Link DWL-1700AP | Product Manual - Page 23
protocol that reports activity on each network device to the administrator of the network. SNMP can be used to monitor traffic and statistics of the DWL-1700AP. 23 - D-Link DWL-1700AP | Product Manual - Page 24
Using the Configuration Menu (continued) Advanced > Anti-DoS Select one or more of the options shown here in order to reject DoS (Denial of Service) attacks. Some CPU resources are used in Anti-DoS attacks. If you notice performance degradation, you may wish to adjust your selection of Anti-DoS - D-Link DWL-1700AP | Product Manual - Page 25
the Configuration Menu (continued) Tools> Admin At this page, the DWL-1700AP administrator can change the system password. The Login name is admin New Password- Enter a new password in this field Confirm Password- Retype the password for confirmation Block WAN Ping Disable Ping from the WAN side - D-Link DWL-1700AP | Product Manual - Page 26
file can be loaded back on the DWL-1700AP. To reload a system settings file, click on Browse to browse the local hard drive and locate the system file to be used. You may also reset the Wireless Access Point back to factory settings by clicking on Default. Save Settings to Local Hard Drive- Load - D-Link DWL-1700AP | Product Manual - Page 27
Using the Configuration Menu (continued) Tools > Firmware There may be new firmware for your DWL-1700AP available on the D-Link support website. Click here to check for a firmware upgrade on our support site. You will need to download and install TFTP software on a computer in your network. Copy the fi - D-Link DWL-1700AP | Product Manual - Page 28
Using the Configuration Menu (continued) Status > Device Info The Device Info screen displays information about the DWL-1700AP. 28 - D-Link DWL-1700AP | Product Manual - Page 29
Using the Configuration Menu (continued) Status > Wireless The screen above displays the Wireless Status and the length of time of the current connection. Help At the Help screen you can select from Help files displayed above. 29 - D-Link DWL-1700AP | Product Manual - Page 30
Networking Basics Using the Network Setup Wizard in Windows XP In this section you will learn how to establish a network at home or work, using Microsoft Windows XP. Note: Please refer to - D-Link DWL-1700AP | Product Manual - Page 31
Networking Basics (continued) Please follow all the instructions in this window: Click Next In the following window, select the best description of your computer. If your computer connects to the internet through a gateway/router, select the second option as shown. Click Next 31 - D-Link DWL-1700AP | Product Manual - Page 32
Networking Basics (continued) Enter a Computer description and a Computer name (optional.) Click Next Enter a Workgroup name. All computers on your network should have the same Workgroup name. Click Next 32 - D-Link DWL-1700AP | Product Manual - Page 33
Networking Basics (continued) Please wait while the Network Setup Wizard applies the changes. When the changes are complete, Click Next. Please wait while the Network Setup Wizard configures the computer. This may take a few minutes. 33 - D-Link DWL-1700AP | Product Manual - Page 34
Networking Basics (continued) In the window below, select the option that fits your needs. In this example, Create a Network Setup Disk has been selected. You will run this disk on each of the computers on your network. Click Next. Insert a disk into the Floppy Disk - D-Link DWL-1700AP | Product Manual - Page 35
Networking Basics (continued) Please read the information under Here's how in the screen below. After you complete the Network Setup Wizard you will use the Network Setup Disk to run the Network Setup Wizard once on each of the computers on your network. Click Next. 35 - D-Link DWL-1700AP | Product Manual - Page 36
on this screen, then click Finish to complete the Network Setup Wizard. The new settings will take effect when you restart the to run the Network Setup Disk on all the other computers on your network. After running the Network Setup Disk on all your computers, your new wireless network will be ready - D-Link DWL-1700AP | Product Manual - Page 37
Networking Basics (continued) Naming your Computer To name your computer, please follow these directions:(In Windows XP) Click Start (in the lower left corner of the screen) Right-click on My Computer Select Properties and Click Select the Computer Name Tab in the System Properties window. - D-Link DWL-1700AP | Product Manual - Page 38
Address in Windows XP The adapter-equipped computers in your network must be in the same IP Address range (see Getting Started in this manual for a definition of IP Address Range.) To check on the IP Address of the adapter, please do the following: Right-click on the Local Area Connection icon in - D-Link DWL-1700AP | Product Manual - Page 39
Support tab Click Close Assigning a Static IP Address in Windows XP/2000 Note: Residential Gateways/Broadband Routers will automatically assign IP Static IP Addresses. If you are not using a DHCP capable Gateway/Router, or you need to assign a Static IP Address, please follow these instructions: - D-Link DWL-1700AP | Product Manual - Page 40
Networking Basics (continued) Assigning a Static IP Address in Windows XP/2000 Double-click on Network Connections Right-click on Local Area Connections Double-click on Properties 40 - D-Link DWL-1700AP | Product Manual - Page 41
the same for all the computers on the network.) Input your DNS server addresses. (Note: If you are entering a DNS server, you must enter the IP Address of the Default Gateway.) The DNS server information will be supplied by your ISP (Internet Service Provider.) Click OK 41 - D-Link DWL-1700AP | Product Manual - Page 42
OSX Go to the Apple Menu and select System Preferences cClick on Network Select Built-in Ethernet in the Show pull-down menu Select Manually in the Configure pull-down menu Input the Static IP Address, the Subnet Mask and the Router IP Address in the appropriate fields Click Apply Now 42 - D-Link DWL-1700AP | Product Manual - Page 43
Network Select Built-in Ethernet in the Show pull-down menu Select Using DHCP in the Configure pull-down menu Click Apply Now The IP Address, Subnet mask, and the Router's IP Address will appear in a few seconds 43 - D-Link DWL-1700AP | Product Manual - Page 44
one will appear. Type ping xxx.xxx.xxx.xxx, where xxx is the IP Address of the Wireless Router or Access Point. A good wireless connection will show four replies from the Wireless Router or Acess Point, as shown. Checking the Wireless Connection by Pinging in Windows Me and 98 Go to Start > Run - D-Link DWL-1700AP | Product Manual - Page 45
Frequently Asked Questions Q1: My wireless LAN card supports Short and Long Preamble, if I want to use DWL-1700AP as my access device, what is the best preamble setting for it? A: The DWL-1700AP default allows all stations to associate and cannot disallow associations from stations that do not - D-Link DWL-1700AP | Product Manual - Page 46
the Y to reset the DWL-1700AP to its factory default settings. Q7: Does the DWL-1700AP support a change to output power manually? A: This function is not supported in the current version. Q8: To which of the DWL-1700AP's two jacks should I connect when I want to use a high gain antenna to reach the - D-Link DWL-1700AP | Product Manual - Page 47
Troubleshooting This Chapter provides solutions to problems that can occur during the installation and operation of the DWL-1700AP Wireless Access Point. We cover various aspects of the network setup, including the network adapters. Please read the following if you are having problems. Note: It is - D-Link DWL-1700AP | Product Manual - Page 48
, as shown in the illustration below. default Check that the IP Address assigned to the wireless adapter is within the same IP Address range as the access point and gateway. (Since the DWL-1700AP has a WLAN IP Address of 192.168.1.50, wireless adapters must have an IP Address in the same range - D-Link DWL-1700AP | Product Manual - Page 49
to access the Internet. Typically, your ISP (Internet Service Provider) will be able to give you the DNS server information. If you need to find out how to ping network devices, please refer to "Checking the Wireless Connection by pinging" in the Networking Basics section of this manual. 3. Check - D-Link DWL-1700AP | Product Manual - Page 50
Troubleshooting (continued) Double-click on Network Adapters Right-click on D-Link AirPlus DWL-G650 Wireless Cardbus Adapter (In this example we use the DWL-G650; you may be using other network adapters, but the procedure will remain the same.) D-Link AirPlus DWL-G650 Select Properties to - D-Link DWL-1700AP | Product Manual - Page 51
of your D-Link wireless products. 6. Why can't I get a wireless connection? If you have enabled Encryption on the DWL-1700AP, you must also enable encryption on all wireless clients in order to establish a wireless connection. Make sure that the SSID on the Access Point and the Wireless Client are - D-Link DWL-1700AP | Product Manual - Page 52
that can be changed if users have special requirements. Most of the management functions can be accessed using TCP/IP protocol; it can also be .168.0.50 (the default terminal type of Telnet is VT100; the default Ethernet IP Address of the AP is 192.168.0.50; the default wireless IP Address is 192.168 - D-Link DWL-1700AP | Product Manual - Page 53
Telnet Configuration (continued) 2. Enter the User Name and User Password as shown below. (The default User Name is admin and the default User Password is root.) admin After you have logged in, the Telnet user interface screen will appear, as shown below. 53 - D-Link DWL-1700AP | Product Manual - Page 54
(continued) 3. The structure of the menu tree is shown on the following page. Users can use the following keys to select the parameter to change or add. Up/ after enable configuration mode is enabled. Hint 2: In item su, type the default password root to enter the supervisor configuration mode. 54 - D-Link DWL-1700AP | Product Manual - Page 55
Telnet Configuration (continued) 55 - D-Link DWL-1700AP | Product Manual - Page 56
Telnet Configuration (continued) 56 - D-Link DWL-1700AP | Product Manual - Page 57
Telnet Configuration (continued) 57 - D-Link DWL-1700AP | Product Manual - Page 58
Telnet Configuration (continued) 58 - D-Link DWL-1700AP | Product Manual - Page 59
Telnet Configuration (continued) 59 - D-Link DWL-1700AP | Product Manual - Page 60
Telnet Configuration (continued) 60 - D-Link DWL-1700AP | Product Manual - Page 61
2: Boot Code/Firmware Upgrade This procedure is optional. If you wish to upgrade the Boot Code, check the D-Link support website to see style Ethernet cable into the Special Ethernet port of the DWL-1700AP. 3. Connect the RJ-45 Ethernet connector (another end of MIL-C-5015 style Ethernet cable) into - D-Link DWL-1700AP | Product Manual - Page 62
Boot Code Firmware Upgrade (continued) After the Hyper Terminal window appears: Give this new connection a name. (e.g., DWL-1700AP) Select correct COM port. (e.g.,COM1) 62 - D-Link DWL-1700AP | Product Manual - Page 63
Boot Code Firmware Upgrade (continued) Set baud rate as 115200, and flow control as None. Then press OK to bring up the HyperTerminal window. Press Esc to reboot the DWL-1700AP. After reboot, and when showing EDORAM Testing, press X to enter console mode. 63 - D-Link DWL-1700AP | Product Manual - Page 64
Boot Code Firmware Upgrade (continued) Key-in DLX and press Enter. When CCC... appears, select Transfer > Send File. Set Protocol as 1K Xmodem. Key-in correct filename (X.BIN) and path, then choose Send to start boot code upgrade. 64 - D-Link DWL-1700AP | Product Manual - Page 65
Boot Code Firmware Upgrade (continued) When XMODEM End of Transfer & ERASE ROOT FW (X.BIN) NOW (Y/y): appears, type Y to update Flash. Upon completion, you will see X.BIN Upgrade Complete! displayed on the screen. 65 - D-Link DWL-1700AP | Product Manual - Page 66
Boot Code Firmware Upgrade (continued) Key-in reboot and press Enter to let the new boot code activate. After rebooting and when showing EDORAM Testing, press X to enter console mode again. 66 - D-Link DWL-1700AP | Product Manual - Page 67
Boot Code Firmware Upgrade (continued) Key-in DLS and press Enter, the following warning will appear: Warning!! Main program will be overwritten!! Press Y (in upper case) to proceed... - D-Link DWL-1700AP | Product Manual - Page 68
Boot Code Firmware Upgrade (continued) Key-in DLP and press Enter to erase the old Web image and when CCC... appears, select Transfer > Send File. Set Protocol as 1K Xmodem. Key-in correct filename (PFS.IMG) and path, then choose Send to start Web image upgrade. 68 - D-Link DWL-1700AP | Product Manual - Page 69
Boot Code Firmware Upgrade (continued) Key in DLB and press Enter to upgrade the BIOS. When CCC... appears, select Transfer > Send File. Set Protocol as 1K Xmodem. Key-in the correct filename (STARTUP.BIN) and path, then choose Send to start to upgrade the BIOS code. 69 - D-Link DWL-1700AP | Product Manual - Page 70
Boot Code Firmware Upgrade (continued) When XMODEM End of Transfer and Erase Root FW (X.BIN) NOW ( Y/y): appears, type Y to update Flash. After a successful upgrade, you will see STARTUP.BIN Upgrade Complete! Type in reboot to restart the DWL-1700AP. 70 - D-Link DWL-1700AP | Product Manual - Page 71
desktop systems support the same protocols as Ethernet adapter cards. Under many circumstances, it may be desirable for mobile network devices to link to a conventional Ethernet LAN in order to use servers, printers or an Internet connection supplied through the wired LAN. A Wireless Access Point is - D-Link DWL-1700AP | Product Manual - Page 72
Wireless Basics (continued) People use WLAN technology for many different purposes: Mobility - Productivity increases when people have access to small number of users to larger infrastructure networks to accommodate hundreds or thousands of users, depending on the number of wireless devices deployed. - D-Link DWL-1700AP | Product Manual - Page 73
to 2.497MHz Data Rates & Modulation:* 11 Mbps (CCK) 5.5 Mbps (CCK) 2 Mbps (DQPSK) 1 Mbps (DBPSK) Transmit Power (including 5dBi antenna): 24dBm (250mW) *"Maximum wireless signal rate based on IEEE Standard 802.11b specifications. Actual data throughput rate will vary. Network conditions - D-Link DWL-1700AP | Product Manual - Page 74
fications (continued) Receiver Sensitivity: - D-Link DWL-1700AP | Product Manual - Page 75
) Protocol Supported: TCP/IP NAT/NAPT Virtual Server (NAT inbound server) DHCP client/server PPPoE Static Routing Ethernet Bridging Security: 64/128-bit WEP (RC4) IEEE 802.1x port-based authentication MAC Address based access control 802.11b SSID hidden Denial Wireless 802 - D-Link DWL-1700AP | Product Manual - Page 76
over the Telephone: (877) 453-5465 24 hours a day, seven days a week. D-Link Technical Support over the Internet: http://support.dlink.com email:[email protected] Tech Support for customers within Canada: D-Link Technical Support over the Telephone: (800) 361-5265 Monday to Friday 8:30am to 9:00pm - D-Link DWL-1700AP | Product Manual - Page 77
D-Link's sole discretion. Such repair or replacement will be rendered by D-Link at an Authorized D-Link Service price paid by the original purchaser for the defective Hardware will be refunded by D-Link upon return to D-Link the product to the original purchase point based on its return policy. In - D-Link DWL-1700AP | Product Manual - Page 78
package. Do not include any manuals or accessories in the shipping package. D-Link will only replace the defective (Visit http://www.dlink.ca for detailed warranty information within Canada) D-Link may reject or return by anyone other than D-Link or an Authorized D-Link Service Office will void this - D-Link DWL-1700AP | Product Manual - Page 79
in accordance with the instructions, may cause harmful user is encouraged to try to correct the interference by one or more of the following measures: • Reorient or relocate the receiving antenna Link office. Register your D-Link product online at http://support.dlink.com/register/ 06032005
-
 1
1 -
 2
2 -
 3
3 -
 4
4 -
 5
5 -
 6
6 -
 7
7 -
8
-
9
-
10
-
11
-
12
-
13
-
14
-
15
-
16
-
17
-
18
-
19
-
20
-
21
-
22
-
23
-
24
-
25
-
26
-
27
-
28
-
29
-
30
-
31
-
32
-
33
-
34
-
35
-
36
-
37
-
38
-
39
-
40
-
41
-
42
-
43
-
44
-
45
-
46
-
47
-
48
-
49
-
50
-
51
-
52
-
53
-
54
-
55
-
56
-
57
-
58
-
59
-
60
-
61
-
62
-
63
-
64
-
65
-
66
-
67
-
68
-
69
-
70
-
71
-
72
-
73
-
74
-
75
-
76
-
77
-
78
-
79
 |
 |
Manual
Building Networks for People
Outdoor 2.4 GHz
D-Link
Air
Premier
DWL-1700AP
Wireless Access Point
This product should be installed ONLY by
experienced, professional installers who are
familiar with local building and safety codes,
and wherever applicable, are licensed by the
appropriate authorities.
Failure to do so may
void the warranty and may expose the user or the
service provider to legal and financial liabilities.