D-Link DXS-3600-EM-STACK Hardware Installation Guide - Page 14
Installing the Switch into a Rack
 |
View all D-Link DXS-3600-EM-STACK manuals
Add to My Manuals
Save this manual to your list of manuals |
Page 14 highlights
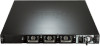
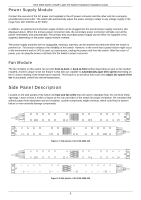
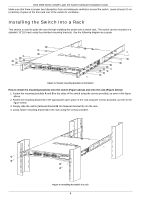
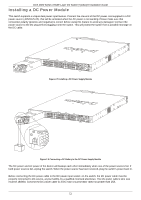
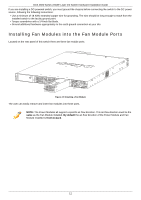
DXS-3600 Series 10GbE Layer 2/3 Switch Hardware Installation Guide Make sure that there is proper heat dissipation from and adequate ventilation around the switch. Leave at least 10 cm (4 inches) of space at the front and rear of the switch for ventilation. Installing the Switch into a Rack This section is used to guide the user through installing the switch into a switch rack. The switch can be mounted in a standard 19"(1U) rack using the provided mounting brackets. Use the following diagram as a guide. B A Figure 2-2 Fasten mounting brackets on the Switch How to install the mounting brackets onto the switch (Figure above) and onto the rack (Figure below): 1. Fasten the mounting brackets A and B to the sides of the switch using the screws provided, as seen in the figure above. 2. Fasten the mounting bracket C in the appropriate open space in the rack using the screws provided, as seen in the figure below. 3. Simply slide the switch (fastened bracket B into fastened bracket C) into the rack. 4. Lastly, fasten mounting bracket A to the rack using the screws provided. C Figure 2-3 Installing the Switch in a rack 8
-
 1
1 -
2
-
3
-
4
-
5
-
6
-
7
-
8
-
 9
9 -
 10
10 -
 11
11 -
 12
12 -
 13
13 -
 14
14 -
 15
15 -
 16
16 -
 17
17 -
 18
18 -
 19
19 -
20
-
21
-
22
-
23
-
24
-
25
-
26
-
27
-
28
-
29
-
30
-
31
-
32
-
33
-
34
-
35
-
36
 |
 |
