Dell C2660dn Dell Color Laser Printer Users Guide - Page 50
Restart System, Dell Printer Configuration Web Tool, Print Server Settings, Wireless LAN, Ad-Hoc
 |
View all Dell C2660dn manuals
Add to My Manuals
Save this manual to your list of manuals |
Page 50 highlights
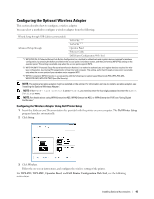
9 Select the encryption type from No Security, Mixed mode PSK, WPA-PSK-TKIP, WPA2-PSK-AES, or WEP. If you do not set security for your wireless network: • Press the button until No Security is highlighted, and then press the To use Mixed mode PSK, WPA-PSK-TKIP, or WPA2-PSK-AES encryption: (Set) button. a Press the button until Mixed mode PSK, WPA-PSK-TKIP, or WPA2-PSK-AES is highlighted, and then press the (Set) button. b Enter the pass phrase, and then press the (Set) button. To use WEP encryption: a Press the button until WEP is highlighted, and then press the (Set) button. b Enter the WEP key, and then press the (Set) button. c Press the button to highlight the desired transmit key from Auto or WEP Key 1 to WEP Key 4, and then press the (Set) button. Proceed to step 11. 10 Select the encryption type from No Security or WEP. If you do not set security for your wireless network: • Ensure that No Security is highlighted, and then press the To use WEP encryption: (Set) button. a Press the button until WEP is highlighted, and then press the (Set) button. b Enter the WEP key, and then press the (Set) button. c Press the button to highlight the desired transmit key from WEP Key 1 to WEP Key 4, and then press the (Set) button. 11 The Restart System screen appears. 12 Turn off the printer, and turn it on again to apply the settings. Wireless LAN connection setting is complete. Dell Printer Configuration Web Tool NOTE: For details about using WPA-Enterprise-AES, WPA2-Enterprise-AES, or WPA-Enterprise-TKIP, see "Using Digital Certificates." 1 Ensure that the printer is turned off and the wireless adapter is connected to the printer. 2 Connect the printer to the network with an Ethernet cable. For details about how to connect the Ethernet cable, see "Connecting Printer to Computer or Network." 3 Turn on the printer. 4 Launch the Dell Printer Configuration Web Tool by entering the IP address of the printer in your web browser. 5 Click Print Server Settings. 6 Click Print Server Settings tab. 7 Click Wireless LAN. 8 Enter the SSID in the SSID text box. 9 Select Ad-Hoc or Infrastructure in the Network Type drop-down list box. 48 Installing Optional Accessories
-
 1
1 -
2
-
3
-
4
-
5
-
6
-
7
-
8
-
9
-
10
-
11
-
12
-
13
-
14
-
15
-
16
-
17
-
18
-
19
-
20
-
21
-
22
-
23
-
24
-
25
-
26
-
27
-
28
-
29
-
30
-
31
-
32
-
33
-
34
-
35
-
36
-
37
-
38
-
39
-
40
-
41
-
42
-
43
-
44
-
 45
45 -
 46
46 -
 47
47 -
 48
48 -
 49
49 -
 50
50 -
 51
51 -
 52
52 -
 53
53 -
 54
54 -
 55
55 -
56
-
57
-
58
-
59
-
60
-
61
-
62
-
63
-
64
-
65
-
66
-
67
-
68
-
69
-
70
-
71
-
72
-
73
-
74
-
75
-
76
-
77
-
78
-
79
-
80
-
81
-
82
-
83
-
84
-
85
-
86
-
87
-
88
-
89
-
90
-
91
-
92
-
93
-
94
-
95
-
96
-
97
-
98
-
99
-
100
-
101
-
102
-
103
-
104
-
105
-
106
-
107
-
108
-
109
-
110
-
111
-
112
-
113
-
114
-
115
-
116
-
117
-
118
-
119
-
120
-
121
-
122
-
123
-
124
-
125
-
126
-
127
-
128
-
129
-
130
-
131
-
132
-
133
-
134
-
135
-
136
-
137
-
138
-
139
-
140
-
141
-
142
-
143
-
144
-
145
-
146
-
147
-
148
-
149
-
150
-
151
-
152
-
153
-
154
-
155
-
156
-
157
-
158
-
159
-
160
-
161
-
162
-
163
-
164
-
165
-
166
-
167
-
168
-
169
-
170
-
171
-
172
-
173
-
174
-
175
-
176
-
177
-
178
-
179
-
180
-
181
-
182
-
183
-
184
-
185
-
186
-
187
-
188
-
189
-
190
-
191
-
192
-
193
-
194
-
195
-
196
-
197
-
198
-
199
-
200
-
201
-
202
-
203
-
204
-
205
-
206
-
207
-
208
-
209
-
210
-
211
-
212
-
213
-
214
-
215
-
216
-
217
-
218
-
219
-
220
-
221
-
222
-
223
-
224
-
225
-
226
-
227
-
228
-
229
-
230
-
231
-
232
-
233
-
234
-
235
-
236
-
237
-
238
-
239
-
240
-
241
-
242
-
243
-
244
-
245
-
246
-
247
-
248
-
249
-
250
-
251
-
252
-
253
-
254
-
255
-
256
-
257
-
258
-
259
-
260
-
261
-
262
-
263
-
264
-
265
-
266
-
267
-
268
-
269
-
270
-
271
-
272
-
273
-
274
-
275
-
276
-
277
-
278
-
279
-
280
-
281
-
282
-
283
-
284
-
285
-
286
-
287
-
288
-
289
-
290
-
291
-
292
-
293
-
294
-
295
-
296
-
297
-
298
-
299
-
300
-
301
-
302
-
303
-
304
-
305
-
306
-
307
-
308
-
309
-
310
-
311
-
312
-
313
-
314
-
315
-
316
-
317
-
318
-
319
-
320
-
321
-
322
-
323
-
324
-
325
-
326
-
327
-
328
-
329
-
330
-
331
-
332
-
333
-
334
-
335
-
336
-
337
-
338
-
339
-
340
-
341
-
342
-
343
-
344
-
345
-
346
-
347
-
348
-
349
-
350
-
351
-
352
-
353
-
354
-
355
-
356
-
357
-
358
-
359
-
360
-
361
 |
 |
