Dell Dimension 8400 Owner's Manual - Page 65
Front-Panel Door and Hinge Arms, Reattaching the Hinge Arms
 |
View all Dell Dimension 8400 manuals
Add to My Manuals
Save this manual to your list of manuals |
Page 65 highlights
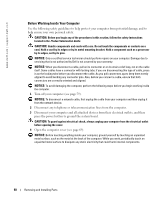
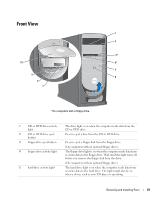
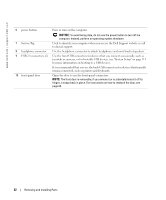
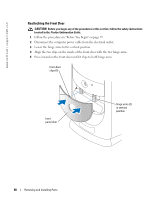
14 network adapter connector To attach your computer to a network or broadband device, connect one end of a network cable to either a network jack or your network or broadband device. Connect the other end of the network cable to the network adapter connector on your computer. A click indicates that the network cable has been securely attached. NOTE: Do not plug a telephone cable into the network connector. On computers with a network connector card, use the connector on the card. It is recommended that you use Category 5 wiring and connectors for your network. If you must use Category 3 wiring, force the network speed to 10 Mbps to ensure reliable operation. 15 USB 2.0 connectors (6) Use the back USB connectors for devices that typically remain connected, such as printers and keyboards. It is recommended that you use the front USB connectors for devices that you connect occasionally, such as joysticks or cameras, or for bootable USB devices. 16 microphone connector Use the pink microphone connector to attach a personal computer microphone for voice or musical input into a sound or telephony program. On computers with a sound card, the microphone connector is on the card. 17 line-out connector Use the green line-out connector to attach headphones and most speakers with integrated amplifiers. On computers with a sound card, use the connector on the card. 18 center/Low-Frequency Use the yellow center/LFE connector to attach your subwoofer. Effects (LFE) connector On computers with a sound card, use the connector on the card. 19 keyboard connector If you have a standard keyboard, plug it into the purple keyboard connector. If you have a USB keyboard, plug it into a USB connector. 20 serial connector Connect a serial device, such as a handheld device, to the serial port. Front-Panel Door and Hinge Arms To prevent damage to your computer, the front-panel door is designed to "break away" if it is lifted up too far. If the front-panel door is open and it is pushed inward too hard, the hinge arms may also break away (the hinge arms are loose when they are detached). Reattaching the Hinge Arms CAUTION: Before you begin any of the procedures in this section, follow the safety instructions located in the Product Information Guide. 1 Follow the procedures in "Before You Begin" on page 59. 2 Disconnect the computer power cable from the electrical outlet. 3 Remove the front-panel door by gently snapping it off the two hinge arms. Removing and Installing Parts 65
-
 1
1 -
2
-
3
-
4
-
5
-
6
-
7
-
8
-
9
-
10
-
11
-
12
-
13
-
14
-
15
-
16
-
17
-
18
-
19
-
20
-
21
-
22
-
23
-
24
-
25
-
26
-
27
-
28
-
29
-
30
-
31
-
32
-
33
-
34
-
35
-
36
-
37
-
38
-
39
-
40
-
41
-
42
-
43
-
44
-
45
-
46
-
47
-
48
-
49
-
50
-
51
-
52
-
53
-
54
-
55
-
56
-
57
-
58
-
59
-
 60
60 -
 61
61 -
 62
62 -
 63
63 -
 64
64 -
 65
65 -
 66
66 -
 67
67 -
 68
68 -
 69
69 -
 70
70 -
71
-
72
-
73
-
74
-
75
-
76
-
77
-
78
-
79
-
80
-
81
-
82
-
83
-
84
-
85
-
86
-
87
-
88
-
89
-
90
-
91
-
92
-
93
-
94
-
95
-
96
-
97
-
98
-
99
-
100
-
101
-
102
-
103
-
104
-
105
-
106
-
107
-
108
-
109
-
110
-
111
-
112
-
113
-
114
-
115
-
116
-
117
-
118
-
119
-
120
-
121
-
122
-
123
-
124
-
125
-
126
-
127
-
128
-
129
-
130
-
131
-
132
-
133
-
134
-
135
-
136
-
137
-
138
-
139
-
140
-
141
-
142
-
143
-
144
-
145
-
146
 |
 |
