Dell Latitude CPi A User Manual - Page 45
Exhaust Fan, the exhaust fan.
 |
View all Dell Latitude CPi A manuals
Add to My Manuals
Save this manual to your list of manuals |
Page 45 highlights
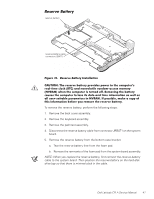
exhaust fan power cable connector (JFAN1) 12-mm screws (2) exhaust fan 1. Remove the back cover assembly. 2. Remove the keyboard assembly. 3. Remove the palmrest assembly. 4. Disconnect the exhaust fan power cable from connector J10 on the system board. 5. Remove the two 12-mm screws securing the exhaust fan, and then remove the exhaust fan. NOTE: When you replace the exhaust fan, orient the fan so that the fan label faces outward and the power cable is at the upper-right corner of the fan (when viewed from the back of the computer). (This prevents the fan wires from being pinched when you reassemble the computer.) Make sure that the wires are routed under the upper EMI shield. Dell Latitude CPi A Service Manual 39
-
 1
1 -
2
-
3
-
4
-
5
-
6
-
7
-
8
-
9
-
10
-
11
-
12
-
13
-
14
-
15
-
16
-
17
-
18
-
19
-
20
-
21
-
22
-
23
-
24
-
25
-
26
-
27
-
28
-
29
-
30
-
31
-
32
-
33
-
34
-
35
-
36
-
37
-
38
-
39
-
 40
40 -
 41
41 -
 42
42 -
 43
43 -
 44
44 -
 45
45 -
 46
46 -
 47
47 -
 48
48 -
 49
49 -
 50
50
 |
 |

Dell Latitude CPi A Service Manual
39
+,̲ĸʺ-²Îº
±²³´µ¶·Â2¹··()5Á´Ç¾·±ÁÀ·Ê¶¼»ËÁÉ·
1.
Remove the back cover assembly.
2.
Remove the keyboard assembly.
3.
Remove the palmrest assembly.
4.
Disconnect the exhaust fan power cable from connector J10 on the system
board.
5.
Remove the two 12-mm screws securing the exhaust fan, and then remove
the exhaust fan.
NOTE: When you replace the exhaust fan, orient the fan so that the fan label
faces outward and the power cable is at the upper-right corner of the fan (when
viewed from the back of the computer). (This prevents the fan wires from being
pinched when you reassemble the computer.) Make sure that the wires are
routed under the upper EMI shield.
exhaust fan
12-mm screws (2)
exhaust fan power cable
connector (JFAN1)