Dell PowerEdge 2300 User's Guide
Dell PowerEdge 2300 Manual
 |
View all Dell PowerEdge 2300 manuals
Add to My Manuals
Save this manual to your list of manuals |
Dell PowerEdge 2300 manual content summary:
- Dell PowerEdge 2300 | User's Guide - Page 1
® - Dell PowerEdge 2300 | User's Guide - Page 2
text: Dell, the DELL logo, and PowerEdge are registered trademarks and DellWare is a registered service mark of Dell Computer trademark of Video Electronics Standards Association; Adobe is a trademark of Adobe Systems Incorporated. Other trademarks and trade names may be used in this document to - Dell PowerEdge 2300 | User's Guide - Page 3
, or uninterruptible power supply. Be sure nothing rests on your computer system's cables and that the cables are not located where they can be stepped on or tripped over. Do not spill food or liquids on your computer. If the computer gets wet, consult your Installation and Troubleshooting Guide. v - Dell PowerEdge 2300 | User's Guide - Page 4
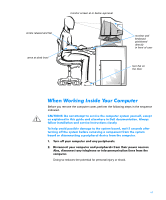
system: Position your system so that the monitor and keyboard are directly in front of you as you work. Special shelves are available (from Dell and other sources) to help you correctly position your keyboard. Set good lower back support. Keep your sitting, make sure the weight of your legs is on - Dell PowerEdge 2300 | User's Guide - Page 5
at or below eye level arms at desk level monitor and keyboard positioned directly in front of user feet flat on the floor Before you remove the computer cover, perform the following steps in the sequence indicated. Doing so reduces the potential for personal injury or shock. vii - Dell PowerEdge 2300 | User's Guide - Page 6
to work inside the computer, periodically touch an unpainted metal surface to remove any static charge your body may have accumulated. In addition to unpacking a static-sensitive component from its shipping carton, do not remove the component from the antistatic packing material until you are ready - Dell PowerEdge 2300 | User's Guide - Page 7
when the memory size or settings for one of the built-in devices is changed. Chapter 6, "Working Inside Your Computer," and Chapter 7, "Installing SCSI Hard-Disk Drives," are intended for users who need to access the system's interior for installing or removing system components or hard-disk drives - Dell PowerEdge 2300 | User's Guide - Page 8
Guide provides instructions for installing system hardware and includes troubleshooting and diagnostic procedures for testing your computer system. The HP OpenView Network Node Manager Special Edition 1.1 With Dell OpenManage 3.1 User's Guide describes the alert messages issued by the server - Dell PowerEdge 2300 | User's Guide - Page 9
use of your computer system. The following list defines (where appropriate) and illustrates typographical conventions used as visual cues for specific elements of text in the Courier New font are intended to be typed as part of an instruction. Example: "Type format a: to format the diskette in - Dell PowerEdge 2300 | User's Guide - Page 10
bold. The brackets indicate items that are optional. Example: del [drive:] [path]filename [/p] Command lines consist of a command and may your monitor or display. It can be a system message, for example, or it can be text that you are instructed to type as part of a command (referred to as a command - Dell PowerEdge 2300 | User's Guide - Page 11
2-3 Configure the RAID Subsystem 2-3 Run System Utilities 2-3 Create Utility Partition 2-4 View Online Documents 2-5 View the System User's Guide 2-5 View the System Installation and Troubleshooting Guide 2-5 View the PowerEdge SDS 100 User's Guide 2-5 View the PowerEdge SDS 100 Installation - Dell PowerEdge 2300 | User's Guide - Page 12
2-10 Installing SCSI Drivers for a Dell PowerEdge Expandable RAID Controller in Windows NT 4.0 3-2 The readme.txt File 3-2 The SCSISelect Utility 3-2 SCSISelect Default Settings 3-3 SCSI Bus Interface Definitions 3-4 Boot Device Options 3-5 SCSI Device/Configuration Settings 3-5 Advanced Host - Dell PowerEdge 2300 | User's Guide - Page 13
Screens 4-2 Using the System Setup Program 4-3 System Setup Categories 4-5 Time 4-5 Date 4-5 Diskette Drive A and Diskette Drive B 4-5 Reserved Memory 4-5 CPU Speed 4-6 Num Lock 4-6 Reset Button 4-6 Processor 1 and Processor 2 4-6 Fan Speed 4-6 System Alert 4-7 Keyboard Errors 4-7 Boot - Dell PowerEdge 2300 | User's Guide - Page 14
Removing the Computer Covers 6-2 Replacing the Computer Covers 6-4 Inside the Chassis 6-5 Installing SCSI Hard-Disk Drives in the Internal Drive Bays 7-2 SCSI Hard-Disk Drive Configuration 7-3 Partitioning and Formatting SCSI Hard-Disk Drives 7-4 Formatting High-Capacity SCSI Hard-Disk Drives - Dell PowerEdge 2300 | User's Guide - Page 15
Installing and Removing SCSI Hard-Disk Drives 7-4 Hot-Pluggable SCSI Hard-Disk Drives 7-4 Installing a SCSI Hard-Disk Drive 7-6 Removing a SCSI Hard-Disk Drive 7-7 Configuring a 2 x 2 or 2 x 3 SCSI Non-Hot-Pluggable Backplane Board 7-7 Configuring a Non-Hot-Pluggable Backplane Board as a Split - Dell PowerEdge 2300 | User's Guide - Page 16
Protection Devices C-8 Surge Protectors C-9 Line Conditioners C-9 Uninterruptible Power Supply C-9 FCC Notices (U.S. Only D-1 Class A D-1 Class B D-2 IC Notice (Canada Only D-2 EN 55022 Compliance (Czech Republic Only D-3 CE Notice D-4 VCCI Notices (Japan Only D-4 Class A ITE D-5 Class - Dell PowerEdge 2300 | User's Guide - Page 17
-Line Options 2-11 Default SCSI Controller Settings 3-3 Drive Status Options 3-19 Read After Write Verify Options 3-19 System-Setup Navigation Keys 4-3 SCSI Backplane Board Characteristics 7-1 SCSI Hard-Disk Drive Indicator Patterns 7-5 Technical Specifications A-1 Pin Assignments for the - Dell PowerEdge 2300 | User's Guide - Page 18
xx - Dell PowerEdge 2300 | User's Guide - Page 19
Dell® PowerEdge® 2300 systems are high-speed, upgradable server systems designed around the Intel® Pentium® II family of microprocessors. The PowerEdge 2300 systems provide both high-performance Peripheral Component Interconnect (PCI) and Industry-Standard Architecture (ISA) expansion slots to allow - Dell PowerEdge 2300 | User's Guide - Page 20
-hot-pluggable 2 x 3 backplane, and hot-pluggable 1 x 6 backplane. The hot-pluggable 1 x 6 backplane supports hot-pluggable SCSI hard-disk drive installation and removal. The integrated SCSI controller resides on the PCI local bus for optimum performance. 1-2 Dell PowerEdge 2300 Systems User's Guide - Dell PowerEdge 2300 | User's Guide - Page 21
/2-compatible mouse port. Standard PowerEdge 2300 systems include a diskette drive and a SCSI CD-ROM drive installed in the externally accessible bays and a SCSI hard-disk drive installed in slot 0. The following software is included with your Dell computer system: Video drivers for displaying many - Dell PowerEdge 2300 | User's Guide - Page 22
transferred to or from the hard-disk drive. If an optional Dell PowerEdge Expandable RAID Controller host adapter card is installed in the system, the amber drive failure indicator (identified by a triangular icon) blinks if a disk failure is detected. 1-4 Dell PowerEdge 2300 Systems User's Guide - Dell PowerEdge 2300 | User's Guide - Page 23
keylock power button power indicator (located on the power button) reset button drive access indicator drive failure indicator system fault indicator hard-disk drive bay key drive failure indicator drive activity indicator drive online indicator Introduction 1-5 - Dell PowerEdge 2300 | User's Guide - Page 24
a procedure described in this guide, or if your system does not perform as expected, Dell provides a number of tools to help you. For more information on these help tools, see Chapter 11, "Getting Help," in your Installation and Troubleshooting Guide. 1-6 Dell PowerEdge 2300 Systems User's Guide - Dell PowerEdge 2300 | User's Guide - Page 25
, documentation, drivers, and other items included on the CD. Most of the functions available on the Dell Server Assistant CD are also available using a bootable utility partition that is installed on your hard-disk drive. This chapter describes the utility partition and provides instructions for - Dell PowerEdge 2300 | User's Guide - Page 26
- Create Diagnostics Diskette Create Operating System Support Diskettes - Create Windows NT Server 4.0 Diskettes Create Driver Diskette Create RAID Driver Diskette - Create NetWare 4.x Diskettes Create Driver Diskette Create Adaptec EZ-SCSI Diskette 2-2 Dell PowerEdge 2300 Systems User's Guide - Dell PowerEdge 2300 | User's Guide - Page 27
Plug and Play ISA expansion cards manually by setting jumpers or switches. See Chapter 5, "Using the Resource Configuration Utility," for more information. This option is available only when a Dell PowerEdge Expandable RAID Controller is installed in the system. The system checks for the presence of - Dell PowerEdge 2300 | User's Guide - Page 28
Dell becomes damaged or is removed from the hard-disk drive. Reinstall the utility partition and/or its contents using the Dell Server Assistant CD as follows: If the system does not boot from the CD, see the Dell Server " found later in this chapter. 2-4 Dell PowerEdge 2300 Systems User's Guide - Dell PowerEdge 2300 | User's Guide - Page 29
. This option allows you to view the PowerEdge SDS 100 Installation and Troubleshooting Guide. The Create Diskettes category allows you to create blank formatted diskettes as well as diskettes of system utilities and operating system-specific drivers. The following subsections describe the options - Dell PowerEdge 2300 | User's Guide - Page 30
following supported operating systems: Microsoft Windows NT Server 4.0 Novell NetWare 4.11 The following drivers are available on the CD: Small computer system interface (SCSI) drivers RAID drivers (for the optional PowerEdge Expandable RAID Controller) Network interface controller (NIC) drivers The - Dell PowerEdge 2300 | User's Guide - Page 31
messages and information as necessary. Use the Create Blank Formatted Diskette option to create the formatted diskette. The system hardware diagnostics are described in Chapter 5, "Running the Dell Diagnostics," of the Installation and Troubleshooting Guide. Using the Dell Server Assistant CD 2-7 - Dell PowerEdge 2300 | User's Guide - Page 32
Utility. ration Utility Configure RAID subsystem Runs the Dell PowerEdge Expandable RAID Controller configuration utility if the controller card is present on your system. Run system utilities: Run system diagnostics Runs the system hardware diagnostics. Upgrade utility partition Allows the - Dell PowerEdge 2300 | User's Guide - Page 33
install on your PowerEdge 2300 system, unless they were installed by Dell. Use the following procedure to install the video drivers for Windows NT 4.0. NetWare provides a textual interface and does not require video drivers. Select the Create Diskettes category from the Dell Server Assistant CD Main - Dell PowerEdge 2300 | User's Guide - Page 34
When prompted to verify the asset tag number, type y and press . The system then displays the new or modified asset tag number and the service tag number. To delete the asset tag number without assigning a new one, type asset /d and press . 2-10 Dell PowerEdge 2300 Systems User's Guide - Dell PowerEdge 2300 | User's Guide - Page 35
Table 2-2 lists the command-line options you can use with the Asset Tag utility. To use one of these options, type asset and a space followed by the option. . /d Deletes the asset tag number /? Displays the Asset Tag utility help screen Using the Dell Server Assistant CD 2-11 - Dell PowerEdge 2300 | User's Guide - Page 36
2-12 Dell PowerEdge 2300 Systems User's Guide - Dell PowerEdge 2300 | User's Guide - Page 37
in Windows NT 4.0," or to your Dell PowerEdge Expandable RAID Controller documentation for information on installing your SCSI device drivers. For instructions on installing SCSI hardware devices such as hard-disk drives, tape drives, or CD-ROM drives, trained service technicians should see Chapter - Dell PowerEdge 2300 | User's Guide - Page 38
"Using the Dell Server Assistant CD," for instructions on creating a diskette of drivers for your operating system. For instructions on configuring the SCSI device drivers, see the appropriate sections in this chapter. To install SCSI drivers for a PowerEdge Expandable RAID Controller in Windows NT - Dell PowerEdge 2300 | User's Guide - Page 39
and the builtin AIC-7890 and AIC-7860 SCSI controllers are shown in Table 3-1. These default settings are appropriate for most Peripheral Component Interconnect (PCI) systems. Run SCSISelect only if you need to change any of the default settings. NOTES: The SCSISelect Utility must be run for - Dell PowerEdge 2300 | User's Guide - Page 40
SCSI Termination - This option sets termination on the host adapter. The default setting for the Adaptec AIC-7860 host adapters is Enabled; the default setting for the AIC-7890 host adapter is Automatic. Dell recommends that you leave this option set to the default. 3-4 Dell PowerEdge 2300 Systems - Dell PowerEdge 2300 | User's Guide - Page 41
of the device from which you wish to boot your system. SCSI IDs are set for the hard-disk drive according to the drive's location on the backplane board (see Figure 7-2 for the SCSI ID of each drive location). The default setting for Boot Target ID is SCSI ID 0. Boot LUN Number - If your boot device - Dell PowerEdge 2300 | User's Guide - Page 42
and changing them may cause conflicts with the SCSI devices. Host Adapter BIOS - This option enables or disables the host adapter BIOS. The default setting is Enabled. NOTE: Several SCSISelect options are not valid unless the host adapter BIOS is enabled. 3-6 Dell PowerEdge 2300 Systems User's Guide - Dell PowerEdge 2300 | User's Guide - Page 43
No removable-media drives are treated as hard-disk drives. In this situation, software drivers are needed because the drives are not controlled by the BIOS. Plug and Play SCAM Support - This option provides automatic configuration of SCSI devices in operating systems that support Plug and Play. Dell - Dell PowerEdge 2300 | User's Guide - Page 44
BIOS Support For Bootable CD-ROM - This option determines whether the host adapter BIOS provides support for booting from a CD-ROM drive. The default setting is Enabled. BIOS Support a hard-disk drive. Most SCSI disk drives are formatted at the factory and 3-8 Dell PowerEdge 2300 Systems User's Guide - Dell PowerEdge 2300 | User's Guide - Page 45
to install and use the Dell SCSI drivers for the 78xx series of SCSI controllers with Windows NT. The Windows NT 4.0 driver diskette you create for the Microsoft Windows NT Server operating system contains the files needed for driver installation. The scsi subdirectory on the diskette contains - Dell PowerEdge 2300 | User's Guide - Page 46
78xx series of SCSI controllers integrated into the operating system. When you load the operating system software, the drivers are automatically loaded. However, Dell recommends that you update the aic78xx.sys driver using the diskette of drivers that you created from the Dell Server Assistant CD - Dell PowerEdge 2300 | User's Guide - Page 47
NT system configuration. NOTE: The Windows NT Setup program does not delete the device driver from your hard-disk drive; it only updates Windows NT software configuration information so that the device driver is no longer loaded during system start-up. Installing and Configuring SCSI Drivers 3-11 - Dell PowerEdge 2300 | User's Guide - Page 48
to invoke the Last Known Good menu If you cannot determine the source of the error, contact Dell for assistance. See Chapter 11, "Getting Help," in the Installation and Troubleshooting Guide for instructions on contacting Dell for technical assistance. 3-12 Dell PowerEdge 2300 Systems User's Guide - Dell PowerEdge 2300 | User's Guide - Page 49
updating the Dell SCSI driver for NetWare 4.11 Using command line options that can be specified when the driver is loaded Automatic driver loading using startup.ncf and autoexec.ncf Booting a NetWare server from a SCSI drive, formatting media, and using removable media Troubleshooting error messages - Dell PowerEdge 2300 | User's Guide - Page 50
directory if the directory does not already exist.) The EZ-SCSI utility also adds command lines to your computer's configuration files (autoexec.bat and/or config.sys) that will load the required device drivers into memory when you boot your computer. 3-14 Dell PowerEdge 2300 Systems User's Guide - Dell PowerEdge 2300 | User's Guide - Page 51
drivers, refer to the NetWare User's Guide for installation instructions. Also, refer to the NetWare User's Guide for information about partitioning, creating a server settings for the installation. Even if you plan to install NetWare SMP, select No at this screen. The intraNetWare Support Pack - Dell PowerEdge 2300 | User's Guide - Page 52
The system now searches for existing device drivers and hardware. If you have not already created this diskette, refer to Chapter 2, "Using the Dell Server Assistant CD," for instructions. NOTE: Specific help text for each driver appears in the middle of the screen as you scroll down the list. The - Dell PowerEdge 2300 | User's Guide - Page 53
the intraNetWare Support Pack 4, complete these steps: iwsp4a.exe NOTE: This file contains directory paths that could exceed the MS-DOS limits. The file must be extracted in a root level directory on your local drive or on a NetWare volume that accepts longer paths. server.exe load install a. From - Dell PowerEdge 2300 | User's Guide - Page 54
the media and lock or unlock the media. These removable media options are supported by NetWare's monitor.nlm program. Follow these steps to set up the removable media: All system hard-disk drives appear. Drive status options appear as shown in Table 3-2. 3-18 Dell PowerEdge 2300 Systems User's Guide - Dell PowerEdge 2300 | User's Guide - Page 55
Status1 Not supported Driver Operating Status1 Active Removable Drive Mount Status2 Mounted Removable Drive Lock Status2 Not Locked 1 Valid for both removable and nonremovable SCSI drives 2 Valid for removable media only The Read After Write Verify option (menu option 2) is set to Hardware - Dell PowerEdge 2300 | User's Guide - Page 56
.nlm utility supports Adaptec host adapters. Use the following procedure to load the backup utility: The syntax to load the aic78u2.ham driver follows: load [pathname]\aic78u2.ham [options] slot=x The ASPI layer (aspitran.dsk) is automatically loaded. 3-20 Dell PowerEdge 2300 Systems User's Guide - Dell PowerEdge 2300 | User's Guide - Page 57
simultaneously manage up to 32 tagged, or 2 nontagged, SCSI commands for each SCSI device, up to a limit of 255 SCSI commands. The firmware can queue as many commands as the operating system is able to send to the host adapter. To set this feature, enter the following command: max_tags=n In general - Dell PowerEdge 2300 | User's Guide - Page 58
the command line options you entered. Be sure you have entered these options correctly. The following error codes alert you to error conditions caused by factors related to the host adapter: 200 No host adapter found for this driver to register 3-22 Dell PowerEdge 2300 Systems User's Guide - Dell PowerEdge 2300 | User's Guide - Page 59
option (removable=off). 206 Invalid 'fixed_disk' setting, use 'off' You can only enter off for this option (fixed_disk=off). 208 SCSI present but not enabled/configured for PCI A host adapter is present, but its bus or device entry has not been enabled. Installing and Configuring SCSI Drivers 3-23 - Dell PowerEdge 2300 | User's Guide - Page 60
3-24 Dell PowerEdge 2300 Systems User's Guide - Dell PowerEdge 2300 | User's Guide - Page 61
and optional settings. Dell recommends that you print the System Setup screens (by pressing the key) or write down the information for future reference. Before you use the System Setup program, you need to know the kind of diskette drive(s) and hard-disk drive(s) installed in - Dell PowerEdge 2300 | User's Guide - Page 62
System Setup If you wait too long and your operating system begins to load into memory, let the system complete the load operation; then shut down the system and try again. NOTE: To ensure an orderly system the category with a currently highlighted field. 4-2 Dell PowerEdge 2300 Systems User's Guide - Dell PowerEdge 2300 | User's Guide - Page 63
previous field. or Cycles through the options in a field. In many or fields, you can also type the appropriate value. Scrolls through help information. or Switches between Pages 1 and 2. Exits the System Setup program and reboots the system if any changes were made. For most of the categories - Dell PowerEdge 2300 | User's Guide - Page 64
SCSI: On Pentium® II Processor 333 MHz Level 2 Cache: 512 KB Integrated System Memory: 128 MB ECC SDRAM Video Memory: 2 MB SGRAM Service Tag: XXXXX Asset Tag: XXXXXXXXXX Tab,Shift-Tab change fields , change values Alt-P next Esc exit Alt-B reboot 4-4 Dell PowerEdge 2300 Systems User's Guide - Dell PowerEdge 2300 | User's Guide - Page 65
listed on Page 1 of the System Setup screens is the top drive in your computer. The options are: 3.5 Inch, 720 KB 3.5 Inch, 1.44 MB 5.25 Inch, 360 KB 5.25 Inch, 1.2 MB Not Installed Reserved Memory allows you to designate a region of system board memory that can be supplied by an expansion card. You - Dell PowerEdge 2300 | User's Guide - Page 66
reset button is pushed. Processor 1 and Processor 2 display the status of each processor slot in the system. These categories have no user-selectable options. The Fan Speed category has the following options: Full Speed (the default option) Noise Reduced 4-6 Dell PowerEdge 2300 Systems User's Guide - Dell PowerEdge 2300 | User's Guide - Page 67
can be set to Diskette First (the default option) or to Hard Disk Only. The term boot refers to the system's start-up procedure. When turned on, the system "bootstraps" itself into an operational state by loading into memory a small program, which in turn loads the necessary operating system. Boot - Dell PowerEdge 2300 | User's Guide - Page 68
setup password in the Setup Password category and then change the Password Status category to Unlocked. In this state, the system password can be disabled at system start-up by pressing and then changed through the System Password category. 4-8 Dell PowerEdge 2300 Systems User's Guide - Dell PowerEdge 2300 | User's Guide - Page 69
that you restrict access to your system with the system password feature. The options are: Not Enabled (the default option) Enabled Disabled by Jumper (jumper removed) NOTE: Read "Using the Setup Password Feature" found later in this chapter for instructions on assigning a setup password and using - Dell PowerEdge 2300 | User's Guide - Page 70
amount of installed memory detected in your system, except for memory on Expanded Memory Specification (EMS) expansion cards. After adding memory, check this category to confirm that the new memory is installed correctly and is recognized by the system. 4-10 Dell PowerEdge 2300 Systems User's Guide - Dell PowerEdge 2300 | User's Guide - Page 71
Password" found later in this section). If you assign and later forget a system password, you need to be able to remove the computer cover to change a jumper setting that disables the system password feature (see "Disabling a Forgotten Password" found later in this chapter). Note that you erase - Dell PowerEdge 2300 | User's Guide - Page 72
password is now set; you can exit the System Setup program and begin using your system. Note, however, that password protection does not take effect until you reboot the system by pressing the reset button or by turning the system off and then on again. 4-12 Dell PowerEdge 2300 Systems User's Guide - Dell PowerEdge 2300 | User's Guide - Page 73
password. ** Number of unsuccessful password attempts: 3 System halted! Must power down. The number of unsuccessful attempts made to enter the correct system password can alert you to an unauthorized person attempting to use your system. Even after your system is turned off and on, the previous - Dell PowerEdge 2300 | User's Guide - Page 74
a setup password, you need to remove the computer cover to change a jumper setting that disables the setup password feature (see "Disabling a Forgotten Password" found later in this chapter). Note that you erase the system password at the same time. 4-14 Dell PowerEdge 2300 Systems User's Guide - Dell PowerEdge 2300 | User's Guide - Page 75
Setup Password setting changes to Enabled. The next time you enter the System Setup program, the system prompts you system lets you view, but not modify, the System Setup screens-with the following exceptions: You can still modify the Date, Time, CPU Speed, Num Lock, and Speaker categories. If System - Dell PowerEdge 2300 | User's Guide - Page 76
-A General Explanation" in Appendix B of the Installation and Troubleshooting Guide for information about the system's jumpers. Booting your system with the PASSWD jumper plug removed erases the existing password(s). NOTE: Before you assign a new system and/or setup password, you must replace the - Dell PowerEdge 2300 | User's Guide - Page 77
the first time you boot your system after installing a memory upgrade. In that situation, do not refer to "System Beep Codes" and "System Messages." Instead, follow the instructions in "Performing a Memory Upgrade" in Chapter 8 of the Installation and Troubleshooting Guide.) If you are given an - Dell PowerEdge 2300 | User's Guide - Page 78
4-18 Dell PowerEdge 2300 Systems User's Guide - Dell PowerEdge 2300 | User's Guide - Page 79
Architecture (ISA) expansion cards manually by setting jumpers or switches. Before your system was shipped from Dell, a technician used the RCU to update the system's database of available system resources stored in nonvolatile random-access memory (NVRAM). Whenever you add, remove, or reposition an - Dell PowerEdge 2300 | User's Guide - Page 80
a diskette because it is not compatible with all operating systems. Also, using a diskette to run the utility allows you to copy any system configuration changes to the diskette for safekeeping. See Chapter 2, "Using the Dell Server Assistant CD," for instructions on creating an RCU diskette. When - Dell PowerEdge 2300 | User's Guide - Page 81
instructions jumper location and settings, see Figure B-1 and Table B-1, respectively, in the Installation and Troubleshooting Guide. If you are running the RCU from your hard-disk drive, remove any TSR programs from memory before starting the utility. These programs take up space in system memory - Dell PowerEdge 2300 | User's Guide - Page 82
or Remove Boards" found later in this chapter. To run the program from your hard-disk drive, switch to the c:\rcu subdirectory, type sd at the operating system prompt, and press . The Main Menu appears as follows: Main Menu Learn about configuring your computer Configure computer Set date Set - Dell PowerEdge 2300 | User's Guide - Page 83
on your hard-disk drive, the card name appears in the expansion slot in which the card is installed. The first time you run the RCU, select Step 2: Add or Remove Boards to verify that the system has detected and acknowledged any expansion cards Dell installed when you purchased your system - Dell PowerEdge 2300 | User's Guide - Page 84
new card's settings. Use the following procedure before an ISA expansion card is repositioned but after a PCI expansion card is repositioned. See "When to Run the Resource Configuration Utility" found earlier in this chapter for more detailed information. 5-6 Dell PowerEdge 2300 Systems User's Guide - Dell PowerEdge 2300 | User's Guide - Page 85
an ISA expansion card is removed but after a PCI expansion card is removed. See "When to Run set a variety of system options through the .sci file. Through this file, you can notify the system of changes to your hardware and memory configuration, manage input/output (I/O) ports, and set other system - Dell PowerEdge 2300 | User's Guide - Page 86
and exit the utility as follows: The following system board options are available on the View or Edit Details screen (see Figure 5-1): System - Dell System PowerEdge 2300 RS-232 COM Port 1 RS-232 COM Port 2 Parallel Port Floppy Controller Mouse Controller 5-8 Dell PowerEdge 2300 Systems User's Guide - Dell PowerEdge 2300 | User's Guide - Page 87
- Adaptec AIC-7860 SCSI Ctrlr - PCI Function 1 NOTE: You can clear the system configuration parameters from NVRAM by placing a jumper on the ISA_CLR jumper pins and then booting the system with the jumper in place. See Table B-1 in the Installation and Troubleshooting Guide for information about the - Dell PowerEdge 2300 | User's Guide - Page 88
System - Dell System PowerEdge 2300 RS-232 COM Port 1 RS-232 COM Port 2 Parallel Port Floppy Controller Mouse Controller IRQ 4 PORT 3F8h-3FFh IRQ 3 PORT 2F8h-2FFh IRQ 7 PORT 378h-37Fh Enabled Enabled PCI 3 - Adaptec Ultra/Ultra Wide SCSI Ctrlr PCI Function 1 Enabled Embedded - PCI Host Bridge - Dell PowerEdge 2300 | User's Guide - Page 89
previously saved .sci file to reconfigure your system or to identically configure many other systems. You can also copy .cfg files system information menu Set verification mode menu Maintain SCI files menu Highlight the menu category you want, and press . Then follow the online instructions - Dell PowerEdge 2300 | User's Guide - Page 90
Installation and Troubleshooting Guide for information on obtaining technical assistance. However, resource conflicts between ISA expansion cards are routine. If the Set Verification Mode menu category is set to Automatic, the RCU tries to resolve the 5-12 Dell PowerEdge 2300 Systems User's Guide - Dell PowerEdge 2300 | User's Guide - Page 91
the card from your computer when the utility prompts you to do so. (For instructions on removing the expansion card, see "Removing an Expansion Card" in Chapter 8 of the Installation and Troubleshooting Guide.) If you remove the card(s) with which the new card is in conflict, or if you want to - Dell PowerEdge 2300 | User's Guide - Page 92
The system reboots with the new system configuration information. For instructions on removing the expansion card, see "Removing an Expansion Card" in Chapter 8 of the Installation and Troubleshooting Guide. 5-14 Dell PowerEdge 2300 Systems User's Guide - Dell PowerEdge 2300 | User's Guide - Page 93
the internal components you may handle if you install Dell hardware options. For instructions on installing internal components such as expansion cards, system board options, and tape and CD-ROM drives, refer to the Installation and Troubleshooting Guide. To make working inside your computer easier - Dell PowerEdge 2300 | User's Guide - Page 94
In addition, Dell recommends that you periodically review the safety instructions at the front of this guide. To troubleshoot problems inside the computer, you need to remove one or both of the computer covers. When following the procedures in this guide, assume that the locations or directions - Dell PowerEdge 2300 | User's Guide - Page 95
Working Inside Your Computer 6-3 - Dell PowerEdge 2300 | User's Guide - Page 96
thumbscrews (6) side covers (2) Use the following procedure to replace a computer cover: 6-4 Dell PowerEdge 2300 Systems User's Guide - Dell PowerEdge 2300 | User's Guide - Page 97
bays provide space for up to six SCSI hard-disk drives. These hard-disk drives are connected to a SCSI host adapter on the system board or on an expansion card, via the SCSI backplane board. During an installation or troubleshooting procedure, you may be required to change a jumper or switch setting - Dell PowerEdge 2300 | User's Guide - Page 98
external drive bays (4) hard-disk drive bays (4-6) DC power cable interface cable SCSI backplane board system board 6-6 Dell PowerEdge 2300 Systems User's Guide - Dell PowerEdge 2300 | User's Guide - Page 99
(SCSI2) Ultra2/LVD SCSI host adapter connector (SCSI1) fan connectors (FAN1 and FAN2) auxiliary hard-disk drive indicator (HDLED) secondary microprocessor (PROCESSOR 2) Dell Remote Access card connector (SVR_MGT) front of system board power input connector (POWER1) power input connector (POWER2 - Dell PowerEdge 2300 | User's Guide - Page 100
jumpered unjumpered 6-8 Dell PowerEdge 2300 Systems User's Guide - Dell PowerEdge 2300 | User's Guide - Page 101
in the External Bays," in the Installation and Troubleshooting Guide. Dell PowerEdge 2300 systems include a SCSI backplane board, which greatly simplifies cabling and configuration for SCSI hard-disk drives. SCSI identification (ID) and termination for SCSI hard-disk drives are both configured - Dell PowerEdge 2300 | User's Guide - Page 102
SCSI hard-disk drive bays (6) Ultra2/LVD SCSI interface cable SCSI connector hot-pluggable SCSI backplane board Ultra2/LVD SCSI host adapter connector (SCSI1) system board SCSI hard-disk drives are supplied by Dell in special drive carriers that fit in the internal drive bays (see Figure 7-3). - Dell PowerEdge 2300 | User's Guide - Page 103
. Set the SCSI ID on all drives to 0. All SCSI ID numbers for the drives are set by the SCSI backplane board, as shown in Figure 7-2. Configure the drive so that the drive motor waits for a Start Unit command from the SCSI host adapter before spinning. SCSI ID 5 SCSI ID 0 1 x 6 hot-pluggable SCSI - Dell PowerEdge 2300 | User's Guide - Page 104
to remove and install SCSI hard-disk drive carriers in the computer's internal drive bays. Dell PowerEdge 2300 systems with a PowerEdge Expandable RAID Controller host adapter card and a 1 x 6 hot-pluggable SCSI backplane board installed support hotpluggable drive installation and removal. Before - Dell PowerEdge 2300 | User's Guide - Page 105
have a Dell PowerEdge Expandable RAID Controller host adapter card installed, you will see only the "drive online" and "drive bay empty" indicator patterns. Identify drive Drive being prepared for removal Drive ready for insertion or removal Drive being prepared for operation Drive bay empty Drive - Dell PowerEdge 2300 | User's Guide - Page 106
drive failure indicator blinks off briefly each second. The drive online indicator blinks rapidly. The drive online indicator is on. Install a SCSI hard-disk drive in an internal drive bay as follows: drive carrier drive carrier handle 7-6 Dell PowerEdge 2300 Systems User's Guide drive bay key - Dell PowerEdge 2300 | User's Guide - Page 107
Installing and Configuring SCSI Drivers," for information. See Chapter 5, "Running the Dell Diagnostics," in the Installation and Troubleshooting Guide for more information. Remove a SCSI hard-disk drive from an internal drive bay as follows: If the drive has been online, the drive status indicators - Dell PowerEdge 2300 | User's Guide - Page 108
controller is automatically determined by the specific system configuration. In descending order of precedence, the system boot order is CD-ROM, diskette, PCI1, PCI2, PCI3, PCI4, PCI5, PCI6, and built-in SCSI host adapter (supporting the internal drives). 7-8 Dell PowerEdge 2300 Systems User's Guide - Dell PowerEdge 2300 | User's Guide - Page 109
168-pin sockets DIMM capacities 64- and 128-MB unbuffered DIMMs or 256-MB registered DIMMs; must be rated for 100-MHz operation Standard RAM (minimum 64 MB Maximum RAM 1 GB External cache none NOTE: For the full name of an abbreviation or acronym used in this table, see the Glossary. Technical - Dell PowerEdge 2300 | User's Guide - Page 110
/LVD SCSI controller 68-pin connector Ultra/Narrow SCSI controller 50-pin connector Diskette drive 34-pin connector SDS_SMB connector 6-pin header connector NOTE: For the full name of an abbreviation or acronym used in this table, see the Glossary. A-2 Dell PowerEdge 2300 Systems User's Guide - Dell PowerEdge 2300 | User's Guide - Page 111
video controller; VGA connector Video memory (standard 2 MB AC power supply: Wattage 300 W Voltage 115 V at 60 Hz/230 V at 50 Hz System battery CR2032 3-V lithium coin cell Height (with support feet 43.9 cm (10.3 inches) Width 26.1 cm (17.3 inches) Depth 59.2 cm (23.3 inches) Weight (maximum - Dell PowerEdge 2300 | User's Guide - Page 112
to 10,600 m (-50 to 35,000 ft) NOTE: For the full name of an abbreviation or acronym used in this table, see the Glossary. A-4 Dell PowerEdge 2300 Systems User's Guide - Dell PowerEdge 2300 | User's Guide - Page 113
a keyboard, mouse, printer, and monitor. Figure B-1 identifies the I/O ports and connectors for your system. The two built-in serial ports use 9-pin D-subminiature connectors on the back panel. These ports support devices such as external modems, printers, plotters, and mice that require serial data - Dell PowerEdge 2300 | User's Guide - Page 114
server-management bus connector (XSMB_OUT) server-management bus connector (XSMB_IN) serial port 1 connector (SERIAL1) parallel port connector (PARALLEL) serial port 2 connector (SERIAL2) video connector (JVGA) The computer system port designation. B-2 Dell PowerEdge 2300 Systems User's Guide - Dell PowerEdge 2300 | User's Guide - Page 115
, you may be able to reset jumpers on the expansion card so that the settings. It should also provide instructions for readdressing the port and changing the IRQ setting, if necessary. The built-in parallel port has autoconfiguration capability through the System Setup program; that is, if you set - Dell PowerEdge 2300 | User's Guide - Page 116
I Shell N/A N/A Data carrier detect Serial input Serial output Data terminal ready Signal ground Data set ready Request to send Clear to send Ring indicator Chassis ground If you reconfigure your hardware, signals for the parallel port connector. B-4 Dell PowerEdge 2300 Systems User's Guide - Dell PowerEdge 2300 | User's Guide - Page 117
shell 13 - 1 25 - 14 1 STB# I/O 2 PD0 I/O 3 PD1 I/O 4 PD2 I/O 5 PD3 I/O 6 PD4 I/O 7 PD5 I/O 8 PD6 I/O 9 PD7 I/O 10 ACK# I 11 BUSY I 12 PE I 13 SLCT I 14 AFD# O 15 ERR# I 16 INIT# O 17 SLIN# O 18-25 GND N/A Strobe Printer data bit 0 Printer data - Dell PowerEdge 2300 | User's Guide - Page 118
detected. The driver software also passes along the mouse data to the application program that is in control. If you Shell N/A N/A Keyboard data No connection Signal ground Fused supply voltage Keyboard clock No connection Chassis ground B-6 Dell PowerEdge 2300 Systems User's Guide - Dell PowerEdge 2300 | User's Guide - Page 119
Fused supply voltage Mouse clock No connection Chassis ground The system uses a 15-pin high-density D-subminiature connector on the back panel for attaching a video graphics array (VGA)-compatible monitor to your computer. The video circuitry on the system board synchronizes the signals that drive - Dell PowerEdge 2300 | User's Guide - Page 120
O N/A N/A Red video Green video Blue video No connection Signal ground Vcc No connection Monitor detect data Horizontal synchronization Vertical synchronization Monitor detect clock Chassis ground B-8 Dell PowerEdge 2300 Systems User's Guide - Dell PowerEdge 2300 | User's Guide - Page 121
) connectors (XSMB_IN and XSMB_OUT) are used to daisy-chain servers together so that server management information can be shared between the servers. 7531 8642 1 RS-485 A I/O Noninverting receiver input and noninverting driver output 2 RS-485 B I/O Inverting receiver input and inverting - Dell PowerEdge 2300 | User's Guide - Page 122
B-10 Dell PowerEdge 2300 Systems User's Guide - Dell PowerEdge 2300 | User's Guide - Page 123
on the amount of storage space on a hard-disk drive and the volatility of the data contained on the drive. Heavily used systems require more frequent backups than systems in which files are seldom changed. Dell recommends that you back up the hard-disk drive at least once a week, with a daily backup - Dell PowerEdge 2300 | User's Guide - Page 124
into the computer by the power supply fan. In particular, you should keep the exterior of your computer and monitor clean, and you should use a commercially available diskette-drive head-cleaning kit to remove contaminants inside your diskette drives. C-2 Dell PowerEdge 2300 Systems User's Guide - Dell PowerEdge 2300 | User's Guide - Page 125
the power supply bracket, that is connected to chassis ground. A liquid dishwashing detergent - Use a mixture of one part liquid dishwashing detergent and three parts water clean the exterior of the computer system. A nonabrasive diskette-drive head-cleaning kit - Dell recommends that you use a kit - Dell PowerEdge 2300 | User's Guide - Page 126
altitudes. Make sure that all slots and openings on the computer remain unobstructed, especially the fan vent on the back of the computer. Clean the system at regular intervals to avoid any buildup of dust and debris, which can cause a system to overheat. C-4 Dell PowerEdge 2300 Systems User's Guide - Dell PowerEdge 2300 | User's Guide - Page 127
the hard-disk drive. If intermittent system failures are Dell system can withstand from 5 to 95 percent relative humidity. Buildings in which climate is controlled system at high altitude (low pressure) reduces the efficiency of forced and convection cooling and can result in electrical problems - Dell PowerEdge 2300 | User's Guide - Page 128
and power source or through the air like transmitted radio waves. The Federal Communications Commission (FCC) publishes specific regulations to limit the amount of EMI and RFI emitted by computing equipment. Each Dell system meets these FCC regulations. C-6 Dell PowerEdge 2300 Systems User's Guide - Dell PowerEdge 2300 | User's Guide - Page 129
drive bays have a drive and/or a metal insert installed. These brackets and metal inserts are available from Dell set 90 degrees. Because they store data magnetically, diskettes and hard-disk drives system can withstand shock pulses of 92 G for 2 ms. Excessive vibration can cause the same problems - Dell PowerEdge 2300 | User's Guide - Page 130
in the area can create large voltage spikes that can damage the system. A number of devices are available that protect against power problems, such as power surges, transients, and power failures. The following subsections describe some of these devices. C-8 Dell PowerEdge 2300 Systems User's Guide - Dell PowerEdge 2300 | User's Guide - Page 131
dollars. However, these devices cannot protect against a complete loss of power. An uninterruptible power supply (UPS) offers the most complete protection against variations in power because it uses battery power to keep the system running when AC power is lost. The battery is charged by the AC - Dell PowerEdge 2300 | User's Guide - Page 132
C-10 Dell PowerEdge 2300 Systems User's Guide - Dell PowerEdge 2300 | User's Guide - Page 133
not installed and used in accordance with the manufacturer's instruction manual, may cause harmful interference with radio communications. This equipment has been tested and found to comply with the limits for a Class A digital device pursuant to Part 15 of the FCC Rules. These limits are designed - Dell PowerEdge 2300 | User's Guide - Page 134
the manufacturer's instruction manual, may cause This device complies with Part 15 of the FCC system (or other Dell digital apparatus), examine all registration labels located on the bottom or the back panel of your computer (or other digital apparatus). D-2 Dell PowerEdge 2300 Systems User's Guide - Dell PowerEdge 2300 | User's Guide - Page 135
changes or modifications not expressly approved by Dell Computer Corporation could void your authority to specification label. The following applies to devices in category A of EN 55022 (radius of protection up to 30 meters). The user of the device is obliged to take all steps necessary to remove - Dell PowerEdge 2300 | User's Guide - Page 136
. If any one of the labels carries an FCC Class A designation, your entire system is considered to be VCCI Class A ITE. If all labels carry either an FCC Class B identification number or the FCC logo ( ), your system is considered to be VCCI Class B ITE. D-4 Dell PowerEdge 2300 Systems User's Guide - Dell PowerEdge 2300 | User's Guide - Page 137
trouble occurs, the user may be required to take corrective actions. This is a Class B product based on the standard of the Voluntary Control according to the instruction manual. To determine which classification (Class A or B) applies to your computer system (or other Dell digital apparatus), - Dell PowerEdge 2300 | User's Guide - Page 138
removed from the power supply socket, which should be located near the equipment and easily accessible. A protection mark "B" confirms that the equipment is in compliance with the protection usage requirements of standards PN-93/T-42107 and PN-89/E-06251. -- -- - D-6 Dell PowerEdge 2300 Systems - Dell PowerEdge 2300 | User's Guide - Page 139
with the requirements of the official Mexican standards (NOM 024): Exporter: Importer: Ship to: Supply voltage: Frequency: Current consumption: Dell Computer Corporation One Dell Way Round Rock, TX 78682 Dell Computer de México, S.A. de C.V. Rio Lerma No. 302 - 4° Piso Col. Cuauhtemoc 16500 México - Dell PowerEdge 2300 | User's Guide - Page 140
Lerma No. 302 - 4° Piso Col. Cuauhtemoc 16500 México, D.F. Dell Computer de México, S.A. de C.V. al Cuidado de Kuehne & Nagel de México S. de R.I. Avenida Soles No. 55 Col. Peñon de los Baños 15520 México, D.F. 115/230 V.C.A. ±10% 60/50 Hz 6.0/3.0 A . D-8 Dell PowerEdge 2300 Systems User's Guide - Dell PowerEdge 2300 | User's Guide - Page 141
including accident, abuse, misuse, problems with electrical power, servicing not authorized by Dell, usage not in accordance with product instructions, failure to perform required preventive maintenance, and problems caused by use of parts and components not supplied by Dell. This warranty does not - Dell PowerEdge 2300 | User's Guide - Page 142
. THESE WARRANTIES GIVE YOU SPECIFIC LEGAL RIGHTS, AND YOU MAY ALSO HAVE OTHER RIGHTS, WHICH VARY FROM STATE TO STATE. DELL DOES NOT ACCEPT LIABILITY BEYOND THE REMEDIES SET FORTH IN THIS WARRANTY STATEMENT OR LIABILITY FOR INCIDENTAL OR CONSEQUENTIAL E-2 Dell PowerEdge 2300 Systems User's Guide - Dell PowerEdge 2300 | User's Guide - Page 143
including accident, abuse, misuse, problems with electrical power, servicing not authorized by Dell, usage not in accordance with product instructions, failure to perform required preventive maintenance, and problems caused by use of parts and components not supplied by Dell. This warranty does not - Dell PowerEdge 2300 | User's Guide - Page 144
on the hard-disk drive(s) and any other storage device(s) in the product(s). Remove any removable media, such as diskettes, CDs, or PC Cards. Dell does not accept liability for lost data or software. Dell owns all parts removed from repaired products. Dell uses new and reconditioned parts made by - Dell PowerEdge 2300 | User's Guide - Page 145
Dell. To return products, you must call Dell Customer Service at the telephone number shown in the chapter titled "Getting Help" in your Diagnostics and Troubleshooting Guide be in as-new condition, and all of the manuals, diskette(s), CD(s), power cables, and other items included with a product must - Dell PowerEdge 2300 | User's Guide - Page 146
E-6 Dell PowerEdge 2300 Systems User's Guide - Dell PowerEdge 2300 | User's Guide - Page 147
specific task, such as a spreadsheet or word processor. Application programs are distinct from operating system Acronym for application-specific integrated circuit. Advanced SCSI programming interface. When are essential for setting up a consistent computing environment-such as loading mouse or - Dell PowerEdge 2300 | User's Guide - Page 148
with controllers for all the various peripheral devices connected to the computer. Your computer also contains an address bus and a data bus for communications between the microprocessor and RAM. Eight contiguous bits of information, the basic data unit used by your computer. 2 Dell PowerEdge 2300 - Dell PowerEdge 2300 | User's Guide - Page 149
-only memory. CD-ROM drives use setting up a consistent computing environment-such as loading device drivers with a device= statement. A chip or expansion card that controls the transfer of data between the microprocessor and a peripheral, such as a disk drive or the keyboard. The first 640 KB of RAM - Dell PowerEdge 2300 | User's Guide - Page 150
memory module. c:\windows c:\dos c:\dell subdirectories c:\windows\system A comprehensive set of diagnostic tests for your Dell computer. To use the diskette-based diagnostics, you must boot your computer from the Dell Diagnostics Diskette. Refer to your Installation and Troubleshooting Guide - Dell PowerEdge 2300 | User's Guide - Page 151
A monitor is said to be DPMScompliant when it is designed to enter a power management state after receiving the appropriate signal from a computer's video controller. Abbreviation for dynamic random-access memory. A computer's RAM is usually made up entirely of DRAM chips. Because DRAM chips cannot - Dell PowerEdge 2300 | User's Guide - Page 152
Safety Instructions" at the front of your User's Guide for a complete discussion of ESD. Acronym for enhanced small-device interface. A technique for accessing RAM above 1 MB. To enable expanded memory on your computer, you must use an EMM. You should configure your system to support expanded memory - Dell PowerEdge 2300 | User's Guide - Page 153
A host adapter implements communication between the computer's bus and the controller for a peripheral. (Hard-disk drive controller subsystems include integrated host adapter circuitry.) To add a SCSI expansion bus to your system, you must install the appropriate host adapter. Abbreviation for the - Dell PowerEdge 2300 | User's Guide - Page 154
compatible system is usually confined to the same building or a few nearby buildings, with all equipment linked by wiring dedicated specifically to the LAN. Abbreviation for pound(s). Abbreviation for liquid crystal display. A low-power removed for load number. Dell PowerEdge 2300 Systems User's Guide - Dell PowerEdge 2300 | User's Guide - Page 155
8 MB of RAM. A specific location, usually expressed as a hexadecimal number, in the computer's RAM. A utility that controls the implementation of memory in addition to conventional memory, such as extended or expanded memory. See also conventional memory, EMM, expanded memory, extended Abbreviation - Dell PowerEdge 2300 | User's Guide - Page 156
, a type of microprocessor socket that allows you to remove the microprocessor chip. You can divide a hard-disk drive into mul- Arranged in rows and columns, a pixel is tiple physical sections called partitions a single point on a video display. Video 10 Dell PowerEdge 2300 Systems User's Guide - Dell PowerEdge 2300 | User's Guide - Page 157
of pixels up and down. Abbreviation for Personal System/2. Acronym for power-on self-test. Before the operating system loads when you turn on your computer, the POST tests various system components such as RAM, the disk drives, and the keyboard. Abbreviation for pages per minute. Abbreviation - Dell PowerEdge 2300 | User's Guide - Page 158
Access Memory. Abbreviation for single-edge connector cartridge. Abbreviation for second(s). As the main circuit board, the system board usually contains most of your computer's integral components, such as the following: Microprocessor RAM Expansion-card connectors 12 Dell PowerEdge 2300 Systems - Dell PowerEdge 2300 | User's Guide - Page 159
to support multiple programs running simultaneously, TSR programs can sometimes cause memory conflicts. When troubleshooting, rule out the possibility of such a conflict by rebooting your computer without starting any TSR programs. Some devices, especially disk drives, contain a terminator to - Dell PowerEdge 2300 | User's Guide - Page 160
RAM on the system board. The amount of video memory, along with the adapter's video drivers, may affect the number of colors that can be simultaneously displayed. Video adapters can also include their own coprocessor chip for faster graphics rendering. 14 Dell PowerEdge 2300 Systems User's Guide - Dell PowerEdge 2300 | User's Guide - Page 161
, you must install the appropriate video drivers and your monitor must support the resolution. the operating system level.) For example, in a computer with 8 MB of RAM and 16 MB of virtual memory set up on the hard-disk drive, the operating system would manage the system as though it had 24 MB of - Dell PowerEdge 2300 | User's Guide - Page 162
Memory Specification. See also EMS, extended memory, and memory manager. Acronym for zero insertion force. Some computers use ZIF sockets and connectors to allow devices such as the microprocessor chip to be installed or removed with no stress applied to the device. 16 Dell PowerEdge 2300 Systems - Dell PowerEdge 2300 | User's Guide - Page 163
devices, C-1 BIOS revision number, 4-2 BIOS jumper, 6-8 boot device configuring, 7-8 Boot Sequence category, 4-7 booting the computer system, 4-7 built-in SCSI controller, 1-2, 1-3 cables ribbon, 6-5 cache secondary, 1-1 cautions, xi CD-ROM drive, 1-3 cleaning accessories, C-3 drives, C-4 internal - Dell PowerEdge 2300 | User's Guide - Page 164
2 Dell PowerEdge 2300 Systems User's Guide drive activity indicator, 1-4 drive bays about, 7-1 installing drives in, 7-2 drive failure indicator, 1-4 drive online indicator, 1-4 driver diskettes, creating, 2-2 drives See also CD-ROM drives; diskette drives; hard-disk drives; SCSI hard-disk drives - Dell PowerEdge 2300 | User's Guide - Page 165
hard-disk drives See also drives; SCSI hard-disk drives; System Setup program access indicator, 1-4 boot drive, 7-8 boot order, 7-8 cleaning, C-4 data recovery, C-1 drive bays, 7-2 drive carrier, illustrated, 7-6 failure indicator, 1-4 hard-disk drives (continued) hot-plug installation and removal - Dell PowerEdge 2300 | User's Guide - Page 166
status, 3-19 optimizing performance, 3-21 SCSI driver installation, 3-13 troubleshooting, 3-22 using a CD-ROM, 3-21 using removable media, 3-18 using SCSI devices, 3-18 using the tape backup utility, 3-20 notational conventions, xi Num Lock category, 4-6 4 Dell PowerEdge 2300 Systems User's Guide - Dell PowerEdge 2300 | User's Guide - Page 167
, A-3 surges and spikes, C-8 power source interruptions preventing, C-8 PowerEdge Expandable RAID Controller card hard-disk drive installation, 7-4 Primary SCSI and Secondary SCSI categories, 4-10 problem solving, 1-6 Processor 1 and Processor 2 categories, 4-6 radio frequency interference - Dell PowerEdge 2300 | User's Guide - Page 168
hard-disk drives, 7-1 partitioning, 7-4 using, 3-18 SCSI disk utilities, 3-8 SCSI drivers included with system, 3-1 installing for NetWare, 3-13 installing for Windows NT, 3-2, 3-9 SCSI hard-disk drives bays, 7-2 configuring boot device, 7-8 SCSI hard-disk drives (continued) hot-plug removal and - Dell PowerEdge 2300 | User's Guide - Page 169
, 4-9 small computer system interface. See SCSI SMB connector about, B-9 illustrated, B-2 pin assignments, B-9 Speaker category, 4-10 specifications system, A-1 speed jumpers, 6-8 support, 1-6 surge protector preventing power source interruptions, C-9 System Alert category, 4-7 system board about - Dell PowerEdge 2300 | User's Guide - Page 170
video drivers, 2-9 removing a host adapter, 3-11 swapping a host adapter, 3-12 troubleshooting, 3-12 updating drivers, 3-10 working inside the computer, safety precautions, 6-1 uninterruptible power supply. See UPS UPS, C-9 utility partition, 2-7 8 Dell PowerEdge 2300 Systems User's Guide
-
 1
1 -
 2
2 -
 3
3 -
 4
4 -
 5
5 -
 6
6 -
 7
7 -
8
-
9
-
10
-
11
-
12
-
13
-
14
-
15
-
16
-
17
-
18
-
19
-
20
-
21
-
22
-
23
-
24
-
25
-
26
-
27
-
28
-
29
-
30
-
31
-
32
-
33
-
34
-
35
-
36
-
37
-
38
-
39
-
40
-
41
-
42
-
43
-
44
-
45
-
46
-
47
-
48
-
49
-
50
-
51
-
52
-
53
-
54
-
55
-
56
-
57
-
58
-
59
-
60
-
61
-
62
-
63
-
64
-
65
-
66
-
67
-
68
-
69
-
70
-
71
-
72
-
73
-
74
-
75
-
76
-
77
-
78
-
79
-
80
-
81
-
82
-
83
-
84
-
85
-
86
-
87
-
88
-
89
-
90
-
91
-
92
-
93
-
94
-
95
-
96
-
97
-
98
-
99
-
100
-
101
-
102
-
103
-
104
-
105
-
106
-
107
-
108
-
109
-
110
-
111
-
112
-
113
-
114
-
115
-
116
-
117
-
118
-
119
-
120
-
121
-
122
-
123
-
124
-
125
-
126
-
127
-
128
-
129
-
130
-
131
-
132
-
133
-
134
-
135
-
136
-
137
-
138
-
139
-
140
-
141
-
142
-
143
-
144
-
145
-
146
-
147
-
148
-
149
-
150
-
151
-
152
-
153
-
154
-
155
-
156
-
157
-
158
-
159
-
160
-
161
-
162
-
163
-
164
-
165
-
166
-
167
-
168
-
169
-
170
 |
 |
®
ZZZ±GHOO±FRP
’HOO
±
²3RZHU(GJH
±
²
³´µµ
²
6\VWHPV
86(5•6²*8,’(