Dewalt DW744X Instruction Manual - Page 13
Circuit Breaker Reset Button - motor
 |
View all Dewalt DW744X manuals
Add to My Manuals
Save this manual to your list of manuals |
Page 13 highlights
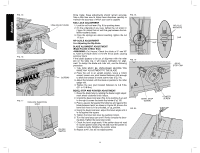
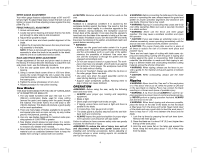
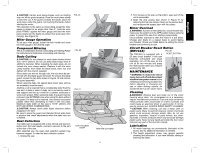
CAUTION: Certain work piece shapes, such as molding may not lift the guard properly. Feed the work piece slowly to start the cut. If the guard contacts the blade, place the work piece under the guard, not touching the blade, before starting the motor. This operation is the same as crosscutting except the miter gauge is locked at an angle other than 0°. Hold the work piece FIRMLY against the miter gauge and feed the work piece slowly into the blade (to prevent the work piece from moving). See Figure 26. Miter Gauge Operation To set your miter gauge, loosen the lock handle and move the miter gauge to the desired angle. Compound Mitering This is a combination of bevel crosscutting and mitering.Follow the instructions for both bevel crosscutting and mitering. Dado Cutting CAUTION: Do not attempt to stack dado blades thicker than 13/16" (20mm). Do not use dado blades larger than 8" (200mm) diameter. When installing the dado stack, do not include the inner clamp washer. Replace it with the outer clamp washer, then install the blade stack, arbor nut, and tighten with the wrench supplied. Since dado cuts are not through cuts, the cuts must be performed with the blade guard removed. To remove the blade guard, loosen the two bolts shown in Figure 10 and remove the guard assembly. When using the dado, the special dado insert (also sold as an accessory) must be used. Anytime a cut is required that is considerably wider than the saw kerf, a dado is used. A dado cut is commonly used to add support and line up a shelf for a cabinet, bookcase or some such project. When using the dado, the guard must be removed. Use EXTREME care when using the dado without the guard. If a deep cut is required. Use several successive passes rather than attempting to make it with one pass. Maximum dado width on this saw is 13/16" (20mm). DO NOT USE WIDER COMBINATIONS. CAUTION: Always check dado blade clearance before plugging in the saw. Be sure to place the guard and standard throat plate back in position and check adjustments when the dado cuts are complete. Dust Collection Your table saw is equipped with a dust shroud and dust collection port. For best results, connect a vacuum to the port at the rear of the saw. After extended use, the saw's dust collection system may become clogged. To clear the dust collection system: 1. Unplug the saw. FIG. 25 FIG. 26 FIG. 27 DUST ACCESS DOOR HAIR PIN COTTERS 11 2. Turn the saw on its side, so the bottom, open part of the unit is accessible. 3. Open the dust access door shown in Figure 27 by removing the hair pin cotters. Clean out the excess dust, and re-secure the access door with the cotters. Motor Overload WARNING: If power is interrupted by a circuit breaker trip, make sure the switch is in the OFF position before restoring power to prevent the saw from starting unexpectedly. Circuit breaker overload is often the result of a dull blade. Change your blade on a regular basis to avoid tripping your breaker. Check your blade before re-setting the circuit breaker and continuing to saw. Circuit Breaker Reset Button (DW744X) FIG. 28 The DW744X is equipped with a RESET BUTTON 25 amp circuit breaker. If this saw becomes overloaded and stops operating, turn off the saw, let the unit sit for two minutes and press the reset button before you resume working (Fig. 28). MAINTENANCE WARNING: To reduce the risk of injury, turn unit off and disconnect machine from power source before installing and removing accessories, before adjusting or changing setups or when making repairs. An accidental start-up can cause injury. Cleaning WARNING: Blowing dust and chips out of the motor housing using clean, dry compressed air is a necessary regular maintenance procedure. Dust and chips containing metal particles often accumulate on interior surfaces and could create an electrical shock or electrocution if not frequently cleaned out. ALWAYS WEAR SAFETY GLASSES. CAUTION: When cleaning, use only a damp cloth on plastic parts. Many household cleaners contain chemicals which could seriously damage plastic. Also, do not use gasoline, turpentine, lacquer or paint thinner, dry cleaning fluids or similar products which may seriously damage plastic parts. Never let any liquid get inside the tool; never immerse any part of the tool into a liquid. Lubrication 1. All motor bearings are permanently lubricated at the factory and no additional lubrication is needed. 2. The height adjustment screw may require periodic cleaning and lubrication. If you have difficulty raising or lowering the blade: English
-
 1
1 -
2
-
3
-
4
-
5
-
6
-
7
-
 8
8 -
 9
9 -
 10
10 -
 11
11 -
 12
12 -
 13
13 -
 14
14 -
 15
15 -
 16
16 -
 17
17 -
 18
18 -
19
-
20
-
21
-
22
-
23
-
24
-
25
-
26
-
27
-
28
-
29
-
30
-
31
-
32
-
33
-
34
-
35
-
36
-
37
-
38
-
39
-
40
-
41
-
42
-
43
-
44
 |
 |
