Electrolux EI30GF55GB Complete Owner's Guide (English) - Page 50
Special door care instructions, IMPORTANT, Changing upper oven lights
 |
View all Electrolux EI30GF55GB manuals
Add to My Manuals
Save this manual to your list of manuals |
Page 50 highlights
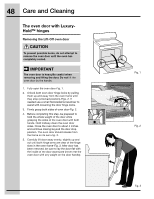
50 Care and Cleaning Special door care instructions Changing upper oven lights IMPORTANT Most oven doors contain glass that can • Be sure the range is unplugged and all parts break. Read the following recommendations: are COOL before replacing oven light. Wear a • Do not close the oven door until all the interior oven racks are fully inserted and retracted to leather-faced glove for protection against possible broken glass or burns. the back of the oven. The upper oven light bulbs are located at the rear • Do not hit the glass with pots, pans, or any of the oven cavity and both are covered with a other object. The oven door glass may break or glass shield. The glass shield must be in place even break at a later time unexpectedly. whenever the oven is in use. • Scratching, hitting, jarring or stressing the oven Replacing the upper oven interior light bulbs: door glass may weaken its structure causing 1. Turn electrical power off at the main source or an increased risk of breakage at a later time. unplug the range. • You may use a glass cleaner on the outside of the oven door glass. Do not spray or allow 2. Remove upper oven interior light shield as illustrated below. water or the cleaner to enter or drip down into 3. Replace bulb with a new T-4 type 40 Watt the oven door vents. Spray cleaner on cloth Halogen appliance bulb. Please note: do not first and then wipe the oven door clean. allow your fingers to touch the new bulb when replacing. This will shorten the life of the new • Do not use strong oven cleaners, powders or bulb. Use a paper towel to cover the new bulb any harsh abrasive cleaning materials on the when installing. outside of the oven door or glass. 4. Replace glass shield over bulb. • Never clean the oven door gasket. The oven door gasket should always clean during the Self-clean cycle. 5. Turn power back on again at the main source (or plug the range back in). 6. The clock will then need to be reset.
-
 1
1 -
2
-
3
-
4
-
5
-
6
-
7
-
8
-
9
-
10
-
11
-
12
-
13
-
14
-
15
-
16
-
17
-
18
-
19
-
20
-
21
-
22
-
23
-
24
-
25
-
26
-
27
-
28
-
29
-
30
-
31
-
32
-
33
-
34
-
35
-
36
-
37
-
38
-
39
-
40
-
41
-
42
-
43
-
44
-
 45
45 -
 46
46 -
 47
47 -
 48
48 -
 49
49 -
 50
50 -
 51
51 -
 52
52 -
 53
53 -
 54
54 -
 55
55 -
56
 |
 |
