Epson 2180 Product Information Guide - Page 18
Release the left and right sprockets by pulling the sprocket - lq lower next page
 |
UPC - 010343815766
View all Epson 2180 manuals
Add to My Manuals
Save this manual to your list of manuals |
Page 18 highlights
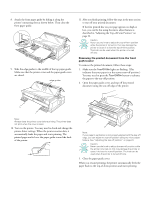
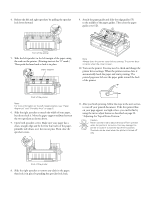
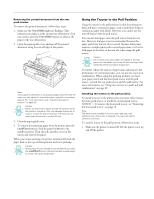
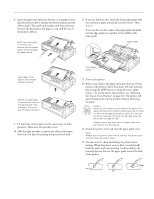
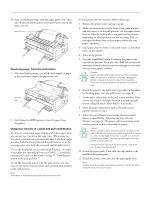
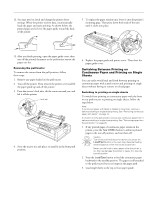
EPSON LQ-2180 2. Push up the tabs on each side of the paper tension unit and lift the unit up and off the printer. Store the paper tension unit in a safe place. 3. Set the paper release lever to the pull tractor position. Also set the paper thickness lever to the proper position for your paper's thickness. 3. Lower the tractor into the printer's mounting slots and press down both ends of the tractor to make sure that it is firmly seated. 4. Release the left and right sprockets by pulling the sprocket lock levers forward. 5. Slide the left sprocket to the left margin of the paper using the scale on the paper guide. (Printing starts at the arrow mark.) Then push the lever back to lock it in place. You are now ready to load continuous paper onto the pull tractor as described in the next section. Loading paper onto the pull tractor When using the pull tractor, load continuous paper in the front or bottom slot, if possible; loading paper in the rear slot may increase the chance of a paper jam. Caution: Do not load continuous paper with labels in the rear paper slot; the labels may come off their backing sheet inside the printer and cause a paper jam. To load paper onto the pull tractor, follow these steps: 1. Make sure the printer is turned off, and the printer cover is removed. Also check that a tractor is installed in the pull position. 2. Slide the edge guides to the middle of the paper guide. Note: See "Paper Alignment" and "Printable Area" on page 5 for more information on the left margin position. 6. Slide the right sprocket to match the width of your paper, but do not lock it. Move the paper support midway between the two sprockets as shown above. Then open both sprocket covers. 7. Make sure your paper has a clean, straight edge. 18 - EPSON LQ-2180 2/99
-
 1
1 -
2
-
3
-
4
-
5
-
6
-
7
-
8
-
9
-
10
-
11
-
12
-
 13
13 -
 14
14 -
 15
15 -
 16
16 -
 17
17 -
 18
18 -
 19
19 -
 20
20 -
 21
21 -
 22
22 -
 23
23 -
24
-
25
-
26
-
27
-
28
-
29
 |
 |
