Epson 2180 Product Information Guide - Page 27
Aligning Vertical Lines in Your, Printout, Printing a Self Test - lq printing problems
 |
UPC - 010343815766
View all Epson 2180 manuals
Add to My Manuals
Save this manual to your list of manuals |
Page 27 highlights
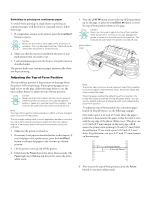
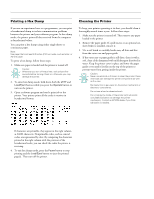
EPSON LQ-2180 4. Press the Font button to print the default-setting mode instructions (two pages) in the language you selected. The printed instructions list the default settings you can change, describe how to change them, and show you how the control panel lights help you make settings. Follow these instructions to change the default settings using the buttons on the printer's control panel. Note: The arrows on the instruction sheets indicate the printer's current settings. 5. When you finish making your settings, press the Operate button to turn off the printer and exit the default-setting mode. Any settings you make remain in effect until you change them again. Note: You may exit the default-setting mode by turning off the printer while the printer is not printing. Aligning Vertical Lines in Your Printout If you notice that the vertical lines in your printout are not properly aligned, you can use the printer's bidirectional adjustment mode to correct this problem. Note: To complete the steps below, you need four sheets of A3-size singlesheet paper or four pages of continuous paper that are at least 11 inches (279 mm) long and 14.8 inches (376 mm) wide. If you use single sheets, you need to load a new sheet of paper each time the printer ejects a printed sheet onto the paper guide. Follow these steps to perform the bidirectional adjustment: 1. Make sure paper is loaded and the printer is turned off. Caution: Whenever you turn off the printer, wait at least five seconds before turning it back on; otherwise you may damage the printer. 2. While holding down the Pause button, press the Operate button to turn on the printer. The printer enters the bidirectional adjustment mode and then prints instructions and the first set of alignment patterns. 3. As described in the instructions, compare the alignment patterns and select the pattern with the best alignment. 4. Follow the instructions to print the remaining sets of alignment patterns and select the pattern with the best alignment in each set. 5. After you select the best pattern in the final set of alignment patterns, press the Operate button to turn off the printer and exit the bidirectional adjustment mode. Your selections are saved automatically. Printing a Self Test Running the printer's self test helps you determine whether the printer or the computer is the cause of a printing problem. You can print the self test using either single sheets or continuous paper. Note: Use paper that is at least 14.8 inches (376 mm) wide, such as A3-size paper. To perform a self test, follow these steps: 1. Make sure paper is loaded and the printer is turned off. Caution: Whenever you turn off the printer, wait at least five seconds before turning it back on; otherwise you may damage the printer. 2. To run the test using the Draft font, hold down the LF/FF button while you press the Operate button to turn on the printer. To run the test using the printer's letter-quality fonts, hold down the Load/Eject button while you turn on the printer. Either self test can help you determine the source of your printing problem; however, the draft test prints faster than the letter-quality test. After a few seconds, the printer loads the paper automatically and begins printing the self test. A series of characters is printed. Note: To temporarily stop the self test, press the Pause button. To resume the test, press the Pause button again. If the self test results are satisfactory, the printer is working properly and the problem probably results from your printer driver settings, application settings, computer, or interface cable. (Be sure to use a shielded interface cable.) If the self test does not print properly, there is a problem with the printer. See "Problems and Solutions" in your User's Guide for possible causes and solutions to the problem. 3. To end the self test, press the Pause button to stop printing and the Load/Eject button to eject the printed page. Then turn off the printer. 2/99 EPSON LQ-2180 - 27
-
 1
1 -
2
-
3
-
4
-
5
-
6
-
7
-
8
-
9
-
10
-
11
-
12
-
13
-
14
-
15
-
16
-
17
-
18
-
19
-
20
-
21
-
 22
22 -
 23
23 -
 24
24 -
 25
25 -
 26
26 -
 27
27 -
 28
28 -
 29
29
 |
 |
